


This is a guest post by Hamel Husain, a machine learning engineer with over a decade of experience building and evaluating AI systems at companies like GitHub and Airbnb. He co-teaches a course on AI Evals with Shreya Shankar.
Engineers love numbers that go up. In the world of Large Language Models (LLMs), this desire has led to an endemic abuse of generic, off-the-shelf evaluation metrics. We see dashboards packed with scores for "helpfulness," "coherence," "toxicity," or similarity metrics like ROUGE and BERTScore. They feel objective. They produce a score. They create the illusion of progress.
But for your specific AI application, they are a mirage. Relying on these prefab evals is one of the fastest ways to build false confidence and waste time optimizing for things that don’t matter to your users. They are a "painkiller" that makes you feel good without solving the real problem. There's a fundamental disconnect between a model's performance on a general benchmark and its ability to do a specific job well. This is the difference between a foundation model's capabilities and your product's quality. This article presents a systematic alternative: a process for first discovering what's actually broken in your application and then building custom metrics to measure it.
Foundation Benchmarks vs. Product Evals: A Tale of Two Worlds
We often hear about models conquering public benchmarks like MMLU or HELM. These are foundation model evals, designed to measure the general knowledge and reasoning capabilities of the base LLM itself. They serve a purpose, offering a rough sense of a model's overall power and helping with initial selection. Think of them as standardized tests; they tell you if a model is broadly capable, but not if it's the right fit for your specific job.
Application-centric evals, the focus of our work, answer a different question: does our pipeline perform its task successfully, on our data, for our users? A model can score brilliantly on a benchmark and still fail catastrophically in a real-world product. Why? Because your product has specific constraints, a unique domain, and user expectations that no generic metric can capture. An off-the-shelf "hallucination score" doesn't know that for your legal-tech app, citing a non-existent case is a critical failure, while for a creative writing assistant, inventing a fictional character is a feature.
This is why we must be extremely skeptical of generic metrics. Consider a real estate assistant designed to schedule property viewings. A user might say, "Find me a 3-bedroom home near downtown and set up a showing for this weekend." If the assistant responds by proposing a time when the real estate agent is unavailable, that's a critical failure. A generic "helpfulness" score might rate the response highly because it provided options, completely missing the catastrophic functional error. Generic metrics like verbosity or similarity won't catch this. In the best case they waste your time, and in the worst case they create an illusion of confidence that is unjustified. While they fail as a final report card for quality, their limited utility lies in acting as a flashlight, helping you find interesting or problematic examples for manual review (more on this later).
Using Generic Metrics as a Flashlight, Not a Report Card
Treating a metric as a flashlight means using it for exploration and discovery, not for grading. The goal is not to get a high average score on "helpfulness," but to use that score to surface traces for a human to review. This is a powerful technique for finding hotspots in your data that merit a closer look.
Here are a few ways to put this into practice:
Sort and Slice Your Data: Instead of calculating an average score, use a generic metric to sort all your production traces. Manually inspect the traces with the highest and lowest scores. For example, sorting by "verbosity" might reveal that your most verbose answers are rambling and unhelpful, while your least verbose answers are curt and missing key information. These clusters of problematic traces often point directly to a failure mode you can then analyze systematically.
Diagnose a Specific Component: In a complex system like Retrieval-Augmented Generation (RAG), a similarity score can be a useful diagnostic tool for one specific part: the retriever. You can use it to answer the narrow question, "Did my retriever pull relevant documents?" This is a valid use because you are evaluating a component on a well-defined task (search), not judging the final, generated answer's overall quality.
Challenge Your Assumptions: Sometimes a low score on a generic metric can be a signal that your "golden" reference answer is wrong. If you calculate BERTScore against a reference answer and find a cluster of low-scoring outputs, a manual review might reveal that the LLM found a more creative or even more correct solution than the one you provided.
In all these cases, the generic metric is not the final verdict. It is the starting point of an investigation that relies on human judgment to draw meaningful conclusions.
The Evals-Driven Alternative: From Error Analysis to Custom Metrics
So, if not generic scores, then what? The answer lies in a more rigorous, application-centric workflow grounded in qualitative error analysis. This isn't a new idea born from the LLM era. The practice of meticulously examining system failures to guide improvement is a cornerstone of traditional machine learning and software engineering, yet it has been surprisingly lost in the rush to deploy modern AI. The methodology's roots run even deeper, adapted from qualitative research methods in social sciences like grounded theory.
Instead of starting with a metric, you start by looking at your data. This is the single most important and highest ROI activity in building reliable AI systems.
The process, which we teach in-depth, follows a simple loop: Analyze, Measure, Improve. This starts with a deep dive into your application's actual behavior to understand what's really going wrong.
A Step-by-Step Guide to Error Analysis
Error analysis is a systematic process that lets failure modes emerge from your data, rather than starting with a fixed checklist of what you think might be wrong. It's a journey of discovery that unfolds in a few key steps.
Step 1: Get a Starting Dataset Before you can analyze errors, you need traces to review. A trace is the complete record of an interaction, from the user's initial query to the final response, including all intermediate steps like tool calls and data retrievals.
The best data is real data. If you have production traffic or can get a few people (even friends or colleagues) to use your application, start there. If you have no data and are facing a cold-start problem, you can generate a high-quality synthetic dataset. This is an optional step, and it should be done carefully. Don't generate synthetic data without a hypothesis about where your AI might fail. Build intuition first by using the product yourself.
If you go the synthetic route, here's a way to approach it:
Define Dimensions: First, identify 3-5 key dimensions that capture the variation in your user queries. For a recipe bot, this might be Dietary Restriction, Cuisine Type, and Query Complexity.
Generate Tuples: Next, create combinations of these dimensions, called tuples (e.g., (Vegan, Italian, Multi-step)).
Generate Queries: Then, use an LLM to turn each tuple into a realistic, natural-language query (e.g., "I need a dairy-free lasagna recipe that I can prep the day before."). This two-step process avoids repetitive phrasing.
Collect Traces: Finally, run these queries through your system and collect at least 100-200 diverse traces. This number is a heuristic to ensure you have enough data to start seeing patterns.
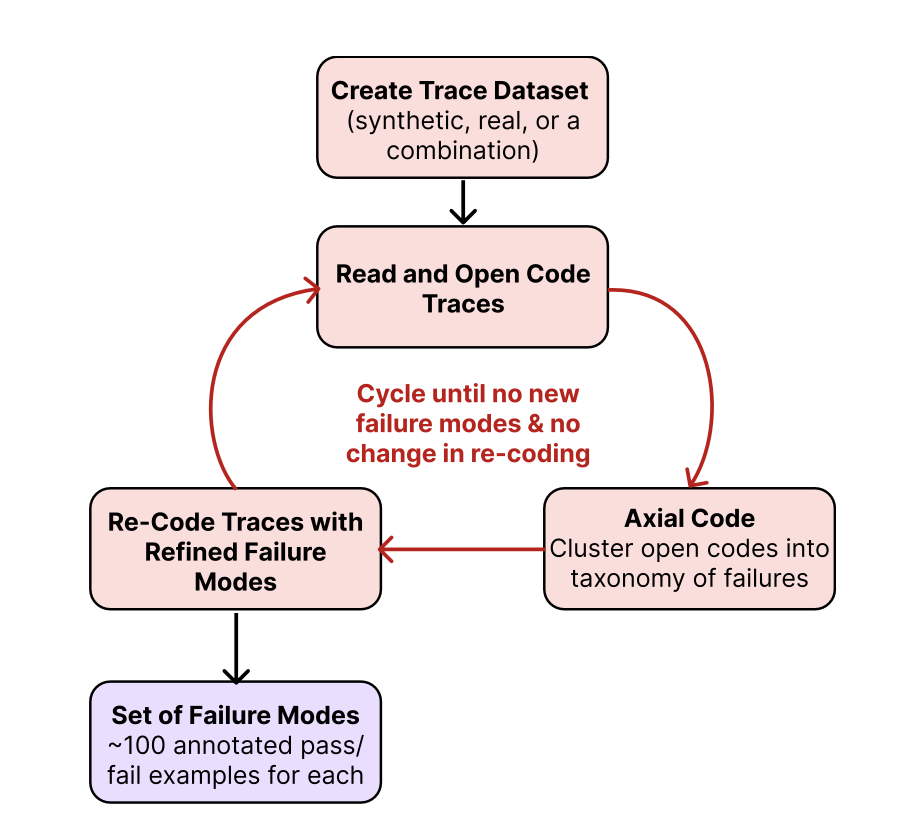
Step 2: Open Coding This is where the deep work begins. Systematically review each trace and write unstructured, open-ended notes about any problems, surprises, or incorrect behaviors you observe.
As you do, keep these principles in mind:
Be Observational, Not Diagnostic: At this stage, your job is to describe what happened, not why. Instead of "the RAG context was wrong," write "The user asked for pet-friendly apartments, but the retrieved context was about gym amenities."
Focus on the First Upstream Failure: In a complex trace, one error often causes a cascade of downstream issues. To be efficient, identify and annotate the first thing that went wrong and move on. Fixing the root cause often resolves the symptoms.
Don't Outsource This: The person doing open coding must be a domain expert who understands the product and its users. Outsourcing this task is a huge mistake, as it breaks the crucial feedback loop needed to build product intuition.
Step 3: Axial Coding After open coding, you'll have a rich but chaotic set of notes. Axial coding is the process of organizing these notes into a structured taxonomy of failure modes.
Here's how you bring order to the chaos:
Cluster Similar Notes: Group your open-coded notes into categories. Failures like "proposed an unavailable showing time" and "suggested a property over budget" might cluster under a broader failure mode called "Constraint Violation."
Use an LLM as an Assistant: You can accelerate this process by feeding your raw notes to an LLM and asking it to propose preliminary groupings. However, you must always review and refine these categories yourself. The LLM is a tool to help you think, not a replacement for your judgment.
Define Clear Categories: The goal is a small, coherent set of failure modes, each with a clear title and a brief, unambiguous definition.
Step 4: Iterate to Saturation Error analysis is not a one-time task. Repeat the process of reviewing traces and refining your failure taxonomy until you reach "theoretical saturation"—the point where looking at new traces no longer reveals new types of failures. This signals that you have a comprehensive understanding of your system's current weaknesses.
Here is a diagram that visualizes this approach:
Scaling Your Evals: Code Evals and Aligned LLM Judges
Once your error analysis has revealed what’s actually breaking, you can build automated evaluators to measure those specific failure modes. These fall into two camps:
Code-Based Evals: For objective, rule-based failures, write simple assertions or programmatic checks. Is the output valid JSON? Does the SQL query include a WHERE clause when one is needed? These evals are fast, cheap, and deterministic. These deterministic checks should always be your first line of defense, but for more nuanced failures like judging the tone of a response or the relevance of an argument, we need a different approach (like the LLM-J, described next).
LLM-as-a-Judge (LLM-J): For subjective failures (like tone or relevance), you can use another LLM as a judge. Building a trustworthy judge is not a plug-and-play activity; it requires a rigorous, ML-inspired alignment process.
The LLM-as-a-Judge Alignment Workflow
Much of the literature and guidance on using an LLM-J boils down to "prompting and praying": writing a clever prompt and hoping the judge is accurate. But how do you know how good your judge is? The fastest way for stakeholders to lose faith in your work is to lose trust in your evals, and this happens when the judges themselves are not validated.
You have to measure the judge. Building a trustworthy LLM-J involves a ML-inspired process of alignment and validation. Here’s the blueprint for getting it right:
Collect Labeled Data: Your labeled dataset comes directly from your error analysis. The traces you've reviewed and tagged with specific failure modes by a domain expert form the foundation. You should aim for at least 100 labeled examples for each failure mode you want to build an automated eval for. More data reduces noise and gives you more certainty, but 100 is a pragmatic starting point.
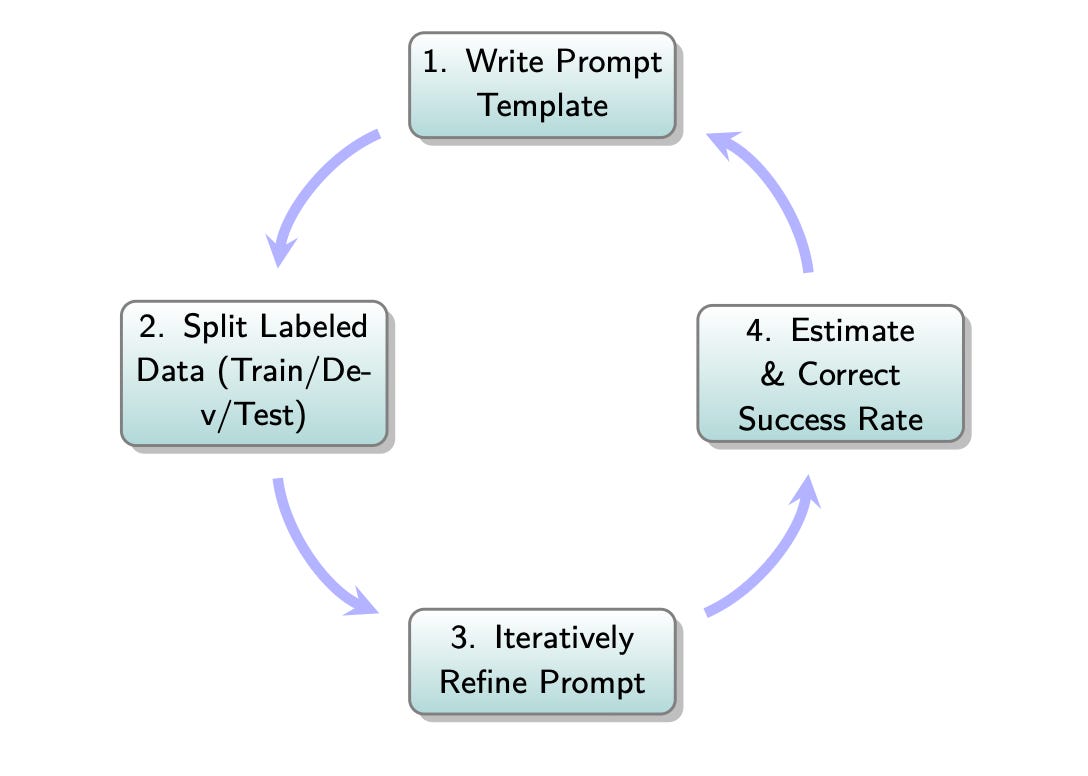
Create Data Splits (Hygiene is Crucial): To avoid fooling yourself, you must split your labeled data. While this sounds like the standard Train/Dev/Test split from traditional machine learning, the purpose and proportions are different here. In traditional ML, you need a massive training set to learn model weights. For an LLM-as-a-Judge, the "model" is already trained; you are only "programming" it with a prompt. Therefore, you need far less data for "training" and more data for rigorously testing your prompt.
Here's a standard approach for this context:
- Training Set (~20%): This is a small pool of examples used exclusively to find good few-shot demonstrations for your judge's prompt. You are not training a model, merely selecting good examples.
- Development Set (~40%): This is a much larger set used to iteratively refine and engineer your prompt. You measure the judge's performance on this set to see if your changes to the instructions or few-shot examples are actually working.
- Test Set (~40%): This is a held-out set that you touch only once at the very end. Its purpose is to give you a final, unbiased measure of how well your prompt-based judge performs on data it has never seen before.
Prompt and Iterate: Start with a baseline prompt for your judge that includes the task, clear Pass/Fail definitions, and a few examples from your Training Set. Run this judge over your Dev Set and compare its verdicts to your human labels. Your goal is to measure its accuracy using metrics sensitive to class imbalance, like True Positive Rate (TPR) and True Negative Rate (TNR).
Align the Judge: If the judge's agreement with your human labels is low, iterate. Refine the prompt's definitions. Swap in different few-shot examples from the training set. Re-evaluate on the dev set. Repeat this loop until the TPR and TNR are acceptably high (often 80-90%+ is a good target).
Final Validation on the Test Set: Once you're satisfied with your prompt on the dev set, you run the final, locked-in judge prompt on the Test Set. This step is critical for two reasons. First, it tells you if you have accidentally overfit your prompt to the development set. In other words, if your definitions and examples work well for the dev set but don't generalize to new, unseen data. Second, it provides a final, unbiased measurement of your judge's performance. This lets you know how reliable your automated judge is compared to your ground truth, giving you confidence in the metrics you will ultimately collect.
This process ensures your metrics are directly tied to real, observed failures in your application. This is how you build deep trust in your evals. When a product manager asks what the 'Constraint Violation' metric means, you can immediately show them concrete examples of that exact failure you discovered during analysis.
Here is the LLM Judge alignment process visualized:
Conclusion: Your Evals Are Your Moat
Stop chasing high scores on generic dashboards. The path to a truly robust AI product is paved with a deep, qualitative understanding of its specific failure modes. Start by looking at your data. Let the errors you observe guide the metrics you build. This process of rigorous, application-centric evaluation is the core engine of product improvement.
The moat for an AI product isn't the model; it's the evaluation process. Building this capability is the most critical investment you can make in your product's success and your team's sanity.
If you want to go deeper into building robust, scalable, and effective evaluation systems for your AI applications, check out the AI Evals course that Shreya Shankar and I have created. We provide a practical, hands-on framework to help you move beyond generic metrics and build AI products you can trust. You can find more details and enroll with a 35% discount (ends in 2 weeks) here.

Images
If not otherwise stated, all images are created by the author.
 | A guest post by
|
Thanks for sharing this!
Love this piece!