


Your AI Football Assist Eval Guide
Hands-On RAG Observability with ZenML, MongoDB, and Opik

Today, the scene is owned by Benito Martin, an ML/AI engineer, the founder of Martin Data Solutions, and an AWS legend.
I got to personally know Benito through his blog, where I dissected his multi-modal series. Loved the series and his writing!
He refactored our Second Brain AI Assistant course codebase into a football AI assistant. That’s what we love to see from our readers: how they build stuff!
In this article, he will show you how he did it. 🧑💻
It’s an honour to have you here, Benito. The scene is all yours. 🎬↓
Large Language Models (LLMs) have revolutionized how we interact with information, summarizing articles, answering questions, and even generating new knowledge. But as powerful as they are, these systems often produce outputs that are incomplete, inaccurate, or misleading. To truly trust LLMs in real-world applications, we need more than just impressive results, we need structured evaluation and observability.
That’s where this project comes in.
In this blog, you will learn how to build a complete, observable LLM pipeline, starting with real-world data from Wikipedia articles about football teams. I will walk through a structured ETL pipeline and show how to run detailed evaluations on summarization, question answering, and hallucination detection.
You will see how to integrate:
ZenML for pipeline orchestration
MongoDB for document and vector storage
Opik (Comet ML) for deep LLM observability
Whether you are an ML engineer, an LLM practitioner, or just a football fan curious about how AI understands your favorite team, this project offers a hands-on, reproducible approach to LLM evaluation
I recommend following this blog along with the code repository that can be found here.
Motivation
At the heart of this project is a focused question: How well do LLMs perform when tasked with summarizing and reasoning over real, factual content?
To explore that, I built an end-to-end pipeline centered around Wikipedia articles about football teams. Why football? Because football offers a domain that is:
Consistent: Most club articles follow a similar structure such as history, trophies, and players.
Factual: The content is grounded in real events, making hallucinations easier to detect.
Relatable: Football is globally recognized, offering an intuitive use case to test and demonstrate model behavior.
This makes football teams an ideal benchmark for testing LLM capabilities like summarization, question answering, and hallucination detection, and for highlighting their limitations.
By focusing on this domain and equipping the pipeline with observability tools, this project sets a foundation for rigorous, repeatable LLM evaluation.
Tools and Technologies
To build a robust, observable, and modular evaluation system, this project brings together a carefully selected stack of tools. Each component plays a distinct role in orchestrating workflows, managing data, and evaluating LLM performance across tasks.
ZenML: Pipeline Orchestration & Experiment Tracking
ZenML serves as the backbone of the system’s orchestration layer, enabling you to:
Define modular, reproducible pipeline steps.
Track artifacts, parameters, metrics, and pipeline runs.
Log parameters, metrics, and outputs across experiments.
This framework is essential for establishing a proper MLOps structure, ensuring transparency, and efficiently managing changes throughout the project lifecycle.
MongoDB: Document Storage & Vector Retrieval
All Wikipedia articles are ingested and stored in MongoDB, both as raw documents and as vector embeddings for semantic search. It serves two key functions:
Acts as a centralized database for storing team content and metadata.
Enables vector-based retrieval, powering the RAG (Retrieval-Augmented Generation) pipeline for the Q&A system.
Thanks to its flexible schema and seamless integration with vector search libraries, MongoDB is an ideal choice for hybrid information retrieval tasks in this pipeline.
Opik: Evaluation & LLM Observability
Opik is a powerful tool from Comet ML designed specifically for LLM evaluation and observability. In this project, Opik is used to:
Evaluate generated summaries and Q&A responses.
Measure key metrics including answer relevance, hallucination detection, BERT Score, and semantic similarity.
Through interactive dashboards, Opik provides rich insights into model performance, enabling fine-grained analysis and continuous improvement.
System Architecture
The core of this project is a thoughtfully designed architecture that orchestrates data ingestion, summarization, and Q&A dataset generation, all integrated with observability and evaluation metrics at each stage of the LLM workflow. As shown in the diagram below, the system begins by crawling Wikipedia articles about football teams and processes them through a structured ETL pipeline built with ZenML. The ingested documents are stored in MongoDB and then used in subsequent ZenML-powered steps for summarization and Q&A dataset generation.

The generated summaries and Q&A data are tracked using Opik, enabling observability into model behavior. Summaries are evaluated with metrics like cosine similarity and BERTScore, while Q&A responses are assessed for answer relevance and hallucinations.
The result is a modular, end-to-end pipeline for transparent and reproducible LLM evaluation, grounded in factual content.
├── .github                    # CI pipeline
├── src
│   ├── configs/               # Configs, prompts, and settings
│   ├── data/                  # Evaluation data and crawled team data
│   ├── evaluation/            # Summary and QA evaluation scripts
│   ├── infra/                 # MongoDB vector index utilities
│   ├── pipelines/             # ZenML pipeline entrypoints
│   ├── search/                # Search observability utility
│   ├── steps/                 # ZenML steps: ETL, dataset, summaries
├── tests/                     # Unit tests
├── .pre-commit-config.yaml    # Pre-commit hooks
├── Makefile                   # Makefile commands
├── README.md                  # Project description
├── pyproject.toml             # Project dependencies
Let’s walk now through each component of the system.
Configuration
Before running the pipelines, a few setup steps are required to configure the environment and external services.
MongoDB Setup
Create a MongoDB account and a free cluster.
Get your
MONGODB_URIand add it to your.envfile.The project uses two collections:
One for storing raw Wikipedia articles and summaries.
Another for storing vector embeddings used for semantic search and Retrieval-Augmented Generation (RAG).
Opik (Comet ML) Setup
Create an account at Opik.
Get your
COMET_API_KEY,add it to your.envfile, and configure Opik with the following command and the official configuration guide:
opik configureEnvironment Configuration
config.yaml: This file under src/configs defines pipeline inputs like team names, Wikipedia URLs, and output directories. Modify only if you want to change these values..env: Add yourCOMET_API_KEY, MONGODB_URIandOPENAI_API_KEYhere.
CONFIG_YAML_PATH=src/configs/config.yaml
MONGODB_URI=
MONGODB_DATABASE=football
MONGODB_COLLECTION=teams
MONGODB_COLLECTION_INDEX=summary_vectors
MONGODB_COLLECTION_INDEX_NAME=summary_vectors_index
OPENAI_API_KEY=
OPENAI_LLM_MODEL=gpt-4o-mini
OPENAI_LLM_JUDGE_MODEL=gpt-4o
OPENAI_EMBEDDING_MODEL=text-embedding-3-small
COMET_API_KEY=Makefile: Provides shortcuts to run the different project commands and scripts.settings.py: Located under src/configs, defines Pydantic models and loads variables from both theconfig.yamland.envfiles.
Pipeline Breakdown
Each stage of the pipeline is implemented as modular ZenML steps. Below is an overview of the components.
1. ETL Pipeline: Crawl, Parse, and Ingest Wikipedia Articles
This pipeline serves as the entry point of the system, responsible for collecting the data that the downstream pipelines will process, forming the foundation for the summarization and Q&A dataset generation.
The pipeline crawls Wikipedia articles for selected football teams, parses structured content and metadata, and ingests the data into MongoDB. Raw text files are also saved locally under the data/ directory.
The data is stored in a MongoDB collection created automatically if it doesn't exist. A separate collection is later created to store vector embeddings for semantic search.
You can find all scripts for this pipeline in the src/steps/etl directory:
├── etl
│   ├── crawl_step.py
│   ├── mongo_ingest_step.py
│   ├── parse_step.py
│   └── wikipedia_crawler.py
The wikipedia_crawler.py contains the logic that is being used by the crawl_step.py (see below) to extract the content in a structured format. ZenML uses the decorator @step to define it as a step within the pipeline.
import os
from datetime import UTC, datetime

from loguru import logger
from zenml import step

from src.configs.settings import CrawledDoc, YamlConfig
from src.steps.etl.wikipedia_crawler import extract_wikipedia_page

@step(enable_cache=False)
def crawl_step(config: YamlConfig) -> list[CrawledDoc]:

    output_dir = config.output_dir
    os.makedirs(output_dir, exist_ok=True)
    logger.info(f"Output directory: {output_dir}")

    results: list[CrawledDoc] = []

    for team in config.teams:
        logger.info(f"📘 Extracting: {team.name}")
        page_title = team.url.split("/wiki/")[-1]
        file_path = os.path.join(output_dir, team.filename)

        # ✅ Skip if file already exists
        if os.path.exists(file_path):
            logger.info(f"✅ Wikipedia content already exists for {team.name}, skipping.")
            with open(file_path, encoding="utf-8") as f:
                content: str | None = f.read()
            results.append(
                CrawledDoc(
                    team=team.name,
                    url=team.url,
                    filename=team.filename,
                    content=content or "",
                    timestamp=datetime.now(UTC),
                    metadata=team.metadata or {},
                )
            )
            continue

        try:
            content = extract_wikipedia_page(page_title, file_path)
            if content:
                results.append(
                    CrawledDoc(
                        team=team.name,
                        url=team.url,
                        filename=team.filename,
                        content=content,
                        timestamp=datetime.now(UTC),
                        metadata=team.metadata or {},
                    )
                )
            else:
                logger.warning(f"No content for {team.name} / {page_title}")
        except Exception as e:
            logger.error(f"❌ Failed to extract {team.name}: {e}")

    logger.success(f"🧾 Done. Crawled {len(results)} documents.")
    return results
You can run this complete pipeline with the following commands, which first log you in ZenML and then trigger the ETL pipeline under src/pipelines/.
make zenml-login
make run-etl-pipeline
This time ZenML uses the @pipeline decorator to connect all steps.
from zenml import pipeline

from src.configs.settings import Settings
from src.steps.etl.crawl_step import crawl_step
from src.steps.etl.mongo_ingest_step import mongo_ingest_step
from src.steps.etl.parse_step import parse_step

settings = Settings()
settings.load_yaml()


@pipeline
def etl_pipeline() -> None:
    """
    ETL pipeline for crawling, parsing, and ingesting team data.
    """
    if settings.yaml_config is None:
        raise ValueError("YAML configuration not loaded")

    crawled_data = crawl_step(config=settings.yaml_config)
    parsed_docs = parse_step(crawled_data=crawled_data)
    mongo_ingest_step(documents=parsed_docs)


if __name__ == "__main__":
    # Instantiate the pipeline object
    etl_pipeline()
You can access the dashboard locally at
http://127.0.0.1:8237/
, where you will see all logged steps and artifacts.

Also, you shall find the collection in your MongoDB cluster.

2. Summarization Pipeline: Generate Three Summaries
This pipeline transforms raw Wikipedia documents into structured LLM-generated summaries, which are later used for both user-facing answers and evaluation purposes. Built on top of the ETL pipeline output, it enriches each document in MongoDB with three summary types.
The pipeline generates three summaries from the ingested Wikipedia content using the specified LLM gpt-4o-mini and stores them in the same collection created earlier. The logic resides in src/steps/generate_summaries, using a helpers functions that chunks the text if the model’s context window is exceeded.
├── generate_summaries
│   ├── generate_summaries_step.py
│   └── helpers.py
The model uses three prompts located in src/configs/prompts.py to generate summaries:
Default: generates a comprehensive summary of each team.
Recent: generates a summary focusing on recent achievements of each team (2020-2025)
Achievements: generates a summary about the overall historical achievements of each team.
from src.configs.settings import SummaryConfig

SUMMARY_VARIANTS: dict[str, SummaryConfig] = {
    "default": {
        "prompt": """Create a comprehensive summary of {team} from the following Wikipedia content:

                Content:
                {content}

                Expected sections:
                1. **Overview & History**
                2. **Stadium & Facilities**
                3. **Major Achievements**
                4. **Notable Players & Management**
                5. **Recent Performance**
                6. **Culture & Rivalries**

                Keep it factual, structured
                """,
        "max_tokens": 1200,
    },
    "recent": {
        "prompt": """Write a summary of {team} about its recent achievements focusing on from the following content:

                Content:
                {content}

                Expected sections:
                1. **Recent Achievements (2020-2025)**
                2. **Current Performance (2023-2025)**
                3. **Latest Developments (2025)**

                Keep it factual, structured.
                """,
        "max_tokens": 1200,
    },
    "achievements": {
        "prompt": """Write a summary of {team} about its overall historical achievements focusing
                     on from the following content:

                Content:
                {content}

                Expected sections:
                1. **Major Trophies**
                2. **Records & Milestones**
                3. **Historical Significance**

                Keep it factual, structured.
                """,
        "max_tokens": 1200,
    },
}
You can run this complete pipeline with the following command, which will trigger the summarization_pipeline.py script. Later, under the Evaluation & Observability chapter, you will see how these summaries are evaluated using BERT score and cosine similarity.
make run-summarization-pipelineNow your collection shall have an additional summaries field.

3. Dataset Pipeline: Generate a Q&A Dataset
As the final step in the pipeline, this component builds on the generated summaries to evaluate how well an LLM can answer factual questions using vector-based retrieval. It simulates a real-world Q&A setup typical in RAG systems and provides the foundation for measuring hallucinations and answer relevance.
First, you must create a collection that contains vector embeddings of the summaries. Then, to generate the Q&A dataset, a set of questions will be used to generate the ground-truth answers.
To create a separate collection with summary embeddings, run the following scripts located under src/infra.
├── infra
│   ├── create_collection.py
│   ├── insert_embeddings.py
You can use the following commands to run the files:
make create-collection-index
make insert-embeddings
This will generate a new MongoDB collection, where each document represents a summary with its corresponding vector embedding.

Why this setup matters:
It separates raw Wikipedia articles/summaries from their summaries/vectors, allowing more flexibility for experimentation.
It ensures the RAG pipeline remains operational while summaries are iteratively improved.
Because Wikipedia is dynamic and regularly updated, you can create multiple test collections and only promote validated summaries to production.
Once the new knowledge base is ready, you can proceed to generate a synthetic Q&A dataset for evaluation. The relevant scripts are located in steps/generate_dataset:
├── generate_dataset
│   ├── generate_dataset_step.py
│   └── questions.py
The questions.py file includes ten predefined questions about Real Madrid (feel free to change them if you have another favorite team!). These questions are used to simulate user queries against the knowledge base and generate answers. One important aspect here is which model to use to generate the answers, as the answers will be considered as the ground truth (expected output). In this case, the strong LLM selected is gpt-4o, as later gpt-4o-mini will used, which is a weaker model. But feel free to change it.
The core idea behind this approach is that we use a stronger model (gpt-4o) to generate ground truth answers, then evaluate how well a weaker model (gpt-4o-mini) performs when answering the same questions. This approach helps assess whether the less capable model can approximate the stronger one’s output, useful for balancing cost and performance.
from typing import Any

from src.configs.prompts import QUERY_PROMPT
from src.configs.settings import Settings
from src.infra.mongo_search_client import MongoVectorSearchClient

questions = [
    "When was Real Madrid CF founded?",
    "What is the name of Real Madrid's home stadium?",
    "Can you describe the early history of Real Madrid?",
    "Who are some legendary players in Real Madrid's history?",
    "How has Real Madrid performed in recent La Liga seasons (2020-2025)?",
    "What are some of Real Madrid’s recent achievements from 2020 to 2025?",
    "Who is the current manager of Real Madrid?",
    "How many UEFA Champions League titles has Real Madrid won?",
    "What are some of Real Madrid's most significant trophies?",
    "Who are Real Madrid's biggest rivals and what is the significance of their rivalry?",
]


def answer_query_with_context(
    openai_client: Any, vector_client: MongoVectorSearchClient, settings: Settings, query: str, limit: int = 3
) -> str:
    # Get embedding for query
    embedding_response = openai_client.embeddings.create(input=query, model=settings.openai_embedding_model)
    query_vec = embedding_response.data[0].embedding

    # Vector search in MongoDB
    results = vector_client.vector_search(
        collection_name=settings.mongodb_collection_index,
        index_name=settings.mongodb_collection_index_name,
        attr_name="embedding",
        embedding_vector=query_vec,
        limit=limit,
    )

    # Build prompt context
    context = "\n\n".join([r["summary_text"] for r in results])
    prompt = QUERY_PROMPT.format(context=context, query=query)

    # Get LLM response
    response = openai_client.chat.completions.create(
        model=settings.openai_llm_judge_model, messages=[{"role": "user", "content": prompt}]
    )

    return response.choices[0].message.content or ""
The dataset generation step is defined as a ZenML @step:
import json
import os

from loguru import logger
from openai import OpenAI
from zenml import step

from src.configs.settings import Settings, YamlConfig
from src.infra.mongo_search_client import MongoVectorSearchClient
from src.steps.generate_dataset.questions import answer_query_with_context, questions


@step
def generate_qa_dataset(config: YamlConfig) -> list[dict[str, str]]:
    """ZenML step to generate a QA dataset using MongoDB context and OpenAI completions.

    Args:
        config (YamlConfig): Configuration object containing evaluation paths.

    Returns:
        list[dict[str, str]]: List of dictionaries with questions and generated answers.
    """
    eval_dir = config.eval_dir
    eval_dataset = config.eval_dataset
    os.makedirs(eval_dir, exist_ok=True)
    logger.info(f"Output directory: {eval_dir}")

    settings = Settings()
    openai_client = OpenAI(api_key=settings.openai_api_key)
    vector_client = MongoVectorSearchClient(connection_uri=settings.mongodb_uri, db_name=settings.mongodb_database)

    qa_pairs = []
    for q in questions:
        logger.info(f"Generating answer for question: {q}")
        answer = answer_query_with_context(openai_client, vector_client, settings, q)
        qa_pairs.append({"input": q, "expected_output": answer})

    vector_client.close_connection()

    # Save dataset
    output_path = os.path.join(eval_dir, eval_dataset)
    with open(output_path, "w", encoding="utf-8") as f:
        json.dump(qa_pairs, f, indent=2, ensure_ascii=False)

    logger.info(f"✅ Dataset saved to {output_path}")
    return qa_pairs
The output dataset is saved locally under the same data/ directory as a JSON file where team articles are stored. It will later be uploaded to Opik (Comet ML) for evaluation.
  {
    "input": "When was Real Madrid CF founded?",
    "expected_output": "Real Madrid CF was founded on March 6, 1902."
  },
  {
    "input": "What is the name of Real Madrid's home stadium?",
    "expected_output": "The name of Real Madrid's home stadium is the Santiago Bernabéu Stadium."
  },
To run the dataset generation pipeline, use:
make run-dataset-pipelineEvaluation & Observability
Evaluating the outputs of LLMs is critical for ensuring the quality and continuous improvement of your system. In RAG pipelines, this means assessing both the summaries you generate from your source content and the answers provided to user queries. Without reliable evaluation, it's impossible to identify hallucinations, validate factuality, or measure the impact of changes to embeddings, prompts, or models.
Why LLM Evaluation and Metrics Matter
Traditional ML systems rely on deterministic outputs. In contrast, LLM outputs are probabilistic and may vary slightly even for identical inputs. This makes quantitative evaluation metrics and visual observability tools essential to:
Track how well summaries represent source content.
Detect hallucinations or factual inconsistencies.
Compare model versions, prompts, or vector indexing methods.
Safely iterate on pipeline components without deploying untested changes.
Evaluation Scripts & Metrics
You can find the evaluation scripts under the src/evaluation folder:
├── evaluation
│   ├── evaluate_dataset_opik.py
│   ├── evaluate_summaries_opik.py
│   └── metrics.py
Both evaluate_dataset_opik.py (for Q&A) and evaluate_summaries_opik.py (for summarization) use a set of predefined metrics from the Hugging Face evaluate (BERT Score) and scikit-learn (cosine similarity) libraries. The metrics.py script defines these metrics as Pydantic models, where I also defined a combined metric with customizable weights.
class MetricNames(Enum):
    BERT_SCORE = "BERTScore"
    BERT_PRECISION = "BERTPrecision"
    BERT_RECALL = "BERTRecall"
    BERT_F1 = "BERTF1"
    COSINE_SIMILARITY = "CosineSimilarity"
    COMBINED_SCORE = "CombinedScore"


class BERTScoreConfig(BaseModel):
    model_type: str = "distilbert-base-uncased"
    language: str = "en"


class CosineSimilarityConfig(BaseModel):
    model_name: str = "all-MiniLM-L6-v2"


class CombinedScoreConfig(BaseModel):
    bert_weight: float = 0.6
    cosine_weight: float = 0.4
    bert_config: BERTScoreConfig = BERTScoreConfig()
    cosine_config: CosineSimilarityConfig = CosineSimilarityConfig()

    def __post_init_post_parse__(self) -> None:
        total = self.bert_weight + self.cosine_weight
        if not 0.99 <= total <= 1.01:
            raise ValueError("bert_weight and cosine_weight must sum to 1.0")
You can dig deeper into these metrics in the following Opik article.
Summary Evaluation Metrics: BERTScore & Cosine Similarity
To assess the quality of generated summaries against their source articles, I decided to use BERTScore and cosine similarity, two complementary evaluation metrics:
BERTScore evaluates semantic similarity by comparing contextual embeddings of words from the summary and the reference article using a pre-trained BERT model. It captures nuances beyond surface-level token overlap, making it well-suited for LLM outputs where phrasing may differ even when meaning is preserved.
Cosine Similarity measures the angle between the embedding vectors of the full summary and the article. It’s a more global, vector-based metric that reflects how closely the two texts are aligned in embedding space. While BERTScore focuses on token-level alignment, cosine similarity captures overall semantic direction.
Using both metrics helps detect summaries that are fluent but potentially unfaithful, as well as summaries that are too extractive or overly concise. To evaluate the summaries, you can run the following command that will perform the summaries evaluation. The results will be logged on the terminal, but also can be visualized on the Opik dashboard, where you have access to each individual summary evaluation.
make run-evaluate-summaries
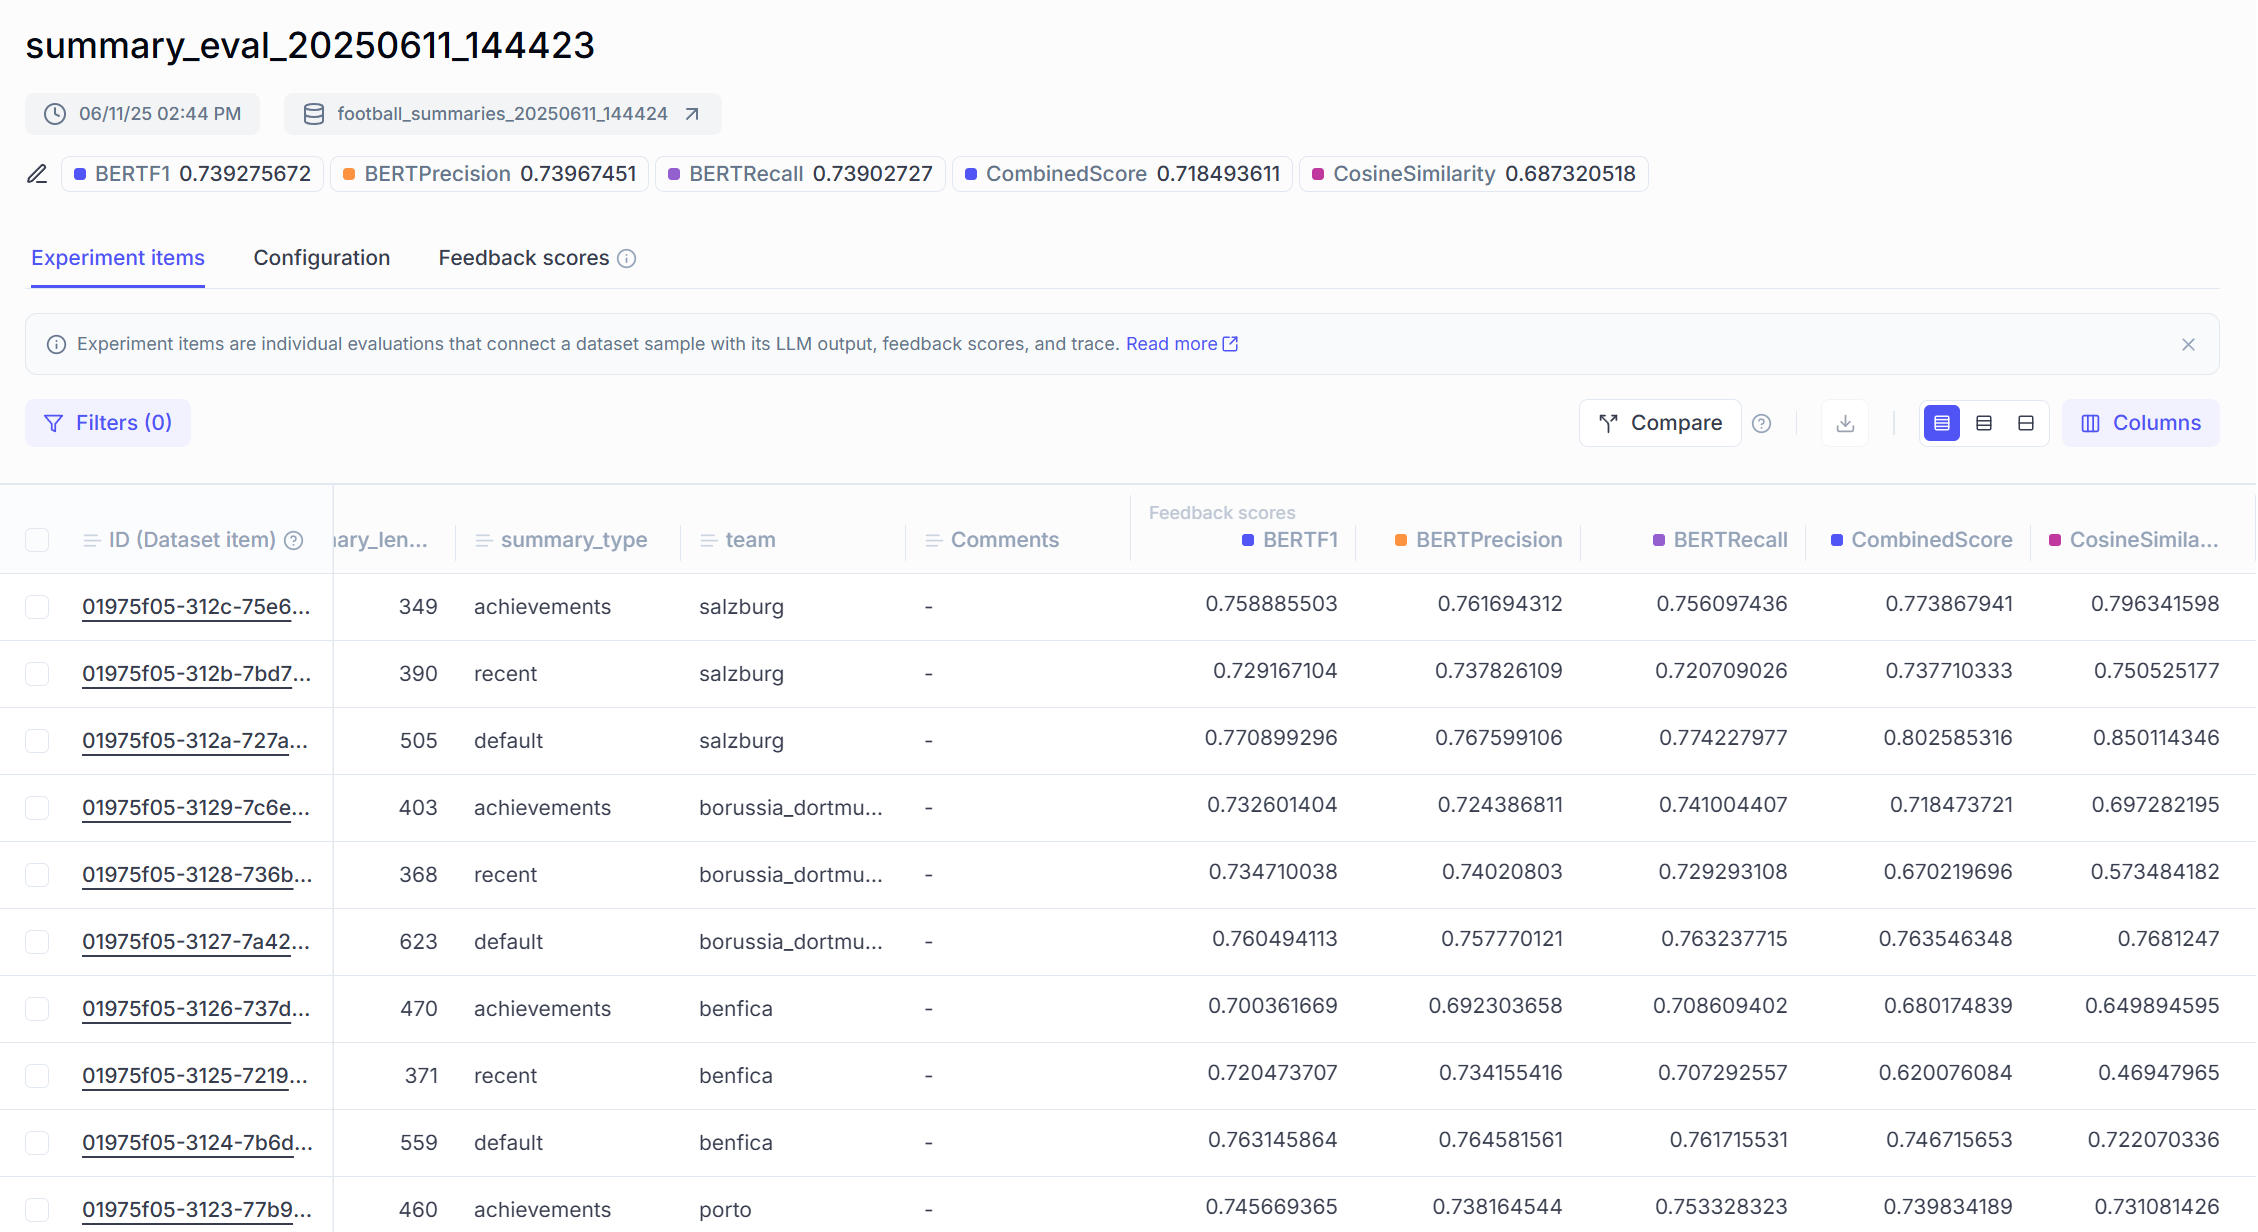
The evaluation results show that both BERTScore and cosine similarity indicate reasonable semantic alignment between the generated summaries and their source articles. The average BERT F1 score of 0.7393 suggests that the summaries generally preserve the core meaning of the original content, while the cosine similarity score of 0.6873 indicates that the summaries maintain semantic coherence with the source material at the document level.
However, there is clear room for improvement. The lower cosine similarity in the "recent" summary type (0.6063 compared to 0.6873 average) indicates inconsistencies in how recent information is extracted and summarized. This could be due to limited recent information availability, as our prompt targets a specific timeframe (2020-2025) that might not contain substantial updates for all teams in the dataset. These insights are very useful for further improvements in prompt engineering, retrieval filtering, or summarization logic.
Q&A Dataset Evaluation Metrics: Answer Relevance & Hallucinations
To evaluate the quality of answers generated by the LLM in the Q&A dataset, two key metrics are used:
Answer Relevance measures how well the generated answer addresses the user’s question by assessing semantic alignment. A high score indicates that the response is contextually appropriate and directly answers the query.
Hallucination measures the factual consistency of the generated answer against the provided context. It helps detect whether the model introduces unsupported or fabricated information.
These two metrics offer complementary insights: answer relevance ensures that the output is useful and accurate in intent, while hallucination detection ensures that the output remains grounded in the source content.
To run the evaluation on your Q&A dataset, use the following command:
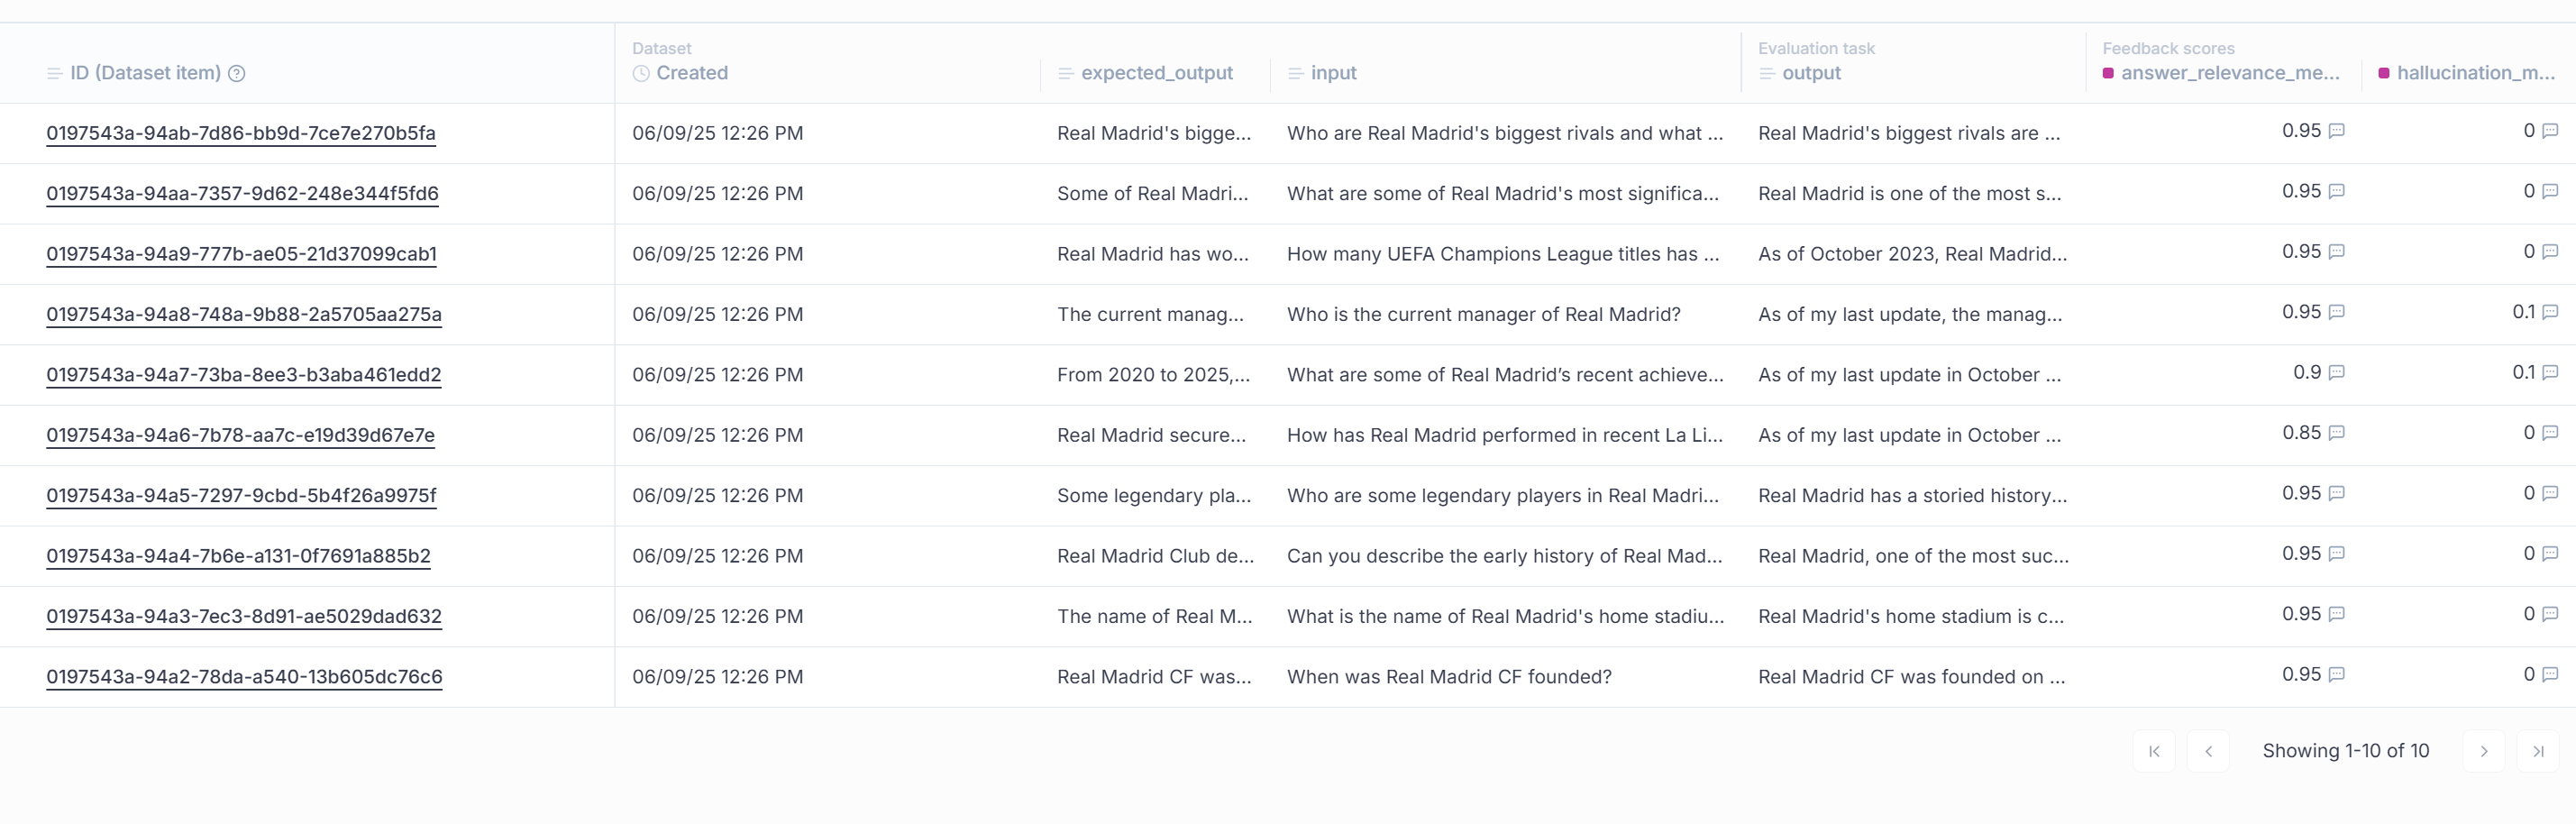
make run-evaluate-datasetThis command runs the evaluation script, which loads the Q&A dataset, executes the model to generate responses, and applies both metrics. During evaluation, gpt-4o-mini is used to answer the questions and compare its responses against the ground truth generated by gpt-4o. Results are displayed in the terminal and can also be explored through the Opik dashboard.

From the evaluation results:
The average answer relevance score of 0.935 indicates that the model consistently generates answers that are semantically aligned with the questions, showing strong comprehension and precision.
The average hallucination score of 0.02 is very low, suggesting that the answers remain highly faithful to the underlying context, with minimal unsupported content.
Overall, these results point to a robust Q&A pipeline with high answer quality and minimal hallucination. However, considering the opportunities for improvement on the summary evaluation metrics, there is still room to enhance the overall pipeline.
In addition to these metrics, Opik allows you to track other important parameters like latency, which measures response time and helps monitor system performance in production environments.
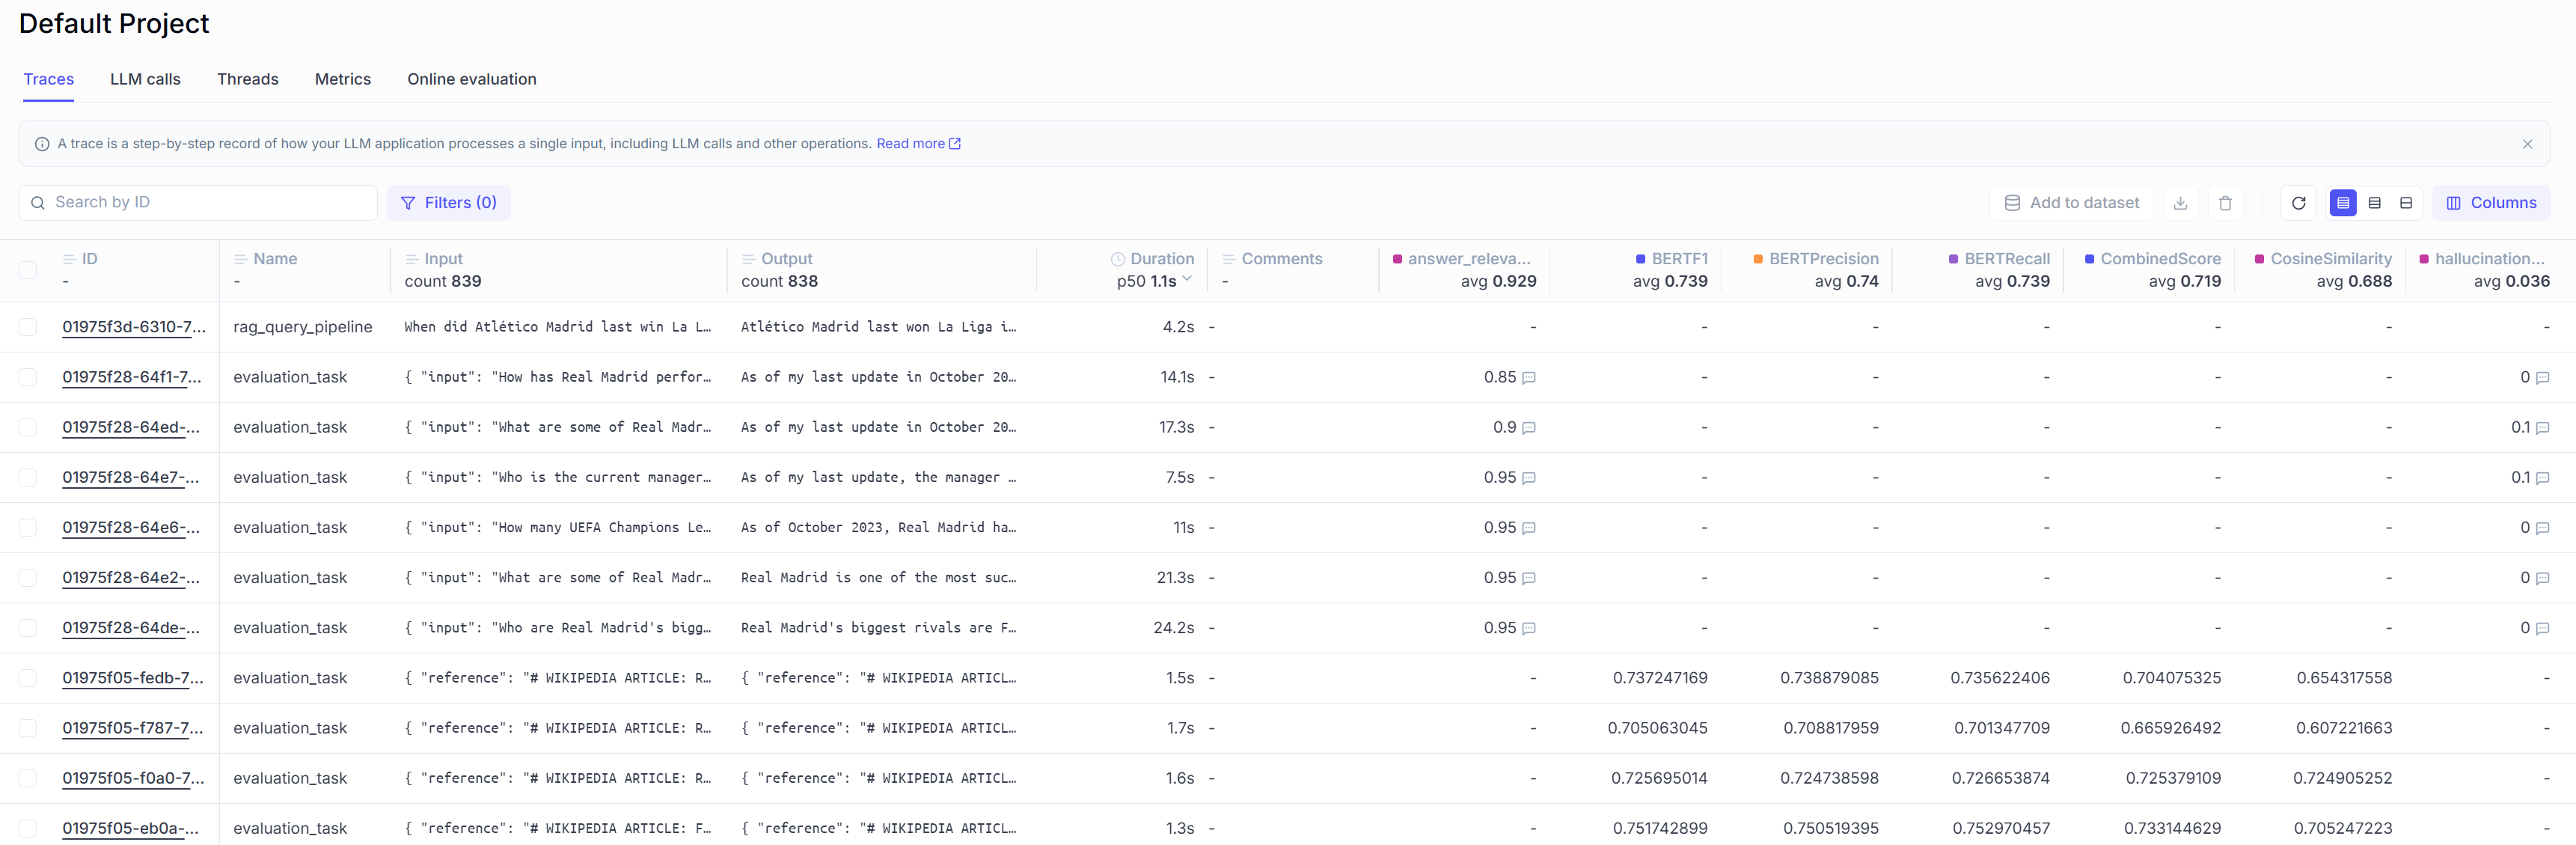
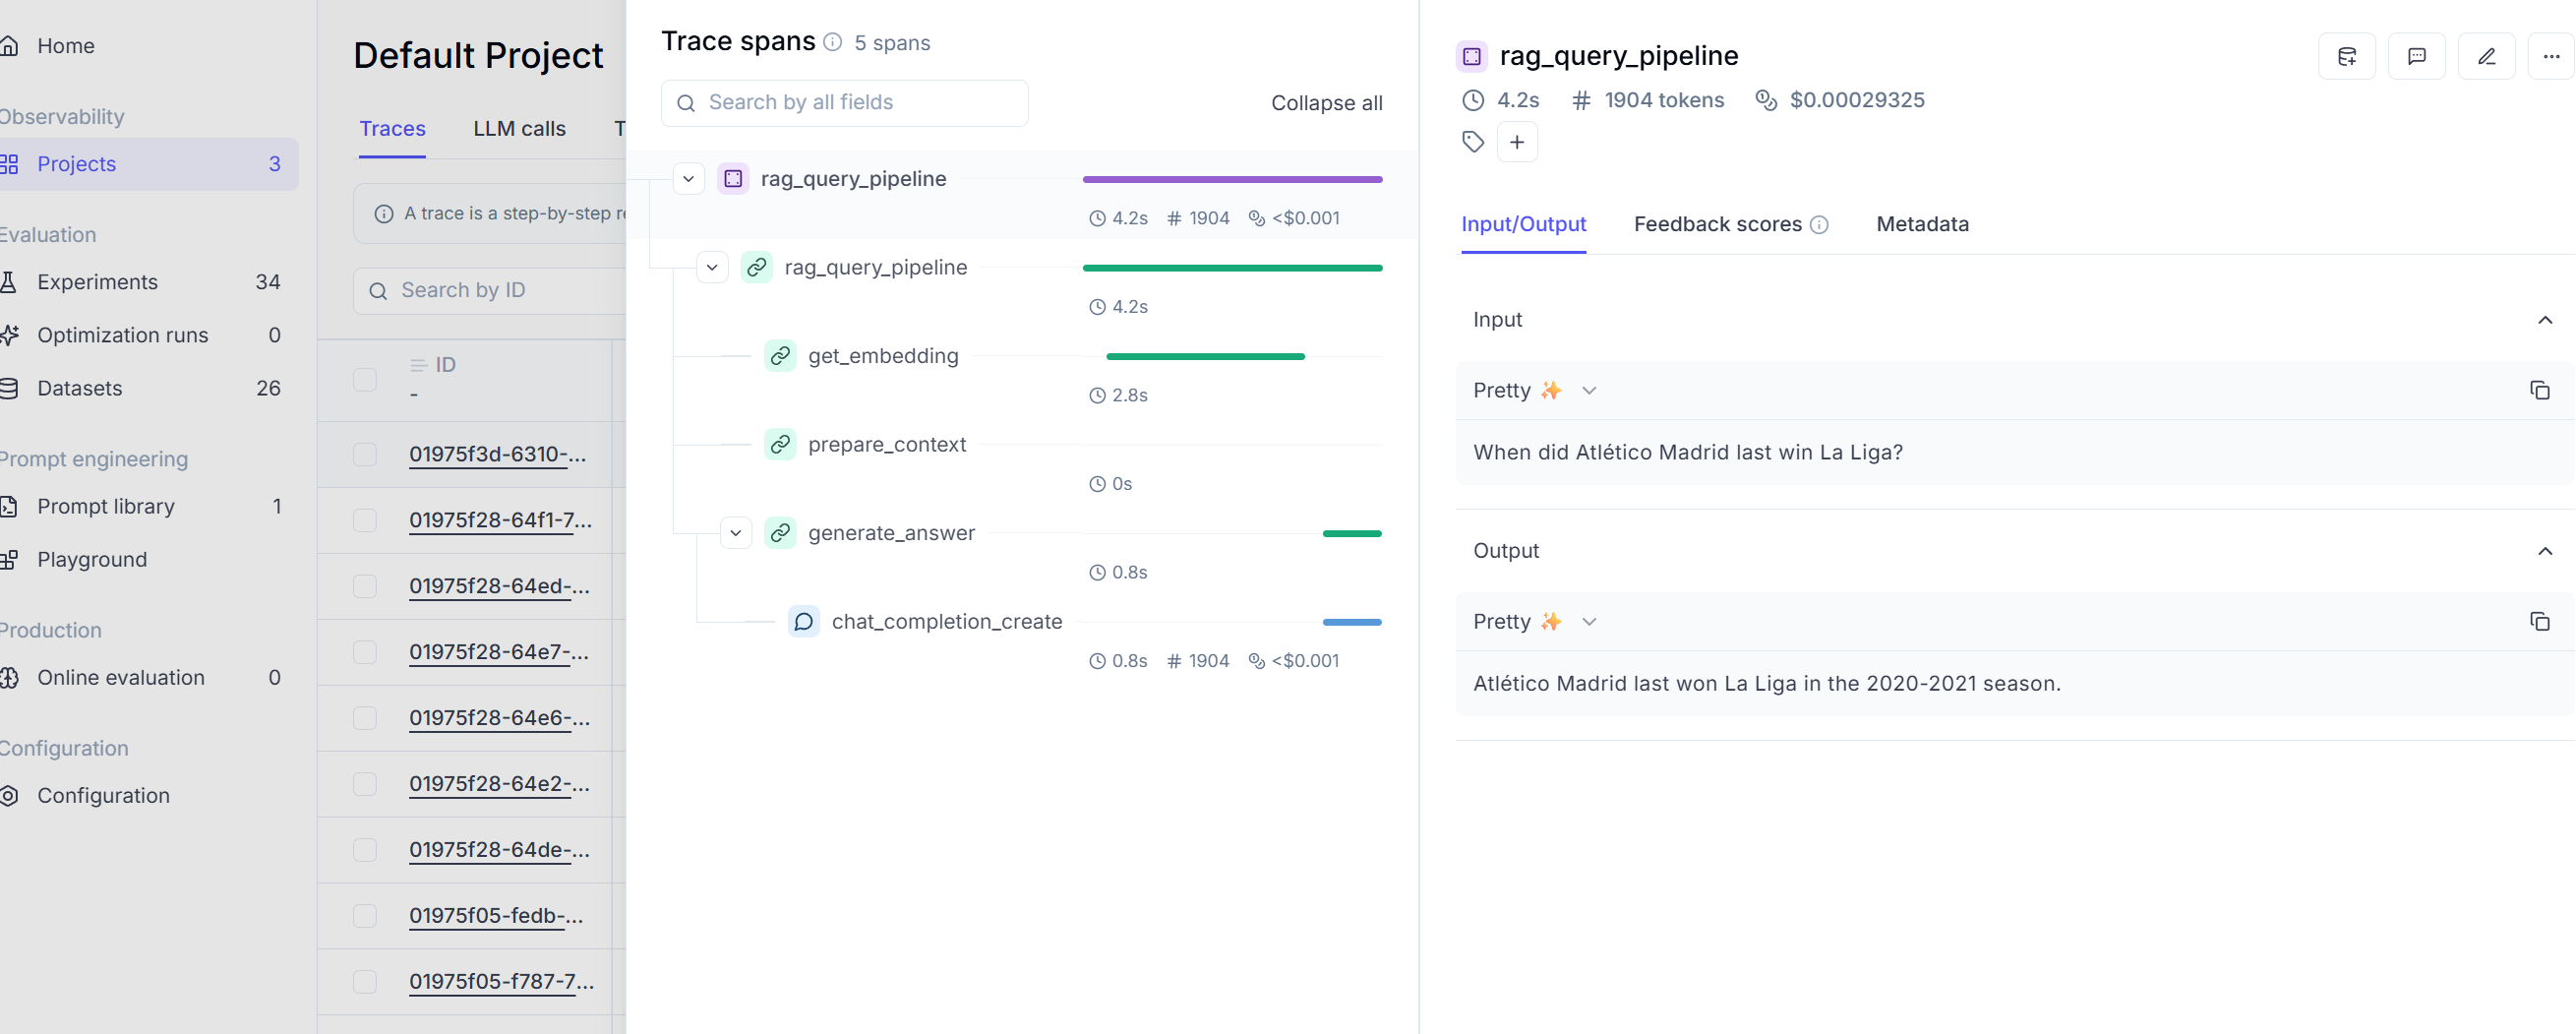
If you want to test a single query, under src/search you can find a simple script that will run one query (you can change it directly in the script), that allows you to experiment first with Opik and check traces and logs in the dashboard.
Conclusion
This project demonstrates how to build a comprehensive evaluation framework for LLMs using real-world content, combining ZenML for pipeline orchestration, MongoDB for flexible data storage and vector search, and Opik for deep observability.
By focusing on football team content from Wikipedia, a practical testbed that reveals both the capabilities and limitations of current language models, achieving strong performance in answer relevance (0.935) and low hallucination rates (0.02), while identifying areas for improvement in time-specific summarization tasks.
The modular architecture and systematic evaluation approach provide a foundation for rigorous, reproducible LLM assessment that can be adapted to any domain. For practitioners, the key insight is that effective LLM evaluation requires both quantitative metrics and domain-specific testing along with proper observability.
💭 Paul here: This is the article I got to know Benito Martin through: Building a Multimodal LLM Application with PyMuPDF4LLM - 100% recommend it!
If you enjoyed reading this content, you can support me by:
Following me on Substack, Medium or Dev, where I publish my articles! 👏 👏
Follow my Github 🎶 🎶
Starring the repo ⭐⭐
Share my content on LinkedIn! 💯💯
Contact me! 👨💻👨💻
Whenever you’re ready, there are 3 ways we can help you:
Perks: Exclusive discounts on our recommended learning resources
(books, live courses, self-paced courses and learning platforms).
The LLM Engineer’s Handbook: Our bestseller book on teaching you an end-to-end framework for building production-ready LLM and RAG applications, from data collection to deployment (get up to 20% off using our discount code).
Free open-source courses: Master production AI with our end-to-end open-source courses, which reflect real-world AI projects and cover everything from system architecture to data collection, training and deployment.
Images
If not otherwise stated, all images are created by the author.
 | A guest post by
|
Thanks, man, for contributing to Decoding ML. The article is 🔥
Really appreciated this the way you break down evaluation into something as tangible as a football assist makes it feel accessible and fun rather than abstract.
Your piece also quietly highlights why strong ethical guardrails matter. When technical metrics become the only scoreboard, it’s easy to overlook how these systems might shape decisions or reinforce hidden biases, especially in spaces with weak or lagging regulations.
Your guide feels like a reminder that good engineering should not only focus on performance but also responsibility to the larger game we’re all playing. Thanks for making it so clear and grounded.