

Build with MCP Like a Real Engineer
Hands-on code for an enterprise AI PR Reviewer by unifying GitHub, Slack, and Asana through MCP.

The second lesson of the open-source course Designing Enterprise MCP Systems — a free course that will teach you how to architect and build AI-powered developer workflows that scale across teams and tools.
A 3-lesson journey, where you will learn how to:
Architect LLM applications with clean, modular MCP-based designs.
Build real-world developer experience automations, like an AI PR Reviewer Assistant.
Choose the right agent architecture for scale and adaptability.
Lessons:
Lesson 1: Why MCP Breaks Old Enterprise AI Architectures
Lesson 2: Build with MCP Like a Real Engineer
Lesson 3: Getting Agent Architecture Right
🔗 Learn more about the course and its outline.
Build with MCP Like a Real Engineer
Reviewing pull requests isn’t the most exciting part of a developer’s day.
Not when you’re juggling Jira tickets, Slack channels, and half-baked issue descriptions.
And at the enterprise level? Let’s be honest — PRs pile up, reviewers skim, and context gets lost across tools.
Now imagine an assistant that automatically parses the PR, pulls in linked Jira tickets, summarizes key changes, and posts a clean, actionable summary to Slack — all before a human even opens the tab.
That’s why tools like CodeRabbit, Cursor BugBot, and Qodo have started emerging — showing just how much developers value automation in code review.
That’s the kind of system we’re building. But more importantly: this use case is a blueprint for building AI systems that are integrated, modular, and production-ready.
Enterprise software today isn’t built around a single model call — it’s built around orchestrating tools, connecting context, and taking action across systems. GitHub, Jira, Slack, internal APIs — real value comes when you make them work together.
And that’s exactly where MCP shines.
We’ve already covered the mindset in Lesson 1 — now it’s time to apply it.
In this lesson, we’ll get our hands dirty and implement the PR Reviewer Assistant from the ground up using MCP.
💻 See it in action on GitHub → Github Repository
You’ll learn how to:
Decompose a real-world automation into MCP’s host-client-server structure.
Connect to both local and remote MCP servers like GitHub.
Build custom MCP servers for Asana and Slack.
Write a custom MCP host that triggers on real GitHub PR events.
Add observability with Opik for latency, tool usage, and prompt versioning.
Let’s dive into the content. Enjoy!
Table of contents:
Designing the Assistant with MCP
Setting up your environment
Building the MCP Global Server
Writing a custom MCP Host
Observability with Opik
Running the code end-to-end
↓ But first, a quick word from our sponsors.
The Full Stack AI Engineering Course (Affiliate)
Trying to get into AI Engineering, but don’t know where to start?
When learning something new, to avoid wasting time, we need structure. That’s why if you consider a career in AI Engineering, we heartily recommend The Full Stack AI Engineering Course from the Towards AI Academy.
It’s full-stack. Therefore, it covers everything you need from LLMs, prompting, RAG, fine-tuning and agents.
Similar to what I preach through Decoding ML and my LLM Engineer’s Handbook, the course is project-focused. Made for active builders who, through a bit of sweat, want to build awesome stuff!
Instead of focusing on dozens of mini-projects that don’t reflect the real world. During the course, you will design, implement and deploy an AI Tutor as your capstone project, reflecting an end-to-end workflow similar to what you would do at your job.
You can find more details by clicking the button below. They offer a free preview of the course and a 30-Day Money-Back Guarantee.
Use code Paul_15 for 15% off and to keep Decoding ML free.
💭 As I am developing my Agentic AI Engineering course together with the Towards AI team, I am confident that we are 100% on the same page. A massive passion for AI and the will to put in hard work for something worth your time.
↓ Now, back to our lesson.
1. Designing the Assistant with MCP
Before we dive into building, let’s quickly revisit how we structured this in Lesson 1.
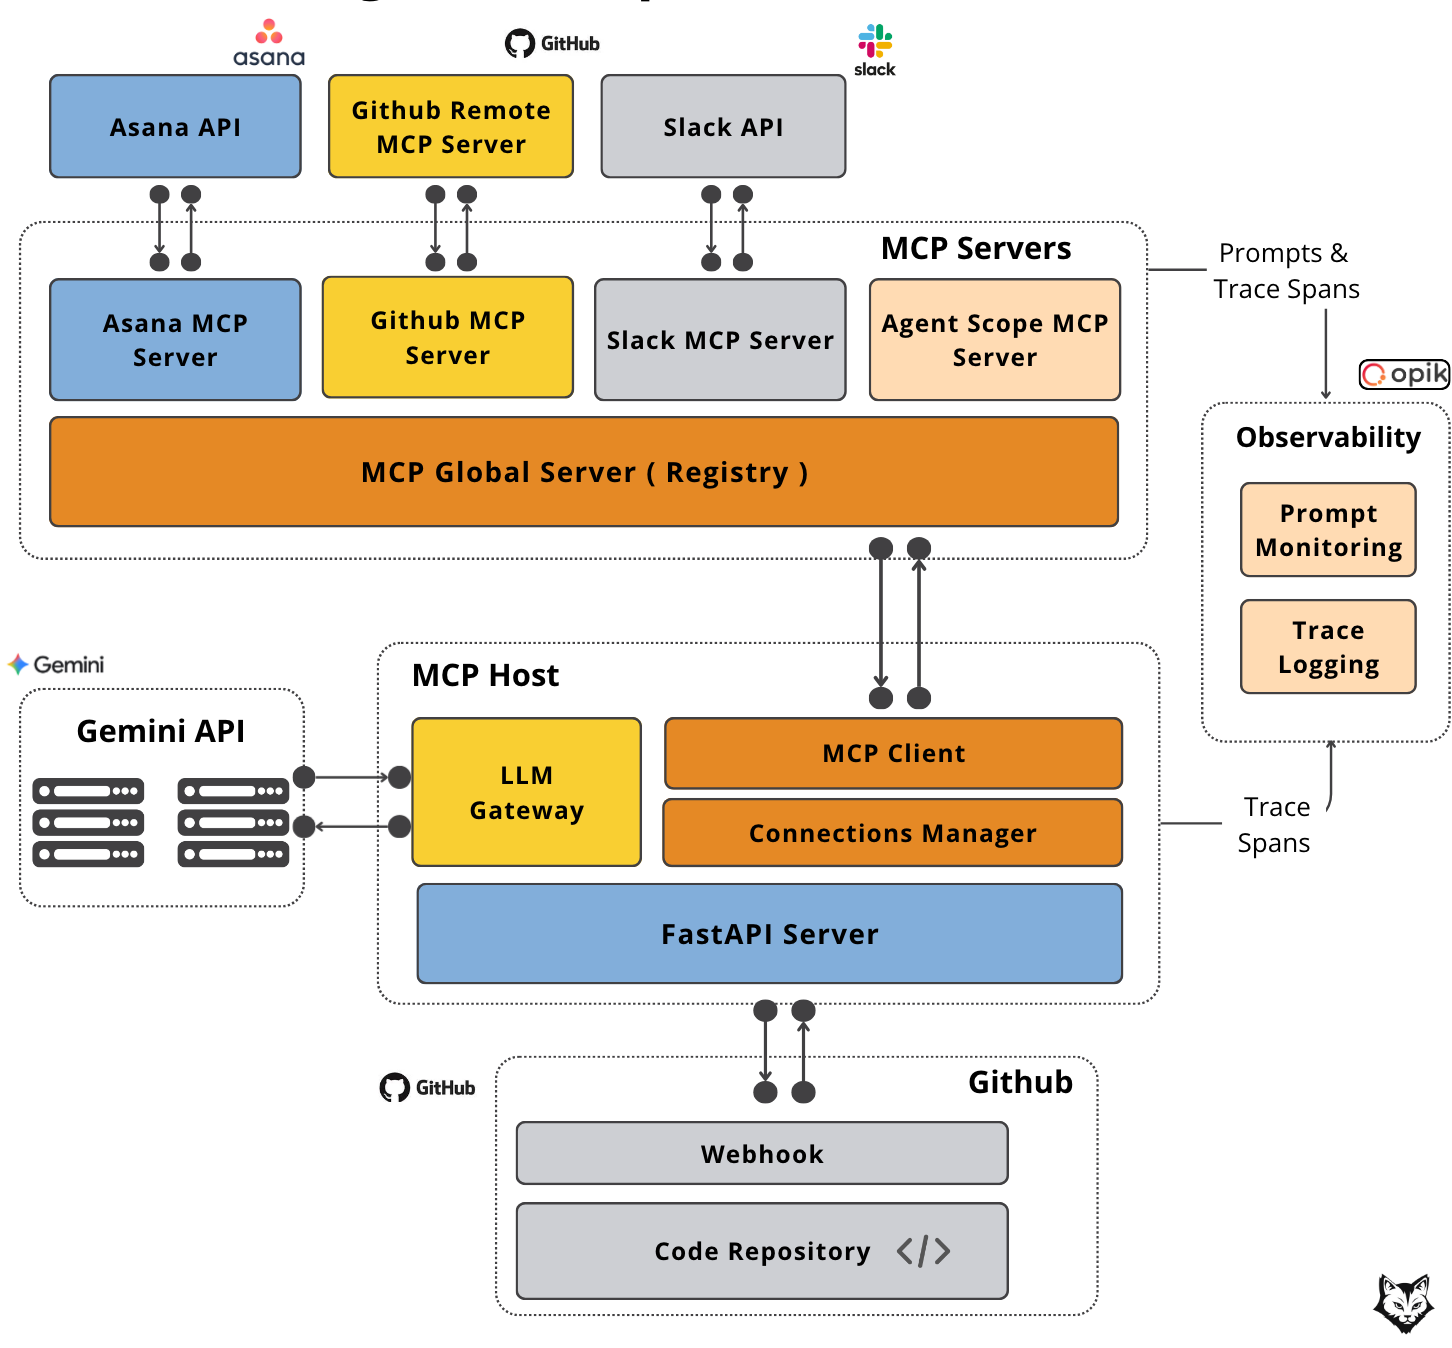
Our PR Reviewer Assistant follows MCP’s host–client–server model:
Host – A FastAPI app with a Gemini LLM, triggered by a GitHub webhook the moment a PR opens.
Why Gemini? The free tier gives us plenty of room to experiment, and the stateful chat API keeps context intact across tool calls. It’s a solid fit for multi-step workflows like PR reviews. Check out the full LLMs comparison here.
Client – A single MCP Client connected to the MCP Global Server, which keeps all tools, prompts, and resources discoverable in one place.
Why a Global MCP Server? This component allows us to have centralized tool management — a single place to discover, organize, and access every MCP tool across your environment.
Instead of hardcoding connections to specific servers, your host can query by tag (e.g., pull_request), and the Global Server will return every tool that matches — whether it lives on the GitLab MCP Server, GitHub MCP Server, or anywhere else.
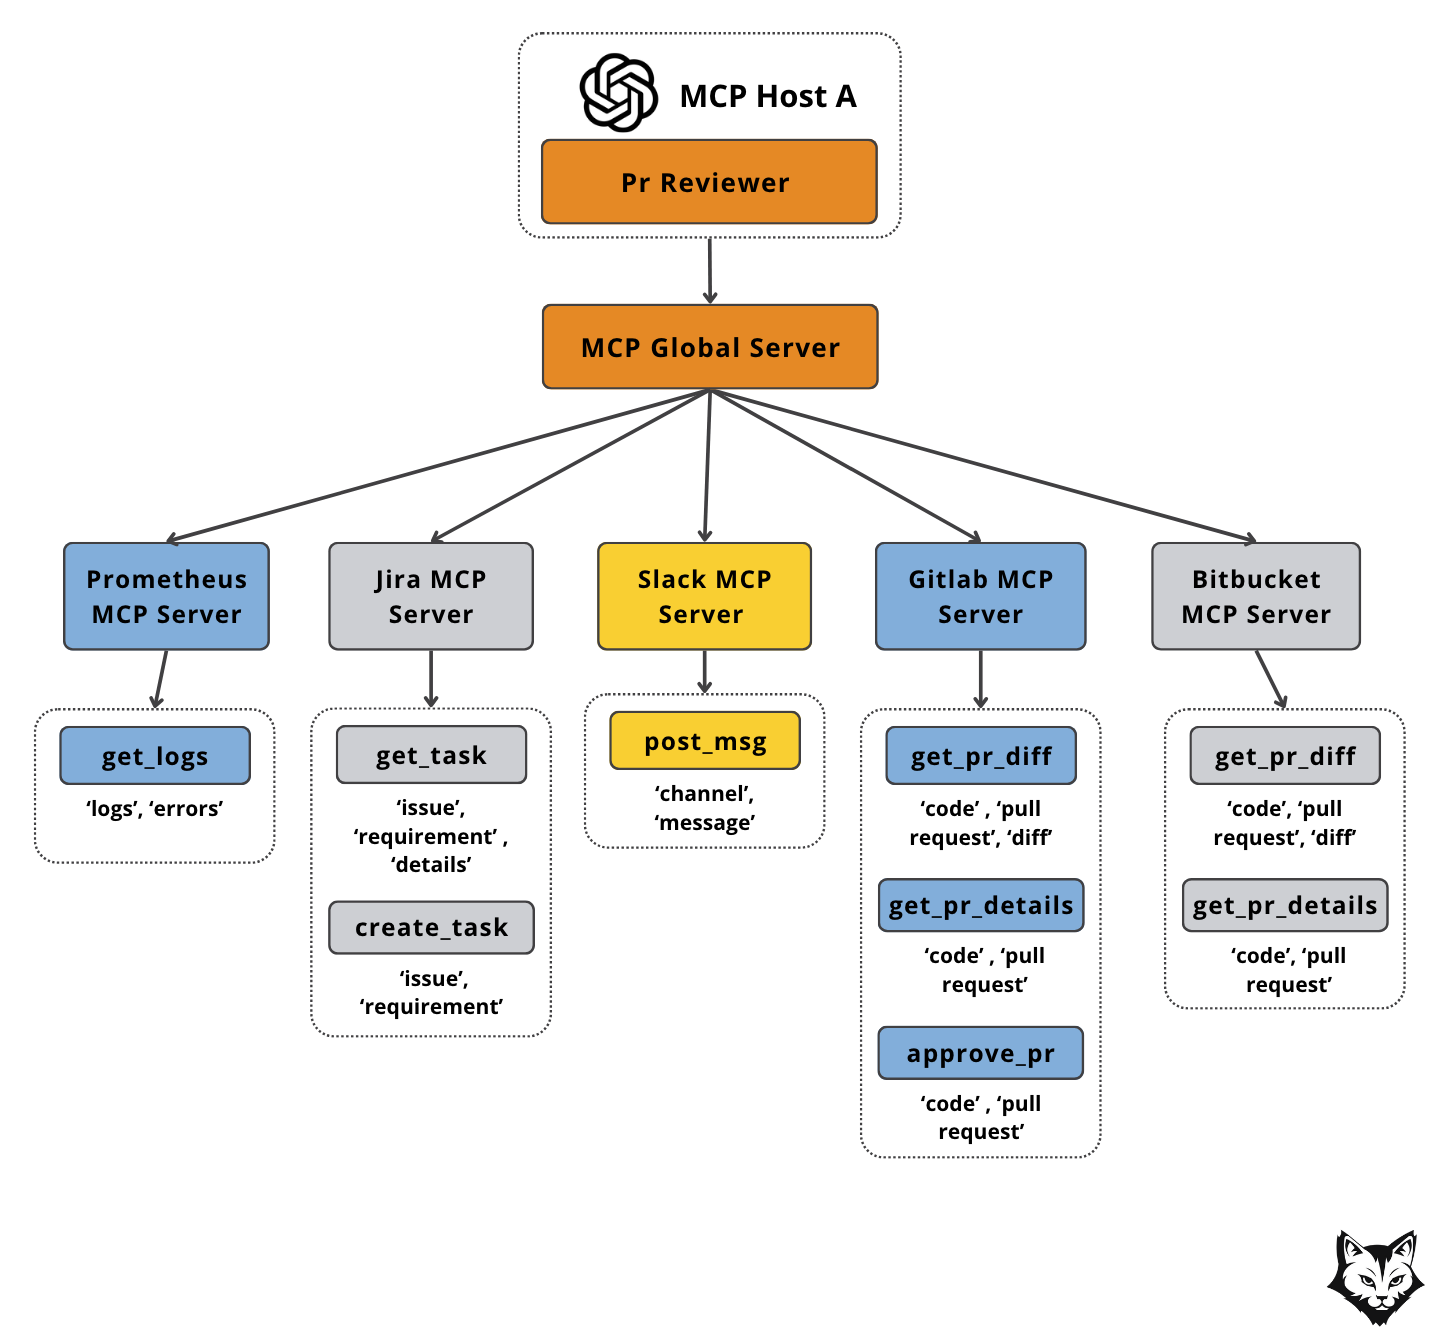
In the diagram above, this means you can ask “Give me the PR diff” without caring if it comes from GitHub or GitLab. The host simply filters for get_pr_diff tools tagged with code and pull_request, and the Global MCP Server handles the routing.
This keeps workflows flexible, scalable, and decoupled — so adding or swapping a server never requires changing your host logic.
Servers – An MCP Global Server that aggregates multiple MCP Servers :
GitHub MCP – Pulls PR metadata, file changes, and diffs.
Asana MCP – Retrieves linked task context and requirements.
Agent Scope MCP – Supplies the review prompt.
Slack MCP – Posts the completed review to the right channel.
What is the purpose of the Agent Scope MCP? This MCP Component serves specializations — prompts and role configs that define how agents behave. By hosting them centrally, you can:
Keep workflows consistent across multiple hosts (Claude Desktop, custom webhook apps, etc.)
Update once and roll out everywhere to avoid duplication and drift
It’s a single source of truth for agent behavior across the enterprise.
Now that we’ve got all the pieces on the table, let’s see how they actually work together from start to finish.
The diagram below shows the full data flow for our PR Reviewer Agent in action:
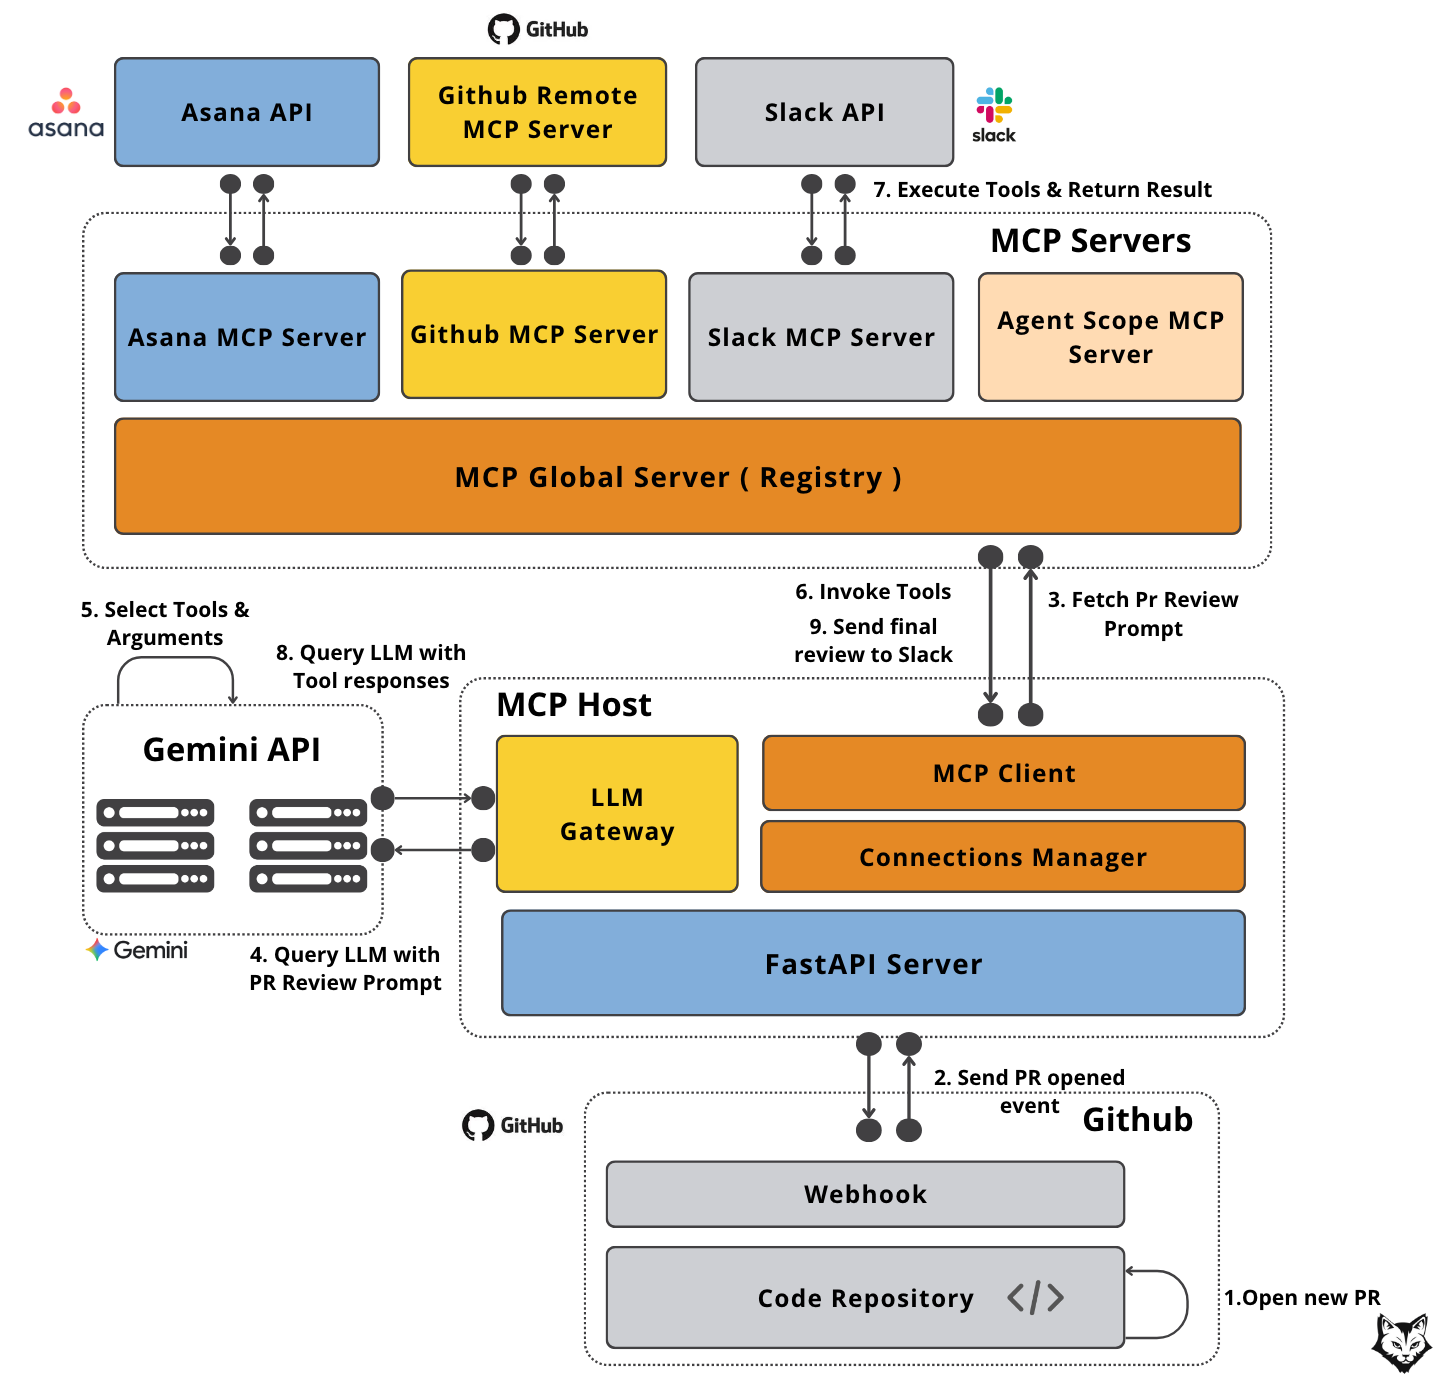
The data flows in the system as follows:
A developer opens a new pull request in GitHub.
GitHub sends a PR opened event to our FastAPI Host, including all the pull request metadata.
The Host requests a PR review prompt from the Agent Scope MCP Server via the MCP Global Server — ensuring we start the review with the right instructions.
The Host sends the PR data and the retrieved prompt to Gemini, asking it to decide which tools to run.
Gemini responds with a plan — for example: fetch the PR diff from GitHub, retrieve linked task details from Asana.
The Host invokes these tools through the MCP Global Server, which routes the calls to the right MCP Servers.
Each MCP Server connects to its respective external API, executes the request, and returns the results to the Host.
The Host passes these results back to Gemini, which composes the final review text based on all available context.
The completed review is sent to the Slack MCP Server, which posts it directly to the relevant team channel so it’s immediately visible.
Note: In some cases, Gemini may need additional information to complete the review. When that happens, steps 5–9 can repeat until all context is gathered and the output is ready.
Now that we have remembered the overview of the system architecture, let’s dig into the implementation.
2. Setting up your environment
Before starting to dig into the code, we need to set up our environment. This project is split into two main components:
pr-reviewer-mcp-host– this is where the orchestration logic lives. It’s the Host that connects to all the MCP servers, handles PR events, and coordinates the review.Get started: see the Host README for details on the setup.
pr-reviewer-mcp-servers– a set of modular MCP servers (GitHub, Slack, Asana, etc.) that expose tools and prompts which the Host can call. Each server is standalone and follows the FastMCP interface.Get started: see the Servers README for details on the setup.
Each folder contains a README with detailed tutorials on how to start things up locally. We’ve made sure you can get each part running with minimal guesswork.
To install all dependencies, under both folders, just run:
make installAfterwards, you’ll need to configure a few external integrations:
GitHub App: Register your MCP Host as a GitHub App. Once registered, add your
GITHUB_CLIENT_IDandGITHUB_CLIENT_SECRETto the.envfile, then runmake register-githubto complete the OAuth 2.0 flow.Slack Bot: Just like with GitHub, you'll need to register your MCP Host as a Slack App using your Slack Client ID and Client Secret. After registration, run
make register-slackto authorize it. Then, add the resultingSLACK_BOT_TOKENand yourSLACK_CHANNEL_IDto the.envfile.Asana Integration: Use your
ASANA_PERSONAL_ACCESS_TOKENandASANA_WORKSPACE_IDto access Asana’s tools through the corresponding MCP server.Opik & Gemini: Add your
OPIK_API_TOKENandGEMINI_API_KEYto enable tracing and access to the Gemini LLM.
Now that we have our environment set up, let’s break it down—component by component.
3. Building the MCP Global Server
The MCP Global Server acts as a central hub that aggregates tools, prompts, and resources from multiple specialized MCP servers—like GitHub, Slack, Asana, or a local agent.
This design gives us a single point of access and control, making it much easier to:
Discover and manage available tools and prompts.
Add or remove integrations without tightly coupling them to the LLM host logic.
Tag, trace, and route requests in a unified and consistent way.
By structuring it this way, we make our system modular, extensible, and easier to maintain—while giving the LLM a single endpoint to interact with, regardless of how many microservices or servers are operating behind the scenes.
What Does the Global Server Aggregate?
Currently, our global registry imports tools and prompts from the following MCP servers:
asana_mcp: Handles project/task information from Asana.agent_scope_mcp: Provides tools for local agent context (e.g., code analysis).slack_mcp: Allows us to post messages or pull Slack context.github_mcp: Gives us metadata and file-level access for GitHub PRs.
Let’s look at how we define the global registry:
class McpServersRegistry:
    def __init__(self):
        self.registry = FastMCP("tool_registry")
        self.all_tags: Set[str] = set()
        self._is_initialized = False
At its core, the global server is just a standard MCP server instance, built using the FastMCP class. It will act as the master registry that imports other MCP servers.
Important: All imported servers must implement the
FastMCPinterface—this ensures they expose the correct tool, prompt, and resource definitions in a compatible format.
Now let’s walk through the initialize() method, where the real work happens:
    @opik.track(name="tool-registry-initialize", type="general")
    async def initialize(self):
        if self._is_initialized:
            return

        log.info("Initializing McpServersRegistry...")
        await self.registry.import_server(asana_mcp, prefix="asana")
        await self.registry.import_server(agent_scope_mcp, prefix="scope")
        await self.registry.import_server(slack_mcp, prefix="slack")
        await self.registry.import_server(github_mcp, prefix="github")

        all_tools = await self.registry.get_tools()
        for tool in all_tools.values():
            if tool.tags:
                self.all_tags.update(tool.tags)

        log.info(f"Registry initialization complete. Found tags: {self.all_tags}")
        self._is_initialized = True
Each call to import_server(...) brings in the tools and prompts from another MCP server and registers them in the global registry with a prefix.
This namespacing avoids collisions and makes it easy to route calls properly (e.g., slack_post_message, github_get_diff, etc.).
🛠 Importing vs Mounting MCP Servers
MCP servers can be integrated into the global registry using eitherimport_serverormount, depending on whether stability or real-time updates are preferred.
import_serverperforms a one-time copy of tools, prompts, and other objects into the registry. It’s useful when the source server doesn’t need to stay live and we want a consistent, fast-loading registry.In contrast,
mountsets up a live connection to the external server. Any requests are forwarded in real time, allowing for updates but also introducing runtime dependency and potential latency.
For our setup, we use import_server to keep the global registry stable and self-contained.
After importing all the tools, we extract their tags and store them in self.all_tags. These tags can later be used by the LLM or other agents to:
Filter relevant tools for a task (e.g., “only tools tagged with
code_review”).Dynamically adjust tool access or visibility.
Enhance traceability in observability systems like Opik.
By centralizing the tag collection at registry init time, we can expose this information through a simple API or use it to guide prompt generation later on.
To start the MCP Global Server, we simply run:
mcp_tool_manager = McpServersRegistry()
anyio.run(mcp_tool_manager.initialize)
mcp_tool_manager.get_registry().run(
        transport="streamable-http", host="localhost", port=settings.REGISTRY_PORT
    )
Now, let’s dive into each one of the aggregated MCP Servers.
Connecting to Existing MCP Servers
In a real-world system, not all tools are built in-house. You often need to integrate with external MCP servers, like GitHub's, which expose tools for accessing pull requests, reviews, files, and more.
In our case, we're using the Remote GitHub MCP Server provided and hosted by GitHub themselves—but instead of calling it directly from our MCP Host, we wrap it in a local FastMCP server that acts as a proxy with a clean interface.
This local wrapper allows us to:
Standardize the tool interface (so it's importable into the global registry)
Limit which tools are exposed to the LLM (saving tokens and reducing clutter)
Isolate the connection logic and manage OAuth tokens cleanly
We only need a subset of GitHub tools for PR reviews:
get_pull_request
get_pull_request_comments
get_pull_request_diff
get_pull_request_files
get_pull_request_reviews
get_pull_request_status
We expose only these via the wrapper.
📌 Why wrap instead of connecting directly as a client from the MCP Host?
Because MCP’s import mechanism expects a FastMCP-compatible server, and GitHub’s isn’t natively structured like that. Wrapping it allows us to:
Maintain the same server interface as the other components
Avoid dynamic routing logic between the 2 MCPs ( Remote Github Server & our Global MCP Server )
Stay modular and maintainable
To access the GitHub MCP server securely, we register our wrapper server as a GitHub App, which authorizes it and issues a scoped token. This token is then passed along with each tool call.
The
make register-githubcommand handles the OAuth 2.0 flow by exchanging your GitHub Client ID and Secret for an access token. ( Step 1 & 2 in the diagram below )
This is the exact flow:
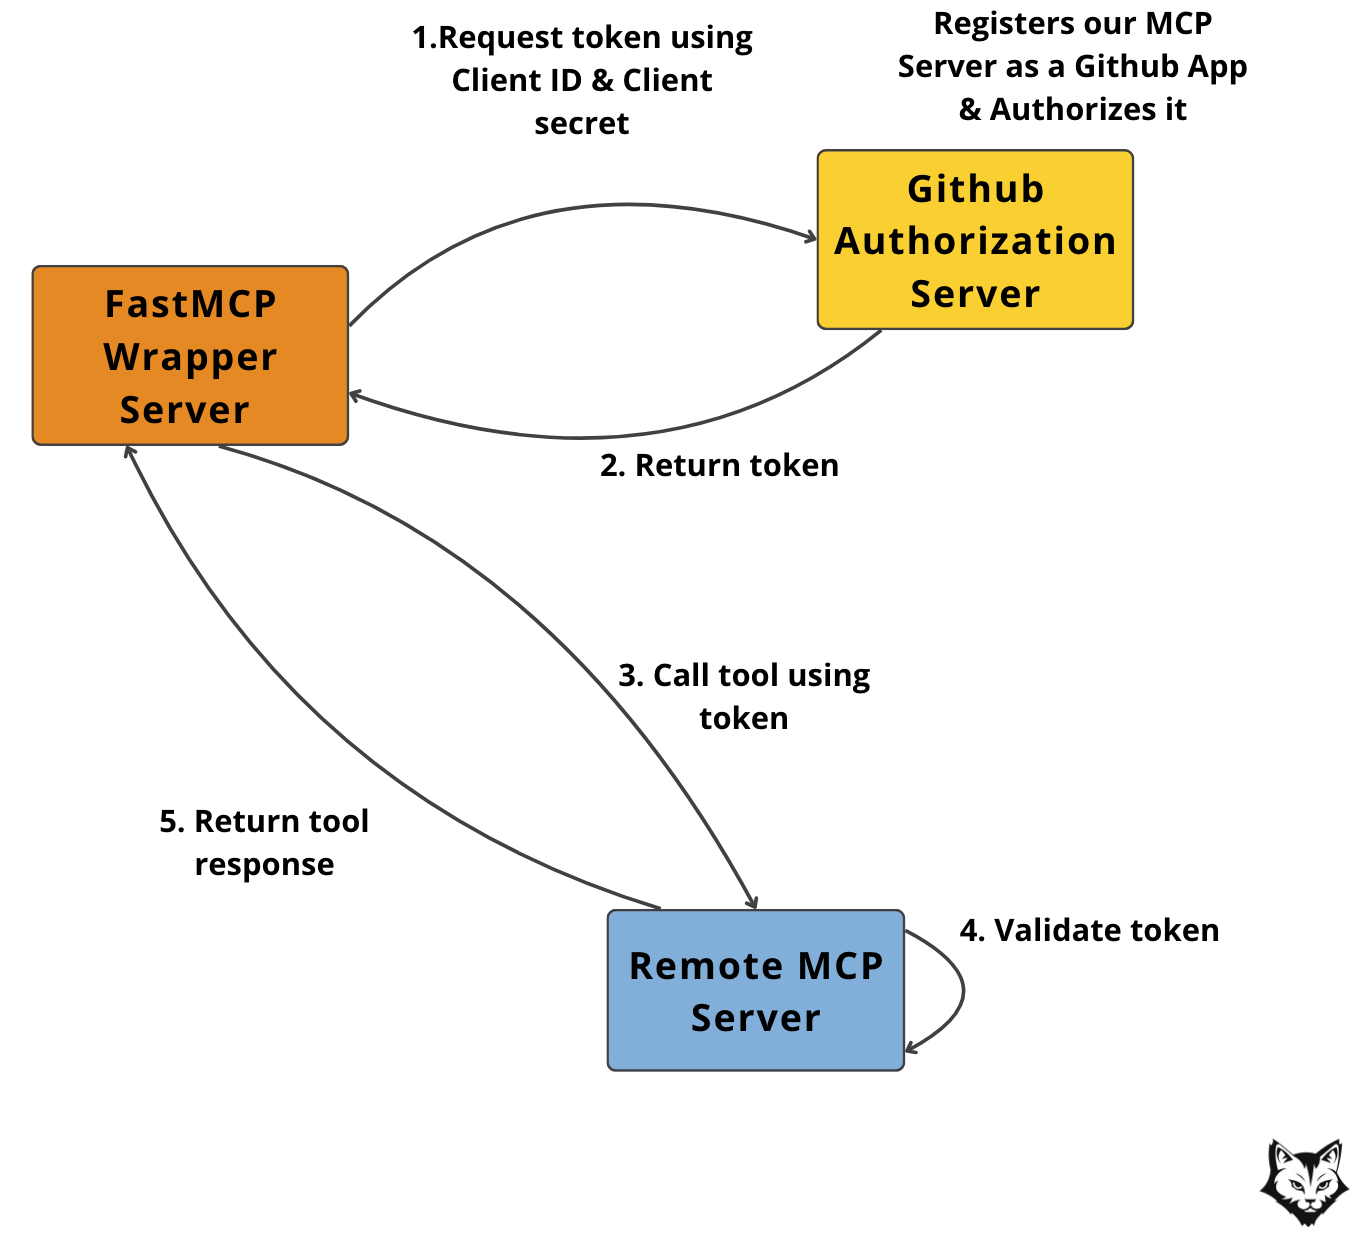
This ensures the wrapper can only access tools it's authorized for—no broad access, no stale credentials.
Afterwards, we use the FastMCP library to define our local proxy:
opik_utils.configure()
logger = logging.getLogger("github_server")
logging.basicConfig(level=logging.INFO)

GITHUB_MCP_URL = "https://api.githubcopilot.com/mcp/"
SERVER_CONFIG = {
        "url": GITHUB_MCP_URL,
        "headers": {
            "Authorization": f"Bearer {settings.GITHUB_ACCESS_TOKEN}",
            "Accept": "text/event-stream",
        },
}

github_mcp = FastMCP("github_proxy")
This config tells the wrapper where to send requests and how to authenticate with the GitHub MCP.
Let’s look at how one tool is wrapped:
@github_mcp.tool(
    description="Get pull request details",
    tags={"github", "pull_request", "details"},
    annotations={"title": "Get Pull Request", "readOnlyHint": True, "openWorldHint": True},
)
@opik.track(name="github-get-pull-request", type="tool")
async def get_pull_request(owner: str, repo: str, pullNumber: int):
    headers = SERVER_CONFIG.get("headers", {})
    context = streamablehttp_client(SERVER_CONFIG.get("url"), headers=headers)
    async with AsyncExitStack() as exit_stack:
        read_stream, write_stream, get_session_id = await exit_stack.enter_async_context(context)
        session = await exit_stack.enter_async_context(ClientSession(read_stream, write_stream))
        await session.initialize()
        logger.info(f"Fetching pull request {pullNumber} for {owner}/{repo}")
        result = await session.call_tool("get_pull_request", {"owner": owner, "repo": repo, "pullNumber": pullNumber})
        return result
Every tool call creates a fresh session to the GitHub MCP server using a streamable HTTP client.
🔄 This stateless design was intentional: rather than managing long-lived remote sessions, the wrapper opens a clean connection for every call.
Because we own the wrapper interface, we can also manage tool tags locally. This lets us curate what shows up in the Global Tool Registry on filtering the tools.
Now that we’ve wrapped GitHub, let’s move on to defining the rest of our custom MCP servers.
Implementing the Custom MCP Servers
Time to plug in the rest of the system.
Beyond GitHub, our system includes three more custom MCP servers—Agent Scope, Asana, and Slack—each handling a focused part of the workflow.
Wiring Up the Agent Scope MCP Server
The Agent Scope MCP Server focuses on specializing agents within the enterprise, essentially defining what kind of reasoning or behavior an agent is allowed to perform.
It doesn’t call tools; instead, it serves prompts, and it handles prompt versioning via Opik. Let’s walk through how we define and serve these versioned prompts.
We start by configuring Opik and initializing a FastMCP instance:
opik_utils.configure()
agent_scope_mcp = FastMCP("agent_scope_prompts")
Afterwards, here’s how we register a prompt inside the server:
@agent_scope_mcp.prompt(
    name="pr_review_prompt",
    description="Prompt for reviewing pull requests"
)
@opik.track(name="pr_review_prompt", type="general")
def pr_review_prompt(arguments: dict):
    """
    Format the PR_REVIEW_PROMPT using the provided arguments dict.
    All keys in arguments will be passed as keyword arguments to format().
    """
    return PR_REVIEW_PROMPT.get().format(**arguments)
The agent knows what arguments to pass to the prompt because they come directly from the PR event payload (e.g., title, description, diff), which is mapped into the arguments dict before invoking it.
This exposes a structured, reusable prompt that can be fetched and filled at runtime with PR context.
Now here’s the prompt we’re versioning and serving for our PR Reviewer use case:
_PR_REVIEW_PROMPT = """
You are an expert software engineer assisting with code review workflows.

## Goal
Review the given pull request using **all available context**:
- **Requirements**: either linked directly in the PR or inferred from its title (identifiers like "FFM-X")
- **Code diff**: changes made in the pull request
- **PR metadata**: title, description, author, linked issues/tasks

## Required Steps
1. **Summarize** in clear, concise language what the pull request changes.
2. **Extract the Asana task name** associated with this PR:
   - Look for an identifier following the pattern: `<PROJECT_KEY>-<NUMBER>` (e.g., `FFM-2`, `FFM-123`).
   - **Return only the identifier itself (e.g., `FFM-2`) and nothing else** (do not include title text or other content).
   - If there are multiple matches, choose the one most relevant to the PR title or description.
   - If no match is found, explicitly state `"No task name found"`.
3. **Retrieve full task details** based on the extracted task name to verify implementation.
4. **Verify implementation**: check whether the changes meet the requirements for the identified Asana task.
   - If no requirements or task name can be identified, explicitly state: `"No task name or explicit requirements available."`
5. **Provide 2–4 actionable improvement suggestions** (code quality, design, tests, documentation).
6. Keep all feedback **concise and focused**.

## Response Format
Always include:
- **Pull request url** (link to the pull request)
- **Summary** (what the PR changes)
- **Asana task id** (just the identifier, e.g., `FFM-2`, or `"No task name found"`)
- **Asana task details** (summary of the description, retrieved from Asana, if exists)
- **Requirement check result**
- **Improvement suggestions**

Current PR context:
- PR ID: {pr_id}
- PR URL: {pr_url}
"""
To version this prompt via Opik, we wrap it in a small class:
class VersionedPrompt:
    def __init__(self, name: str, template: str):
        self.name = name
        self._opik_prompt = None
        self._template = template
        self._init_opik_prompt()

    def _init_opik_prompt(self):
        try:
            self._opik_prompt = opik.Prompt(name=self.name, prompt=self._template)
        except Exception as e:
            logger.warning(
                f"Opik prompt versioning unavailable for '{self.name}': {e}. Using local template."
            )
            self._opik_prompt = None

    def get(self) -> str:
        if self._opik_prompt is not None:
            return self._opik_prompt.prompt
        return self._template

    def __str__(self):
        return self.get()

    def __repr__(self):
        return f"<VersionedPrompt name={self.name}>"

PR_REVIEW_PROMPT = VersionedPrompt("pr-review-prompt", _PR_REVIEW_PROMPT)
This lets us fetch either the latest versioned prompt from Opik or fall back to a local one—great for development environments or offline work.
Implementing the Asana MCP Server
Now let’s connect the dots between pull requests and task management.
The Asana MCP Server exposes tools for querying and creating tasks within your workspace.
While our PR reviewer currently uses only the find_task tool to match PRs to tasks, we’ve designed the server to support broader automation workflows down the line—like creating follow-ups or verifying completion directly in Asana.
We start with the usual setup:
opik_utils.configure()
asana_mcp = FastMCP("asana_tools")
asana_client = AsanaClient()
This initializes a custom FastMCP server called asana_tools and an internal AsanaClient that handles the API calls under the hood.
Then we expose two tools:
@asana_mcp.tool(
    description="Finds an Asana task by name.",
    tags={"asana", "task", "search"},
    annotations={"title": "Find Task", "readOnlyHint": False, "openWorldHint": True},
)
@opik.track(name="asana-find-task", type="tool")
async def find_task(task_name: str):
    """Find an Asana task by name."""
    task = await asana_client.find_task(task_name)
    if task:
        return {"status": "success", "task": task}
    else:
        return {"status": "not_found", "task": None}


@asana_mcp.tool(
    description="Creates a new Asana task with the given name and description.",
    tags={"asana", "task", "create"},
    annotations={"title": "Create Task", "readOnlyHint": False, "openWorldHint": True},
)
@opik.track(name="asana-create-task", type="tool")
async def create_task(task_name: str, description: str = ""):
    """Create a new Asana task."""
    task = await asana_client.create_task(task_name, description)
    return {"status": "created", "task": task}
Both tools are tracked with Opik, versioned for observability, and tagged for registry filtering.
The actual logic is offloaded to the AsanaClient, which handles the API communication with Asana behind the scenes:
ASANA_PROJECT_TASKS_URL = f"https://app.asana.com/api/1.0/projects/{settings.ASANA_PROJECT_GID}/tasks"
ASANA_TASKS_URL = "https://app.asana.com/api/1.0/tasks"

class AsanaClient:
    def __init__(self):
        self.client = httpx.AsyncClient(
            headers={"Authorization": f"Bearer {settings.ASANA_TOKEN}"}
        )

    async def find_task(self, query: str) -> dict | None:
        logger.info(f"Searching for Asana task with query: '{query}' in project {settings.ASANA_PROJECT_GID}")
        list_resp = await self.client.get(
            ASANA_PROJECT_TASKS_URL,
        )
        list_resp.raise_for_status()
        task_refs = list_resp.json()["data"]

        for ref in task_refs:
            logger.debug(f"Checking task: {ref['name']} (gid: {ref['gid']})")
            if query.lower() in ref["name"].lower():
                logger.info(f"Found matching task: {ref['name']} (gid: {ref['gid']})")
                detail_resp = await self.client.get(f"{ASANA_TASKS_URL}/{ref['gid']}")
                detail_resp.raise_for_status()
                return detail_resp.json()["data"]

        logger.warning(f"No matching Asana task found for query: '{query}'")
        return None

    async def create_task(self, name: str, description: str = "") -> dict:
        logger.info(f"Creating Asana task: '{name}' in project {settings.ASANA_PROJECT_GID}")
        payload = {
            "data": {
                "name": name,
                "notes": description,
                "projects": [settings.ASANA_PROJECT_GID],
            }
        }
        resp = await self.client.post(
            ASANA_TASKS_URL,
            json=payload
        )
        resp.raise_for_status()
        logger.info(f"Created Asana task: '{name}' (response: {resp.json()})")
        return resp.json()["data"]
The AsanaClient handles all interactions with the Asana API, keeping external API logic cleanly separated from your MCP tool definitions. It communicates with two key endpoints:
ASANA_PROJECT_TASKS_URL: lists all tasks in a specific Asana projectASANA_TASKS_URL: retrieves or creates individual tasks
Internally, it initializes an asynchronous HTTPX client using your ASANA_TOKEN for secure authentication.
Here’s what each method does:
find_task(query: str)– Searches all tasks in the configured project and returns details on the first task that matches the given name.create_task(name: str, description: str = "")– Creates a new task with the provided name and optional description in the specified Asana project.
Building the Slack MCP Server
The final custom server in our system handles all Slack messaging logic.
To let an MCP server post or read messages from a Slack channel, your system must be registered as a Slack App. This registration gives you access to a Slack bot token, scoped to the correct permissions—like reading channel history or posting messages.
Just like GitHub, Slack uses the OAuth 2.0 flow. When you register your app and complete the auth flow, you receive a SLACK_BOT_TOKEN. Add this token (along with the target SLACK_CHANNEL_ID) to your .env file.
Once set up, we expose two tools:
get_last_messages: fetches recent messages from a Slack channelpost_message: sends a message to a channel
The MCP server is initialized and tracked with Opik like the others:
opik_utils.configure()
slack_mcp = FastMCP("slack_tools")
slack_client = SlackClient()
Then we define the tools:
@slack_mcp.tool(
    description="Gets the last X messages from a Slack channel.",
    tags={"slack", "message", "channel", "history"},
    annotations={"title": "Get Last Messages", "readOnlyHint": True, "openWorldHint": True},
)
@opik.track(name="slack-get-last-messages", type="tool")
async def get_last_messages(channel_name: str, limit: int = 10):
    """Get the last X messages from a Slack channel."""
    messages = await slack_client.get_last_messages(channel_name, limit)
    return {"status": "success", "messages": messages}


@slack_mcp.tool(
    description="Posts a new message to a given channel.",
    tags={"slack", "message", "channel", "post"},
    annotations={"title": "Post Message", "readOnlyHint": False, "openWorldHint": True},
)
@opik.track(name="slack-post-message", type="tool")
async def post_message(channel_name: str, message: str = ""):
    """Posts a new message to a channel."""
    result = await slack_client.send_message(channel_name, message)
    return {"status": "created" if result.get("ok") else "error", "message": result}
Under the hood, we use a dedicated SlackClient class to interface with Slack’s Web API. It communicates with two key endpoints:
SLACK_POST_MESSAGE_URLto send a messageSLACK_CHANNEL_HISTORY_URLto read recent messages
Here's the full implementation:
SLACK_POST_MESSAGE_URL = "https://slack.com/api/chat.postMessage"
SLACK_CHANNEL_HISTORY_URL = "https://slack.com/api/conversations.history"

class SlackClient:
    def __init__(self):
        self.client = httpx.AsyncClient(
            headers={
                "Authorization": f"Bearer {settings.SLACK_BOT_TOKEN}",
                "Content-Type": "application/json"
            }
        )

    async def send_message(self, channel: str, text: str) -> dict:
        logger.info(f"Sending message to Slack channel '{channel}': {text}")
        payload = {
            "channel": channel,
            "text": text
        }
        resp = await self.client.post(
            SLACK_POST_MESSAGE_URL,
            json=payload
        )
        resp.raise_for_status()
        result = resp.json()
        if not result.get("ok"):
            logger.error(f"Failed to send message: {result}")
        else:
            logger.info(f"Message sent: {result}")
        return result

    async def get_last_messages(self, channel: str, limit: int = 10) -> list:
        logger.info(f"Fetching last {limit} messages from Slack channel '{channel}'")
        params = {
            "channel": channel,
            "limit": limit
        }
        resp = await self.client.get(
            SLACK_CHANNEL_HISTORY_URL,
            params=params
        )
        resp.raise_for_status()
        result = resp.json()
        if not result.get("ok"):
            logger.error(f"Failed to fetch messages: {result}")
            return []
        print(result)
        messages = result.get("messages", [])
        logger.info(f"Fetched {len(messages)} messages from channel '{channel}'")
        return messages
This setup keeps the Slack integration modular, testable, and easily extensible for future workflows.
4. Writing a custom MCP Host
As we said earlier, this series isn’t just about showing you how to connect a couple of MCP servers to a Claude desktop.
We’re going deeper—building our own custom Host: a FastAPI application that talks to a Gemini LLM, orchestrates tool use, and posts automated PR reviews directly to Slack.
So let’s revise the high-level flow of our custom MCP Host when the PR opened event triggers it:
We query our MCP server for a system prompt that instructs how to review the PR.
We send this prompt to the LLM and allow it to reason about the PR, possibly invoking tools.
Once we get the final review, we forward it to a Slack channel for team visibility.
All of this logic is encapsulated inside webhook.py. We start by creating our FastAPI app and wiring in our MCP client and Opik configuration. To properly manage startup and shutdown behavior, we use FastAPI’s lifespan context:
client = MCPHost()
opik_utils.configure()

@asynccontextmanager
async def lifespan(app: FastAPI):
    await client.initialize()
    try:
        yield
    finally:
        await client.cleanup()

app = FastAPI(lifespan=lifespan)
The lifespan function ensures that we initialize our MCPHost instance once when the app starts and tear it down gracefully when the app stops. This avoids leaking resources like open sockets or persistent connections.
Next, we define the actual webhook handler:
@app.post("/webhook")
async def handle_github_webhook(request: Request):
    try:
        payload = await request.json()
        if payload.get("action") == "opened":
            pr = payload["pull_request"]

            # Step 1: get PR Reviewer prompt
            system_prompt = await client.get_system_prompt(
                SYSTEM_PROMPT_NAME,
                {"arguments": json.dumps({"pr_id": str(pr["id"]), "pr_url": str(pr["url"])})}
            )

            # Step 2: Pass the task to the LLM
            review = await client.process_query(system_prompt.messages[0].content.text)

            # Step 3: Send the final review to the Slack channel
            if review:
                await client.call_tool(
                    "slack_post_message",
                    {"channel_name": settings.SLACK_CHANNEL_ID, "message": review}
                )
        return {"status": "ok"}
    except Exception as e:
        return {"status": "error", "detail": str(e)}
Our endpoint only reacts to the opened event for pull requests. All other PR events—like closed, reopened, or synchronize—are deliberately ignored.
If you look at the code, you’ll notice how the three major steps we outlined earlier are clearly reflected in the logic of our Host—from getting the prompt, to processing it, to delivering the final review.
This architecture separates concerns nicely: the webhook simply listens, the MCP Host orchestrates logic and tool use, and the LLM handles reasoning. Each piece is modular, making it easy to evolve or extend (e.g., by supporting more events or more tools) in future iterations.
Now let’s dive more into the logic of the MCPHost class:
class MCPHost:
    def __init__(self, model: str = "gemini-2.5-flash"):
        self.model = model
        self.client = genai.Client(api_key=settings.GEMINI_API_KEY)
        self.connection_manager = ConnectionManager()
        self.thread_id = str(uuid.uuid4())
In the constructor, we set up two main components:
A Gemini LLM client, which we’ll use to process the system prompt and generate the review content.
A ConnectionManager, responsible for managing persistent communication with one or more MCP servers—most importantly, the MCP Global Server, which acts as a centralized tool registry. Other servers can be added as needed for task-specific tools or prompt providers.
Let’s take a closer look at what the ConnectionManager does behind the scenes:
class ConnectionManager:
    def __init__(self):
        self.session: Optional[ClientSession] = None
        self.exit_stack = AsyncExitStack()
        self.is_initialized = False
Here, we initialized:
An optional session, which is used for communication with the MCP server. As we discussed in Lesson 1, MCP can use multiple protocols, including streamable HTTP, where keeping a persistent session is essential.
Streamable HTTP or WebSockets? Streaming HTTP is ideal for simple server-to-client streams with wide compatibility. WebSockets shine in interactive, low-latency scenarios, offering true two-way communication for more interactive, real-time use cases.
An
AsyncExitStack, which is a context manager that helps manage multiple asynchronous resources (like sessions and streams). It ensures that all acquired resources are properly cleaned up later, even if something fails midway.
When the app starts up, we use the initialize_all method to connect to the MCP Global Server, which is the central registry for available tools:
   @opik.track(name="connection-initialize", type="general")
    async def initialize_all(self):
        await self.connect_to_server('tool-registry')
        self.is_initialized = True
This uses the connect_to_server method, which handles different types of server configurations:
    @opik.track(name="connect-to-server", type="general")
    async def connect_to_server(self, server_key: str):
        config = AVAILABLE_SERVERS[server_key]

        if config["type"] == "stdio":
            stdio_transport = await self.exit_stack.enter_async_context(
                stdio_client(StdioServerParameters(command="python", args=[config["path"]]))
            )
            self.session = await self.exit_stack.enter_async_context(ClientSession(*stdio_transport))


        elif config["type"] == "streamable-http":
            context = streamablehttp_client(url=config["url"], headers=config.get("headers"))

            read_stream, write_stream, get_session_id = await self.exit_stack.enter_async_context(context)
            await self._run_session(read_stream, write_stream, get_session_id)

        await self.session.initialize()
Depending on the server type (stdio or streamable-http), the connection manager either:
Starts a subprocess and communicates via
stdio, orEstablishes a streaming HTTP session.
If we use a streamable HTTP server, _run_session handles the setup:
 async def _run_session(self, read_stream, write_stream, get_session_id):
        session = await self.exit_stack.enter_async_context(ClientSession(read_stream, write_stream))
        self.session = session
        await session.initialize()
        if get_session_id:
            session_id = get_session_id()
            if session_id:
                print(f"Session ID: {session_id}")
This method builds the actual session over a streamable transport, calls initialize, and logs the session ID if available—handy for debugging or audit trails.
Once the session is active, the ConnectionManager exposes several convenience methods that wrap the MCP protocol calls:
    @opik.track(name="get-mcp-tools", type="general")
    async def get_mcp_tools(self):
        return await self.session.list_tools()

    @opik.track(name="call-tool", type="tool")
    async def call_tool(self, function_name, function_args):
        return await self.session.call_tool(
                function_name, arguments=dict(function_args)
            )

    @opik.track(name="get-prompt", type="general")
    async def get_prompt(self, name, args):
        return await self.session.get_prompt(name, args)
These are the building blocks that let the LLM access real-world tools and get structured instructions from the MCP Host.
At the end of the app's lifecycle, we close the exit stack to ensure all sessions and subprocesses are terminated properly:
    @opik.track(name="cleanup", type="general")
    async def cleanup_all(self):
        await self.exit_stack.aclose()
Now we understand how ConnectionManager handles sessions and server communication.
Let’s shift focus back to the MCPHost, where the real review workflow comes together.
Once our connection manager is initialized, we can walk through the core logic of the MCPHost class, which implements the three major steps we saw earlier.
The first thing we need is a system prompt that tells the LLM what kind of review we want it to generate. This is done in the get_system_prompt method:
    @opik.track(name="get-system-prompt", type="general")
    async def get_system_prompt(self, name, args) -> str:
        if not self.connection_manager.is_initialized:
            raise RuntimeError("ConnectionManager is not initialized. Call initialize_all() first.")
        return await self.connection_manager.get_prompt(name, args)
Afterwards, the process_query method does the heavy lifting.
It first prepares the tools available from the MCP server and wraps them into the right format for Gemini:
    @opik.track(name="process-query", type="llm")
    async def process_query(self, query: str) -> str:
        if not self.connection_manager.is_initialized:
            raise RuntimeError("ConnectionManager is not initialized. Call initialize_all() first.")
        opik_context.update_current_trace(thread_id=self.thread_id)
        tools = await self.get_mcp_tools()
        config = types.GenerateContentConfig(
            temperature=0,
            tools=tools,
        )
        contents = [
            types.Content(
                role="user", parts=[types.Part(text=query)]
            )
        ]
With the tools and prompt prepared, we enter the reasoning loop:
MAX_LLM_CALLS = 5
llm_calls = 0
        while llm_calls < MAX_LLM_CALLS:
            try:
                # Step 1 - LLM pass
                response = self.client.models.generate_content(
                    model=self.model,
                    contents=contents,
                    config=config,
                )
            except Exception as e:
                logger.error(f"Error during LLM call #{llm_calls+1}: {e}")
                return f"[Error during LLM call: {e}]"
            llm_calls += 1
            contents.append(response.candidates[0].content)
            function_call_found = False

            # Step 2 - Parse the response and do the function calls if requested
            for part in response.candidates[0].content.parts:
                if getattr(part, "function_call", None):
                    function_call_found = True
                    function_call = part.function_call
                    try:
                        result = await self.connection_manager.call_tool(
                            function_call.name, dict(function_call.args)
                        )
                    except Exception as e:
                        logger.error(f"Error during tool call '{function_call.name}': {e}")
                        result = f"[Error during tool call: {e}]"
                    function_response_part = types.Part.from_function_response(
                        name=function_call.name,
                        response={"result": result},
                    )
            # Step 3 - Append tool responses to the conversation history if present
                    contents.append(types.Content(role="user", parts=[function_response_part]))

            # Step 4 - If no new function calls requested => return final review
            if not function_call_found:
                parts = response.candidates[0].content.parts
                text_result = "".join([p.text for p in parts if hasattr(p, 'text') and p.text])
                logger.info(f"Final response after {llm_calls} LLM calls: {text_result}")
                return text_result
logger.error("Maximum LLM call limit reached without a final answer.")
return None
We hard-code a maximum of 5 reasoning steps (MAX_LLM_CALLS = 5). This prevents infinite loops if the LLM gets stuck or keeps trying to call tools in a way that doesn't resolve the task. It’s a simple but important safety mechanism.
💡 Note: You could replace this whole loop with something like LangGraph and build a more expressive ReAct agent architecture. However, in our case we chose a minimal and focused loop so we can better control and observe LLM + tool interactions directly, without extra abstractions.
Now let’s break this loop down into four clear steps:
LLM Pass: The model is called with the current conversation and tool configuration. It returns a response, which may include plain text or a tool invocation.
Parse and Execute Tool Calls: The loop checks if the LLM requested any tool calls (
function_call). If so, the corresponding tool is invoked through theConnectionManager, and the result is captured.Append Tool Responses: If a tool was called, its result is wrapped in a Gemini-compatible format and added to the conversation history, allowing the LLM to incorporate it in the next pass.
Final Answer or Continue: If no tool call was made, we assume the model has completed its reasoning. The plain text parts are extracted and returned as the final review. If not, the loop continues.
Now that we have the final review generated by the LLM, we can move on to the final step: sending it to Slack. This is done via the call_tool method, which delegates tool execution to the ConnectionManager:
@opik.track(name="call-tool", type="tool")
async def call_tool(self, function_name: str, function_args: dict) -> Any:
    if not self.connection_manager.is_initialized:
        raise RuntimeError("ConnectionManager is not initialized. Call initialize_all() first.")
    return await self.connection_manager.call_tool(function_name, function_args)
So far we’ve seen how the reasoning loop drives the review process.
But for the loop to work, the model needs to know what tools exist and how to call them. That’s where the get_mcp_tools method comes in.
It prepares the tools earlier in the flow by pulling metadata from the MCP servers and converting it to Gemini’s expected format:
SKIPPABLE_PROPS = ["additional_properties", "additionalProperties", "$schema"]

def strip_additional_properties(schema: dict) -> dict[Any, dict] | list[dict] | dict | list:
    if isinstance(schema, dict):
        return {
            k: strip_additional_properties(v)
            for k, v in schema.items()
            if k not in SKIPPABLE_PROPS
        }
    elif isinstance(schema, list):
        return [strip_additional_properties(item) for item in schema]
    else:
        return schema

    @opik.track(name="get-mcp-tools", type="general")
    async def get_mcp_tools(self) -> list[Tool]:
        tools = await self.connection_manager.get_mcp_tools()
        return [
            types.Tool(
                function_declarations=[
                    {
                        "name": tool.name,
                        "description": tool.description,
                        "parameters": strip_additional_properties({
                            k: v
                            for k, v in tool.inputSchema.items()
                            if k not in SKIPPABLE_PROPS
                        }),
                    }
                ]
            )
            for tool in tools.tools
        ]
The strip_additional_properties helper ensures we remove extra keys (like $schema) that Gemini doesn't support.
🛠️ Why is this needed?
The Gemini LLM needs an exact schema for each tool: it must know the tool’s name, input argument types, and descriptions so it can decide whether and how to call them. This format gives it enough structure to reason about which tool to invoke, and with which arguments. It’s a bit verbose—but it’s also very flexible.
With our MCPHost logic in place, the next step is to start the servers and make sure they can communicate in the next section.
5. Observability with Opik
In any complex MCP setup, observability isn’t just a nice-to-have — it’s how you keep control when multiple components are running and interacting behind the scenes.
With Opik, observability is built into the process, giving every PR review run a clear, traceable story from start to finish.
Because MCP cleanly separates orchestration from execution, we track two Opik projects:
pr_reviewer_host: tracks coordination logic (webhooks, prompt fetch, planning).pr_reviewer_servers: tracks tool execution logic (GitHub, Asana, Slack).
If you don’t manually set OPIK_PROJECT, the system defaults to using predefined names. Additionally, just make sure to provide your OPIK_API_KEY so it can authenticate with your workspace.
Here’s how we wire Opik into the environment:
def configure() -> None:
    api_key = settings.OPIK_API_KEY
    project = settings.OPIK_PROJECT

    if api_key and project:
        try:
            client = OpikConfigurator(api_key=api_key)
            default_workspace = client._get_default_workspace()
        except Exception as e:
            logger.warning(f"Default workspace not found: {e}. Setting workspace to None and enabling interactive mode.")
            default_workspace = None

        os.environ["OPIK_PROJECT_NAME"] = project

        try:
            opik.configure(
                api_key=api_key,
                workspace=default_workspace,
                use_local=False,
                force=True,
            )
            logger.info(f"Opik configured successfully using workspace '{default_workspace}'")
        except Exception as e:
            logger.error(f"Opik configuration failed: {e}")
            logger.warning(
                "Couldn't configure Opik. There may be a problem with the OPIK_API_KEY, OPIK_PROJECT, or the Opik server."
            )
    else:
        logger.warning(
            "OPIK_API_KEY and OPIK_PROJECT are not set. Set them to enable prompt monitoring with Opik (powered by Comet ML)."
        )
This separation makes it easy to tell at a glance whether an issue is in the decision-making flow or buried in a specific MCP server’s API call.
Now let’s walk through how tracking works for both projects.
Tracking the Host
In the pr_reviewer_host project, we track the latency, input and output of the key methods used in the MCP Host, MCP Client and interaction with the Gemini API.
Let’s take a look at a method tracked with the @opik.track annotation:
    @opik.track(name="connect-to-server", type="general")
    async def connect_to_server(self, server_key: str):
        config = AVAILABLE_SERVERS[server_key]
        .....
Most are annotated with type="general" to capture logic-level operations (like server connections or tool orchestration), while type="llm" is used when prompting or reasoning with the model.
We also call opik_context.update_current_trace(thread_id=...) to thread trace continuity through async calls.
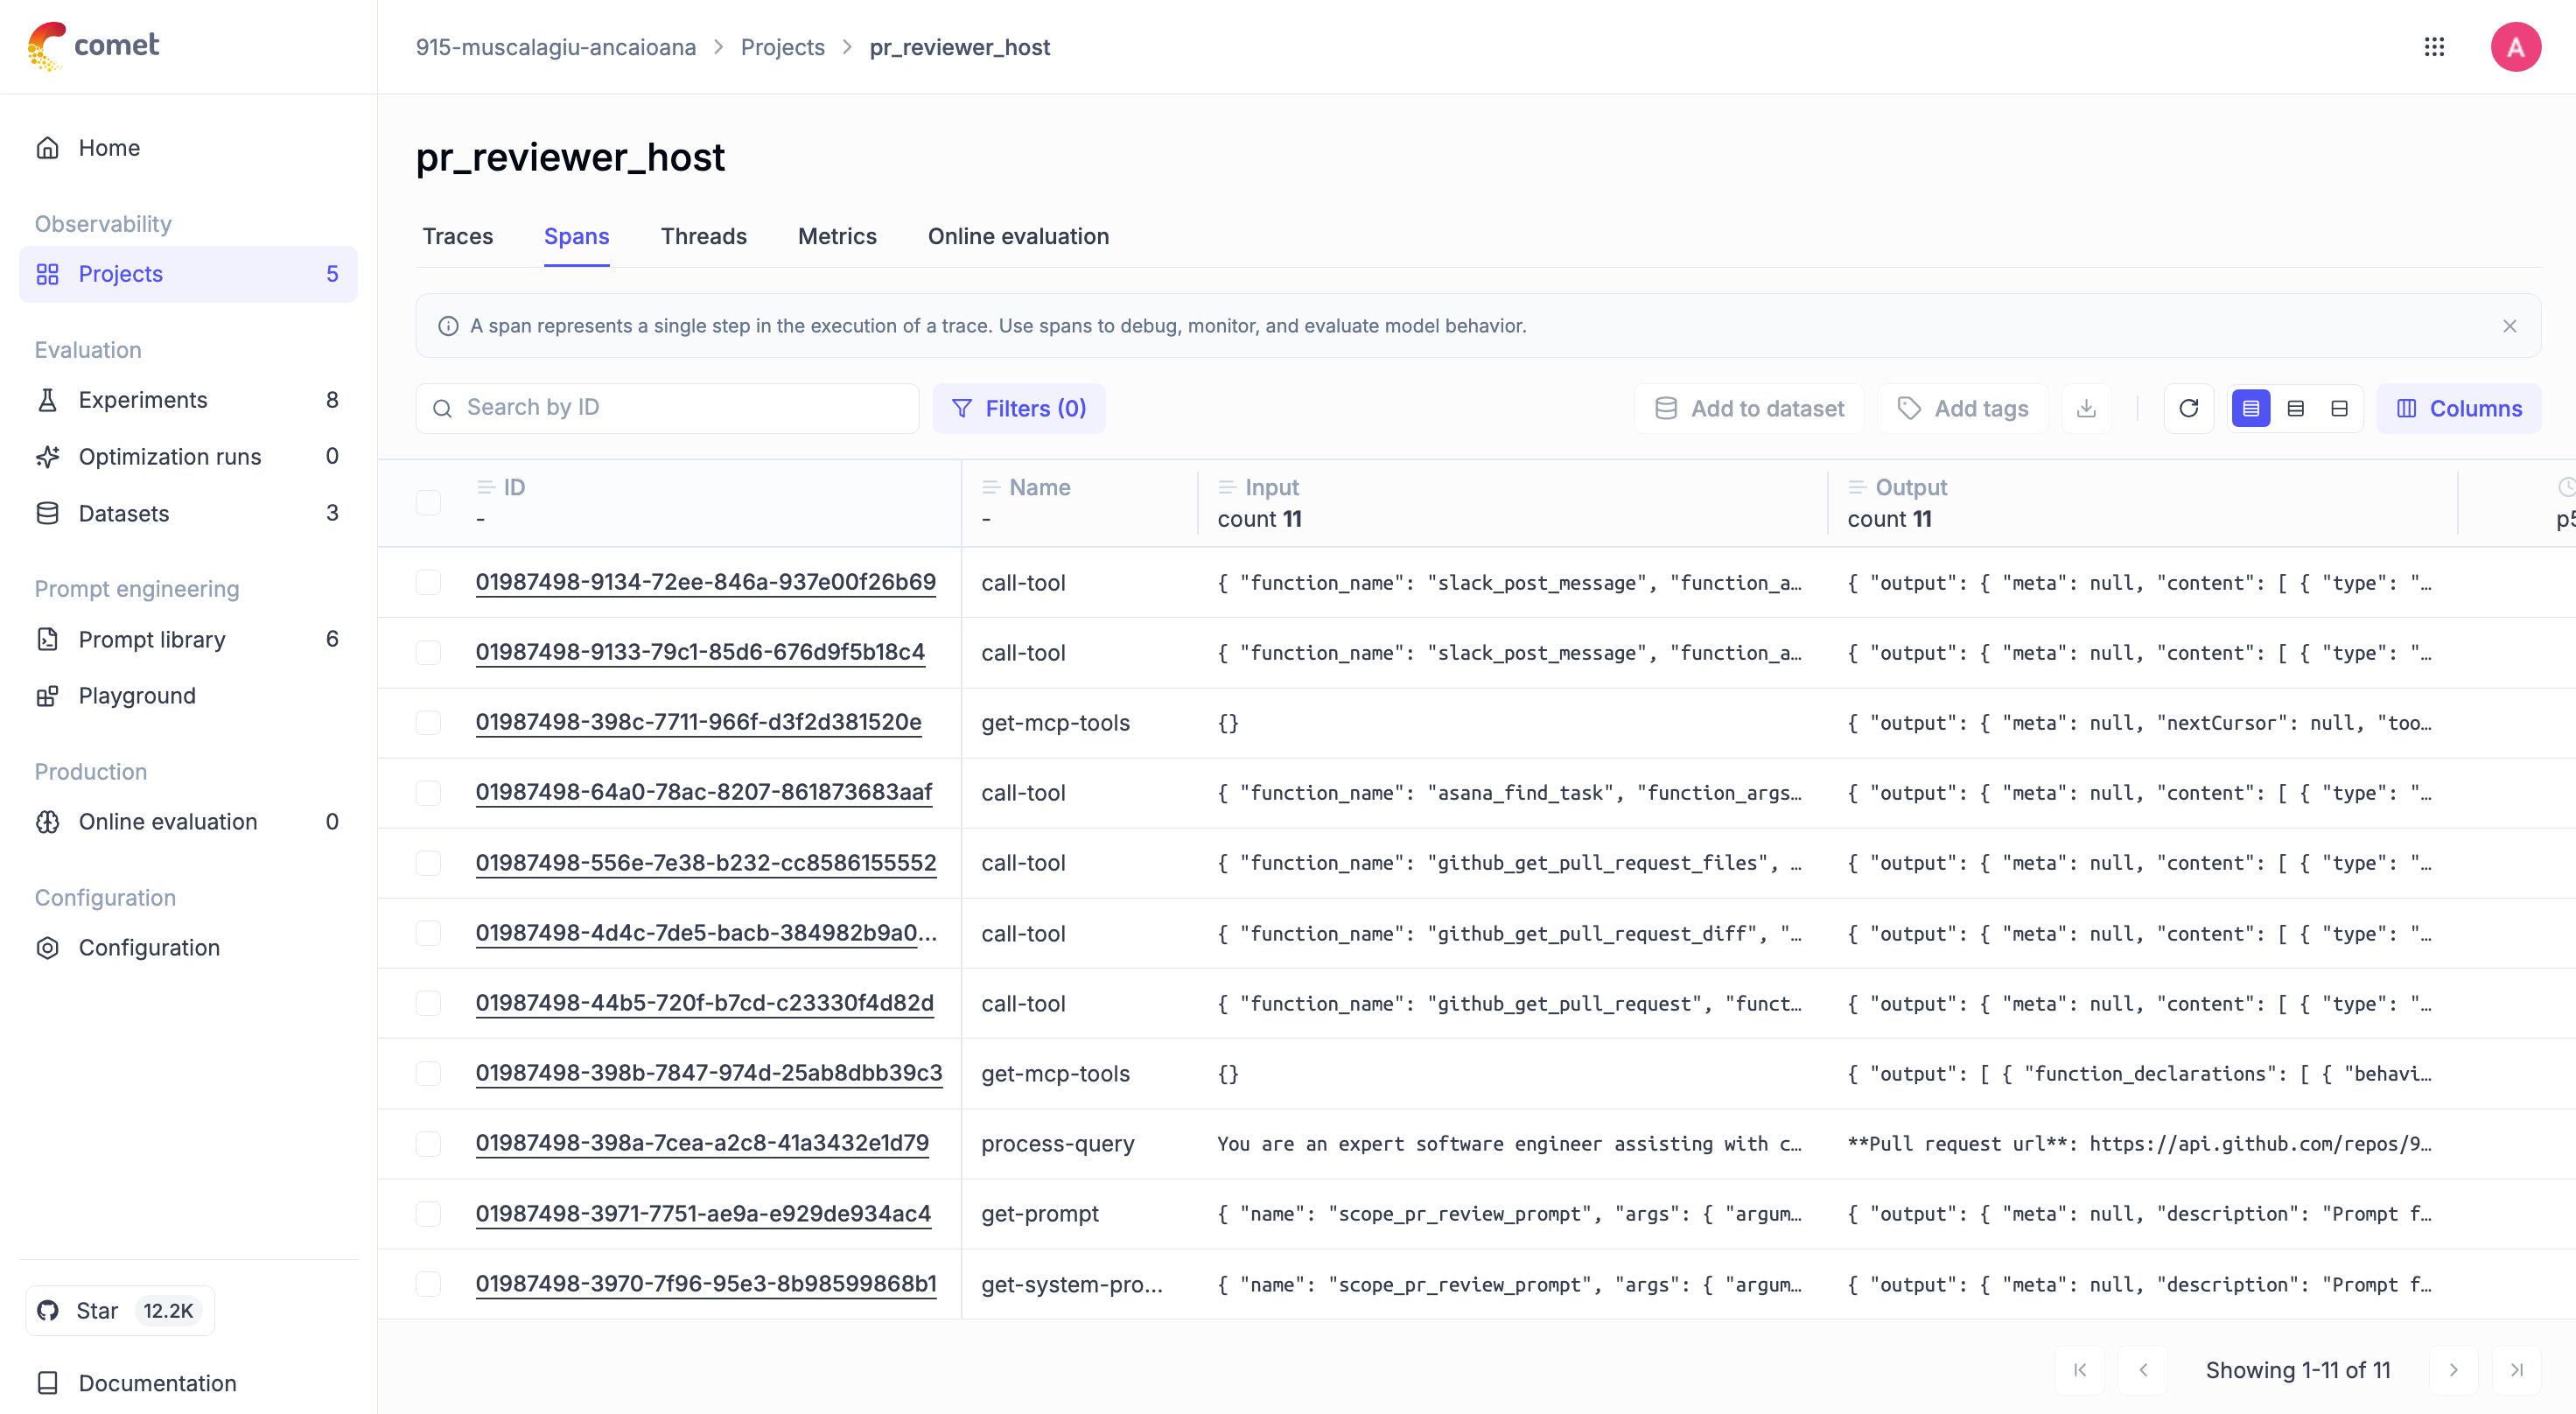
Now you can check the spans of the methods in Opik:
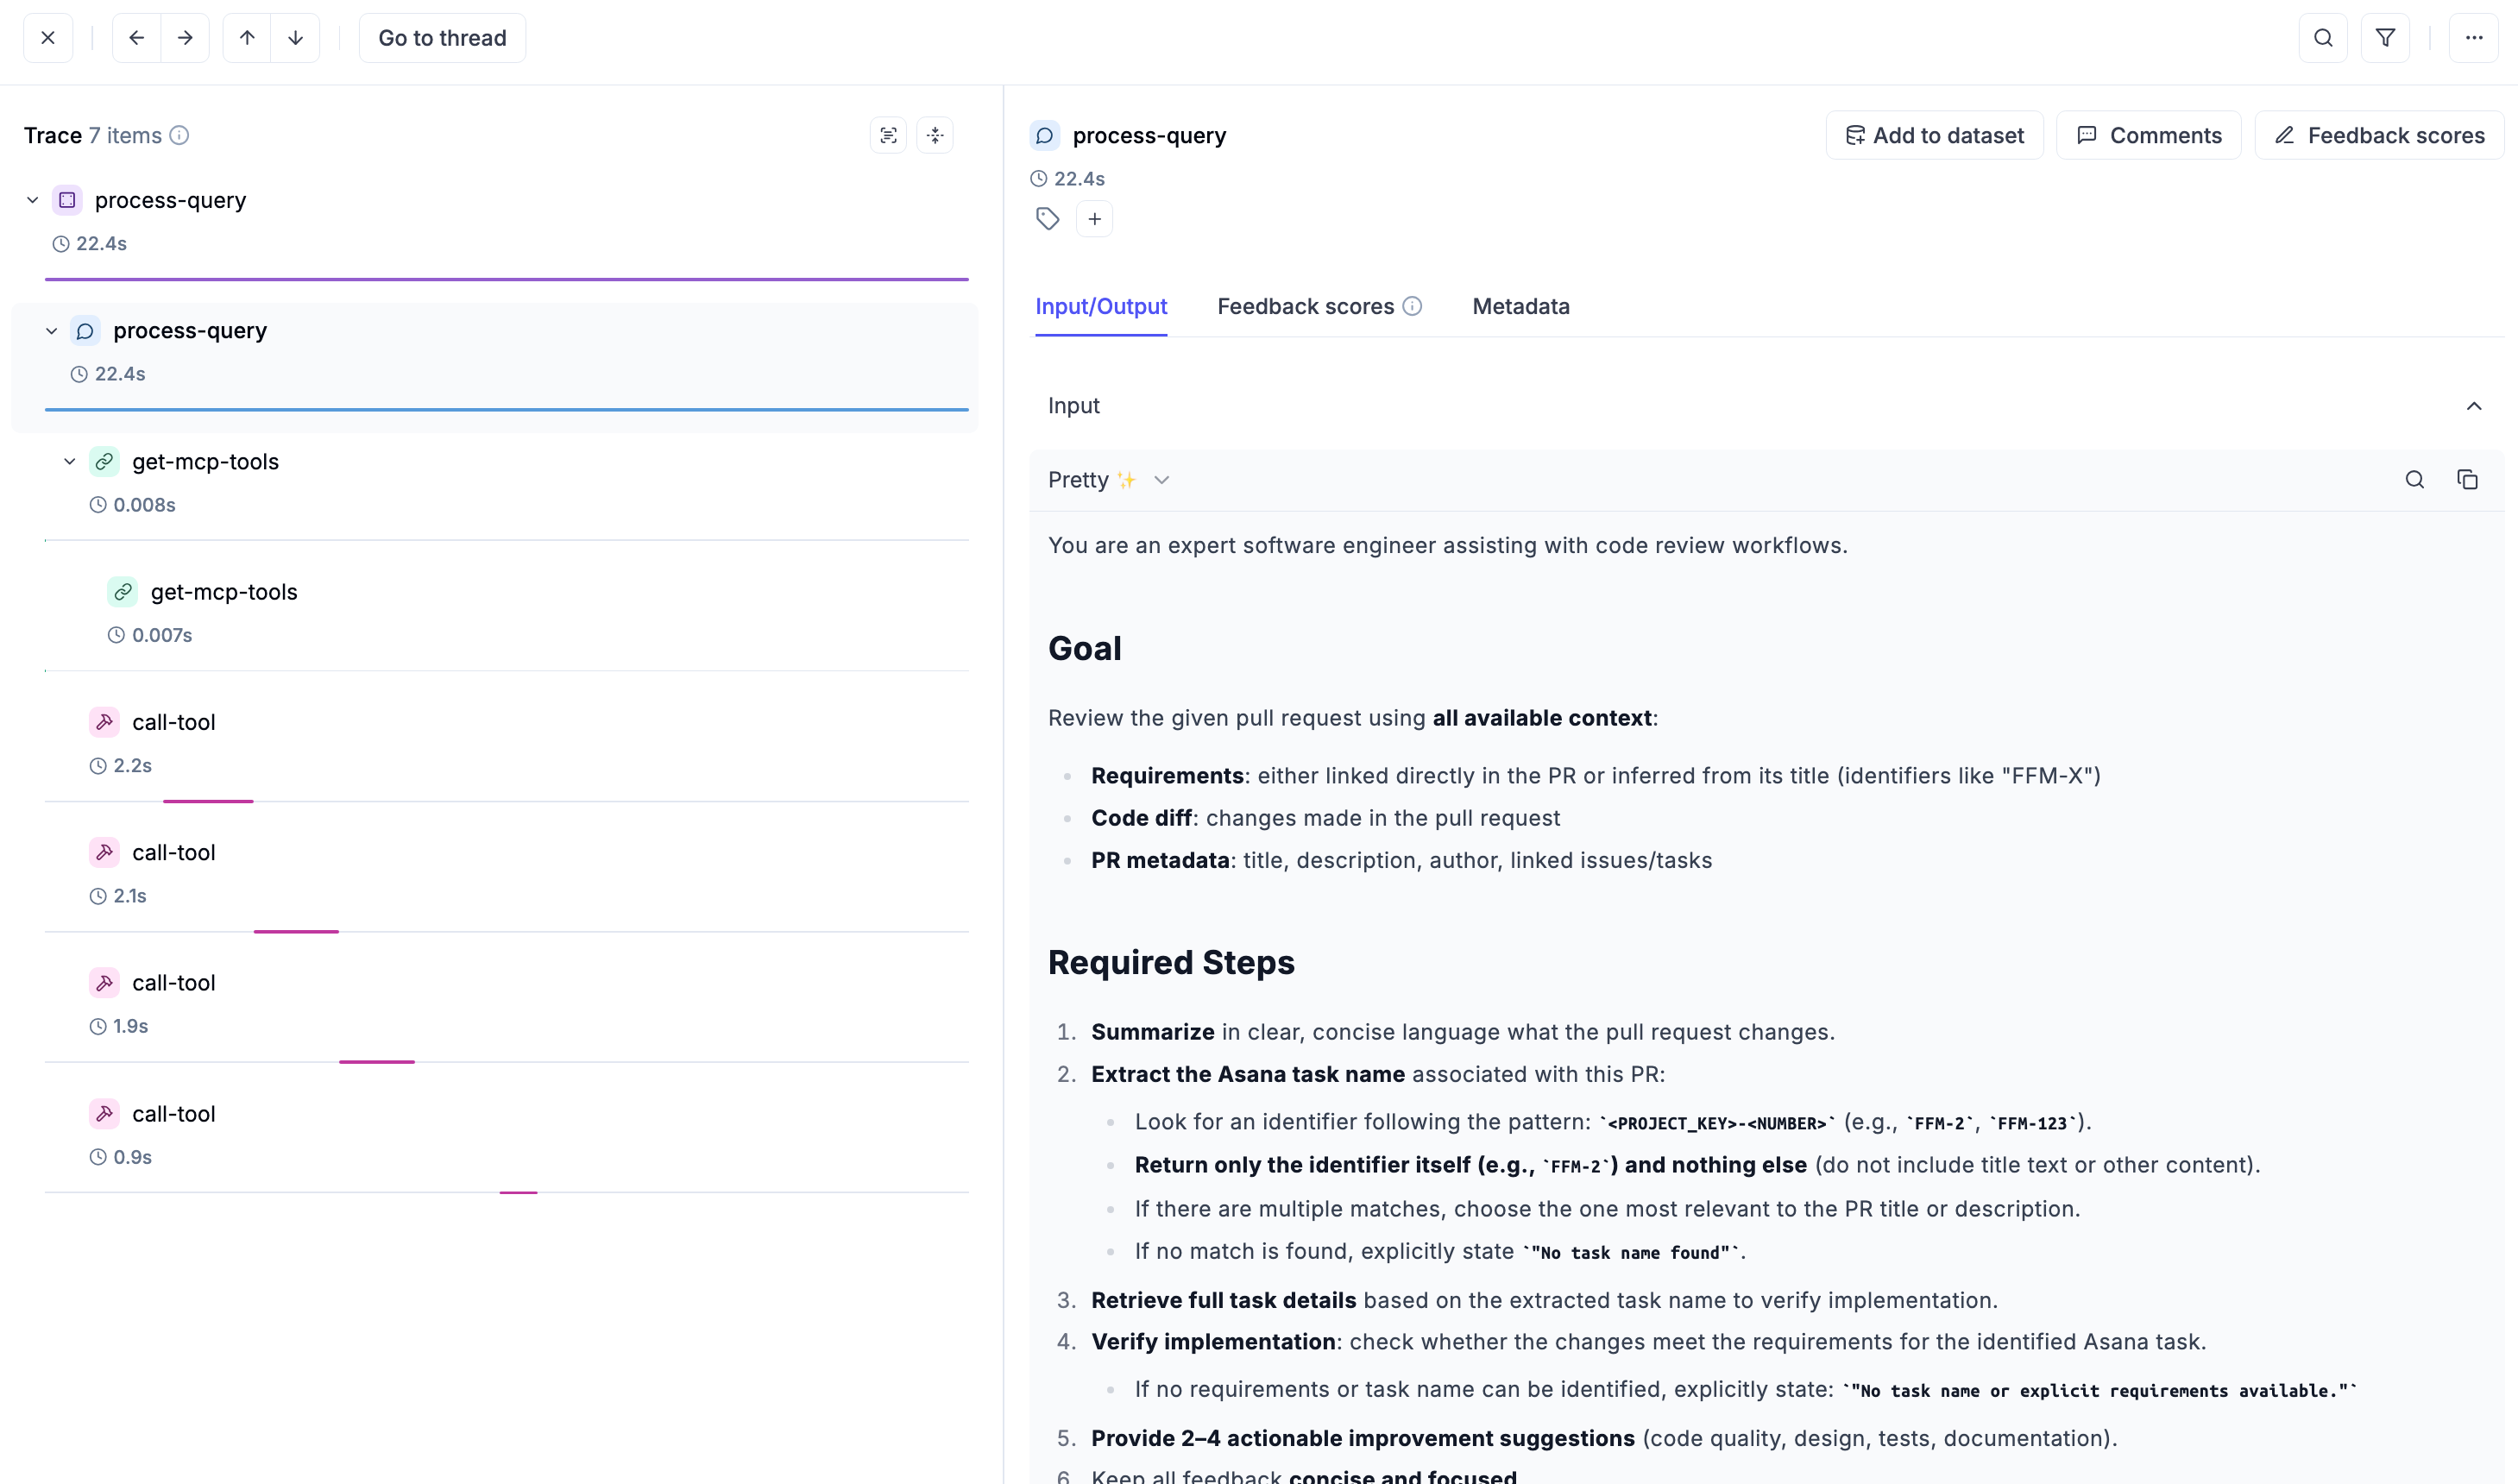
And inspect each of them to view the input/output and the latency recorded:
Later on we can go beyond observability and use Opik to track agent evaluations—like review quality scores or model decisions—right from the host layer.
Check out the Opik evaluation docs to get started.
Tracking the Global Server
In the pr_reviewer_servers project, we use @opik.track to monitor the actual tool executions triggered by the host. These include tasks like retrieving pull request diffs, querying Asana, and sending messages to Slack.
Each tool is annotated similarily with the methods in the MCP host:
@opik.track(name="asana-find-task", type="tool")
async def find_task(task_name: str):
We use type="tool" consistently across all custom servers—GitHub, Asana, Slack, and Agent Scope—to indicate atomic actions the agent can call.
As with the host, each server also sets opik_context.update_current_trace(...) to ensure tool-level traces remain connected to the overall review flow.
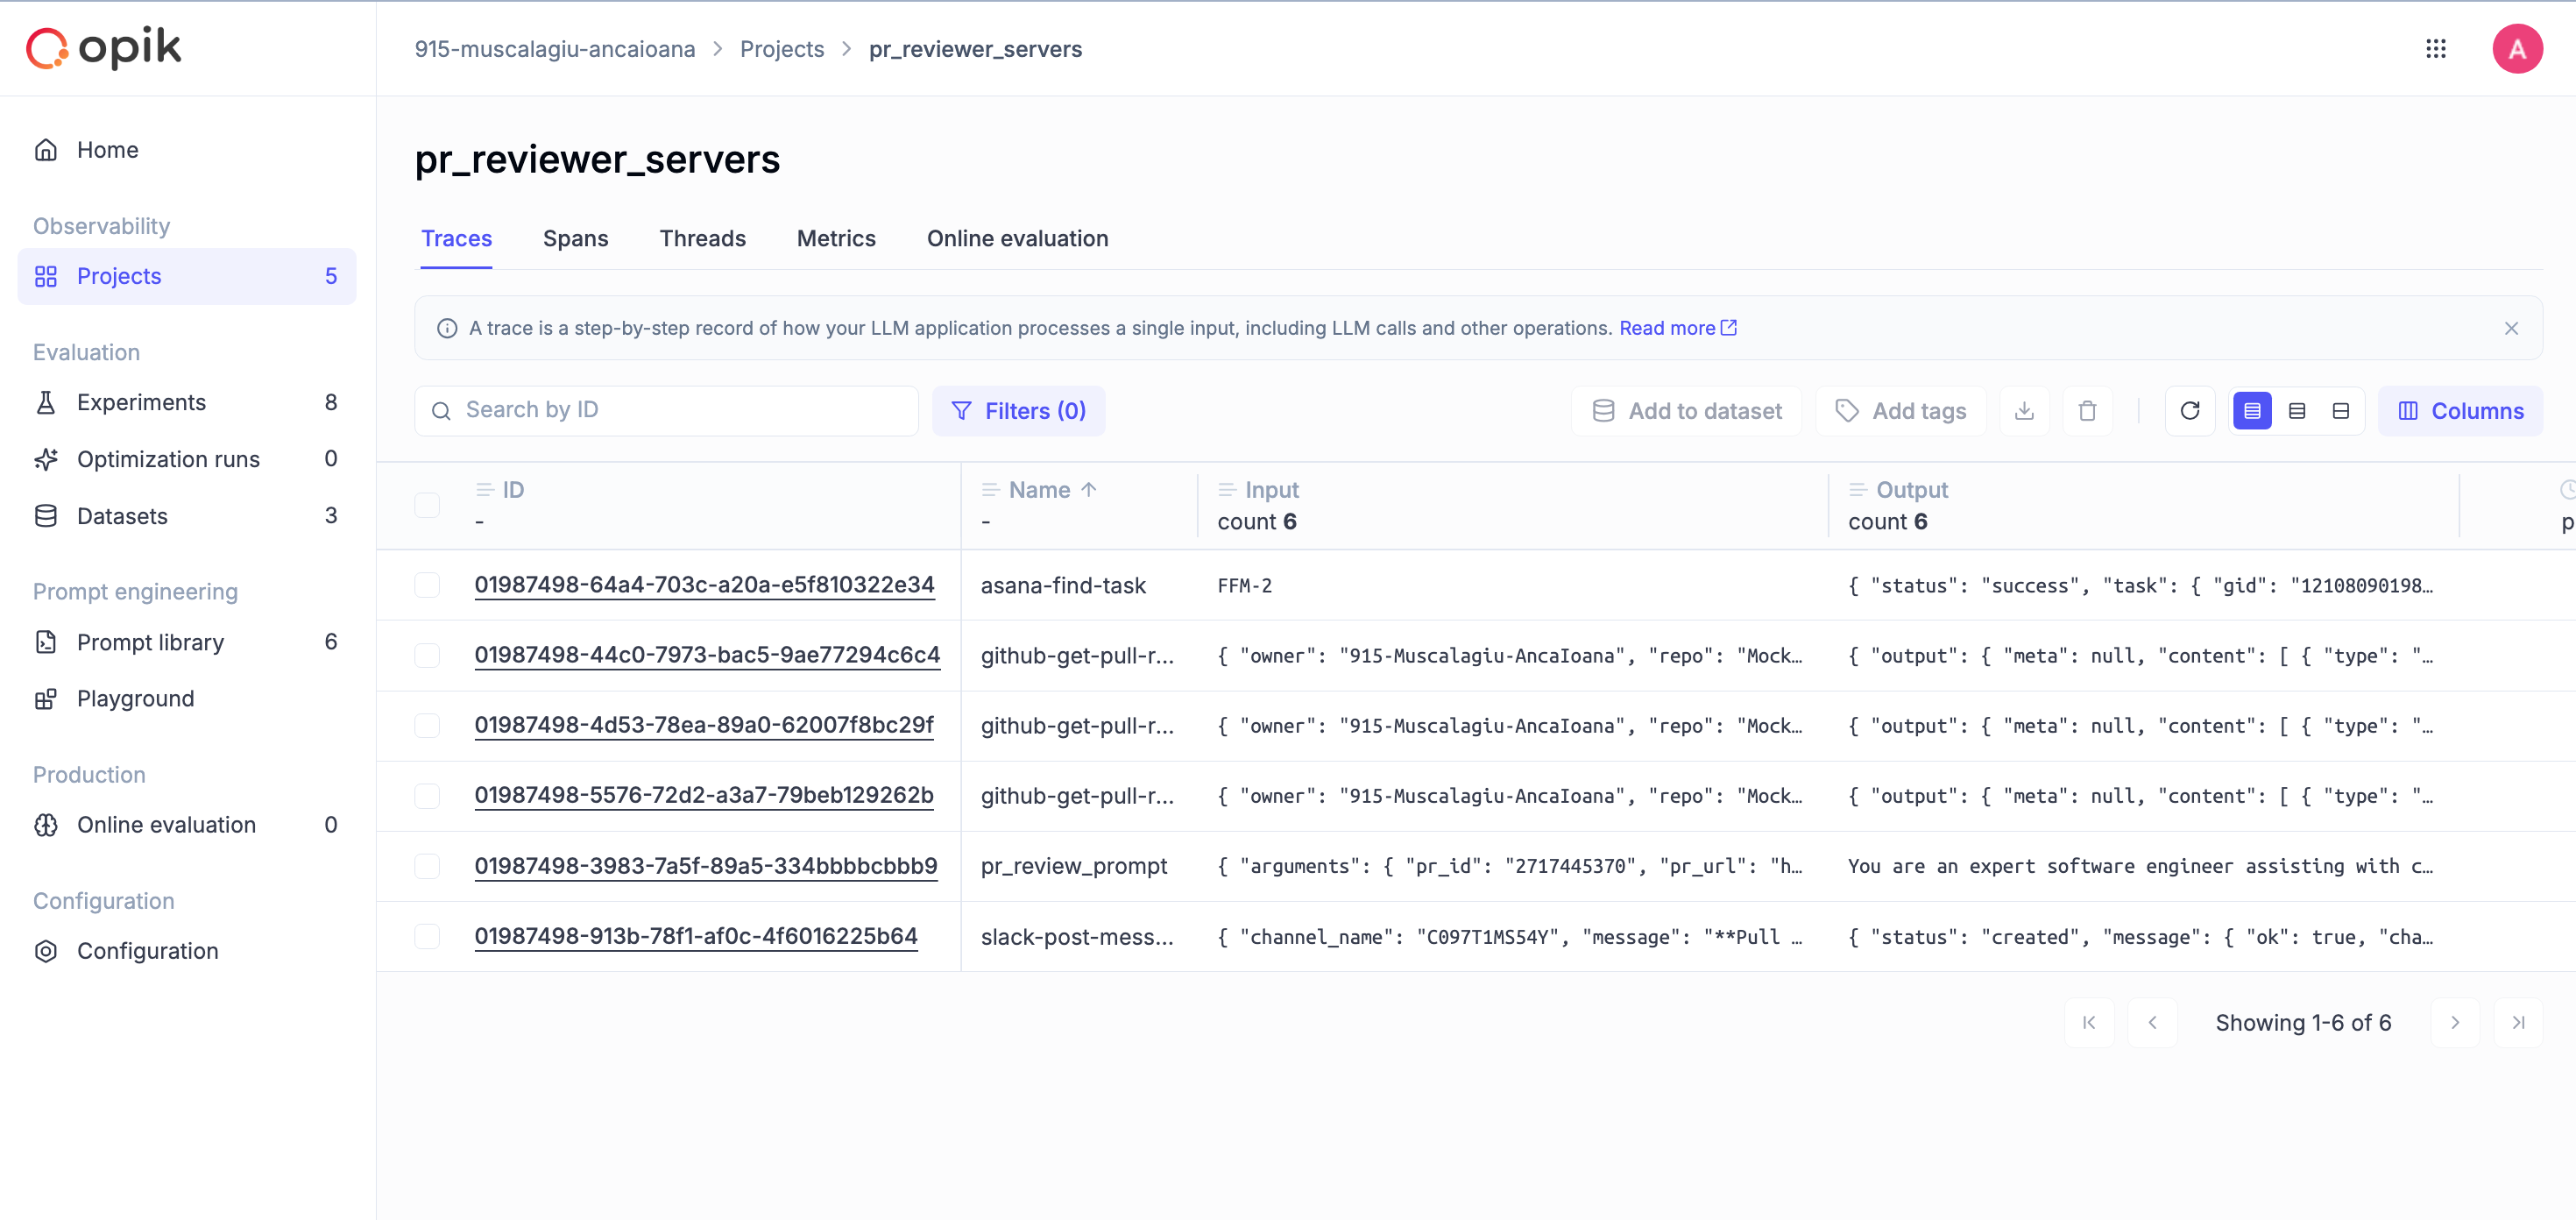
Check out the traces dashboard to see how each imported MCP server is called:
Versioning the prompts
Opik versions your prompts so you always know exactly what instructions the LLM received at any point in time—a must for debugging, auditing, and continuous improvement.
We previously introduced the VersionedPrompt class when wiring up the Agent Scope MCP Server. Let’s zoom in on how versioning actually works inside it:
  def _init_opik_prompt(self):
        try:
            self._opik_prompt = opik.Prompt(name=self.name, prompt=self._template)
        except Exception as e:
            logger.warning(
                f"Opik prompt versioning unavailable for '{self.name}': {e}. Using local template."
            )
            self._opik_prompt = None
We try to register the prompt with Opik using its name and template. If successful, it’s versioned automatically. If not (e.g. bad key or no network), we fall back to the local version and log a warning.
This isn’t happening just under the hood, you can actually get a clear view of it in the Prompt library dashboard:

On the left, you see the selected prompt version in full.
On the right, there’s a commit history that looks and feels almost like Git for prompts. Each entry is timestamped and lets you track exactly how your prompt has evolved over time.
That way, every review run is tied to the exact prompt version used—even if the template changes later.
6. Running the code end-to-end
Now it’s time to run the full system.
Start both apps by navigating to their respective folders—first pr-reviewer-mcp-servers, then pr-reviewer-mcp-host.
In each folder, run:
make runOnce the host is running, expose it with ngrok and register the public URL as a webhook in your GitHub repo. Full setup instructions are in the pr-reviewer-mcp-host README.
That’s it — your LLM-powered PR reviewer is live, listening for pull requests and firing back smart feedback like it’s part of the team.
Before we wrap, let’s see it in action.
In this demo, we open a pull request for implementing the Asana task FFM-2.
The moment the PR goes live, our MCP Host kicks in — fetching context from GitHub and Asana, running the review through the LLM, and posting a clean, actionable summary straight into the Slack channel:
8. Conclusion
We’ve gone from imagining what an AI-powered developer workflow could look like to seeing exactly how to wire one together with MCP.
The PR Reviewer Assistant isn’t just a demo, it’s a blueprint for any AI system that needs to pull context, reason, and act across platforms.
In the next (and last) lesson, we’ll zoom out from MCP specifics and explore different agent architectures — and see how this same use case could run inside the host using alternative patterns.
Check out the full codebase for the PR reviewer here:
📖 Or continue reading with lesson 3 from the series. Enjoy!
Whenever you’re ready, there are 3 ways we can help you:
Perks: Exclusive discounts on our recommended learning resources
(books, live courses, self-paced courses and learning platforms).
The LLM Engineer’s Handbook: Our bestseller book on teaching you an end-to-end framework for building production-ready LLM and RAG applications, from data collection to deployment (get up to 20% off using our discount code).
Free open-source courses: Master production AI with our end-to-end open-source courses, which reflect real-world AI projects and cover everything from system architecture to data collection, training and deployment.
References
Decodingml. (n.d.). GitHub - decodingml/enterprise-mcp-series. GitHub. https://github.com/decodingml/enterprise-mcp-series
Ghadab, Sofiane. (2025, May 11). Beyond Claude: Using OpenAI and Google Gemini Models with MCP Servers. Medium. https://thesof.medium.com/beyond-claude-using-openai-and-google-gemini-models-with-mcp-servers-eea3bc218ed0
Comet ML. (n.d.). Evaluate your LLM application | Opik Documentation. Comet. https://www.comet.com/docs/opik/evaluation/evaluate_your_llm
Comet ML. (n.d.). Open‑source LLM Evaluation Platform | Opik by Comet. Comet. https://www.comet.com/site/products/opik/
Images
If not otherwise stated, all images are created by the author.
Love it! Great work on this one, Anca (as usual).
This is awesome as a Dev myself