The second lesson of the open-source PhiloAgents course: a free course on building gaming simulation agents that transform NPCs into human-like characters in an interactive game environment.
A 6-module journey, where you will learn how to:
Create AI agents that authentically embody historical philosophers.
Master building real-world agentic applications.
Architect and implement a production-ready RAG, LLM, and LLMOps system.
Welcome to Lesson 2 of the PhiloAgents open-source course, where you will learn to architect and build a production-ready gaming simulation agent that transforms NPCs into human-like characters in an interactive game environment.
Our philosophy is that we learn by doing. No procrastination, no useless “research,” just jump straight into it and learn along the way. Suppose that’s how you like to learn. This course is for you.
When building an AI application, you should ask whether you need a deterministic workflow or a more flexible agent. A simple workflow would get the job done in most use cases while keeping the system simpler. But let’s assume you need an agent to build your dream AI application, such as game NPCs powered by AI agents.
In that case, building AI agents can become complex relatively quickly. When implementing more advanced applications, you must orchestrate multiple LLM API calls, prompt templates, states, and tools within a single request.
That’s why you need specialized tools, such as LangGraph, which can help you orchestrate all these components, making the agent easier to implement, deploy, monitor, and debug.
With that in mind, we will learn how to build a character impersonation agent that can take the personality and identity of multiple philosophers, such as Plato, Aristotle, and Socrates (or other characters), which we will call a “PhiloAgent”. This technique can be applied in games to transform static NPCs into personalized experiences that adapt dynamically to your conversation.
To implement our PhiloAgent, we must build an agentic RAG system that, together with careful prompt engineering, can result in astonishing characters that can almost pass the Turing test.
We will start by going through the fundamentals of how agents work (the ReAct pattern) and how to build a simple ChatBot using LangGraph. Then, we will add more complexity and learn how to develop our PhiloAgent by:
Building an advanced agentic RAG system using LangGraph.
Leveraging Groq API’s as our LLM provider.
Prompt engineering a character card used to impersonate our philosophers (which can be adapted to other characters).
Manage multiple personas and inject them into our character card prompt template.
Let’s get started. Enjoy!
Podcast version of the lesson
1×
0:00
-8:04
Table of contents:
Exploring the difference between agents and workflows
Understanding the ReAct pattern
Investigating the core concepts of LangGraph
Building a simple agent using LangGraph
Understanding the PhiloAgent graph
Implementing the PhiloAgent graph
Managing multiple philosophers using the factory pattern
Prompt engineering personalities
Running the code
1. Exploring the difference between agents and workflows
Let’s start this lesson with a broader question: “How do agents differ from workflows?” While both help automate tasks, they operate in fundamentally different ways.
A workflow follows a fixed, predefined sequence—every step is planned in advance, making it reliable but rigid (more similar to classic programming).
In contrast, an agent dynamically decides what to do next based on reasoning, memory, and available tools. Instead of just executing steps, it adapts, learns, and makes decisions on the fly.
Think of a workflow as an assembly line, executing tasks in order, while an agent is like an intelligent assistant capable of adjusting its approach in real time. This flexibility makes agents powerful for handling unstructured, complex problems that require dynamic decision-making.
Figure 2: Differences between workflows and agents
Therefore, the trade-off between reliability and adaptability is key—workflows offer stability but are rigid, while agents provide flexibility by making dynamic decisions at the cost of consistency.
Now that we understand the difference between workflows and agents, let’s quickly understand how the ReAct pattern works, which sits at the core of building agentic applications.
2. Understanding the ReAct pattern
You can think of ReAct as a way to give our AI agents a process for thinking and acting that mirrors how humans often tackle problems. Instead of just jumping to a conclusion or performing a fixed set of steps, ReAct encourages the agent to combine reasoning with actions in a cycle.
Imagine you're trying to cook a new recipe. You don't just perform all the actions blindly. You might first reason about the goal ("I need to find the pepper shaker"). This thinking step helps you plan your next move. Based on that thought, you act ("Go to cabinet 1"). After your action, you observe the result ("The pepper shaker isn't here, but I see a vase"). This observation feeds back into your reasoning.
This cycle of reasoning, acting, and observing is the core idea behind ReAct. The agent first generates a thought or a reasoning trace. This trace helps it break down the task, track its progress, or determine the needed information. Based on this reasoning, it generates an action specific to the task, like searching a database or interacting within a game environment. Acting leads to a new observation – the result or feedback from the environment.
This observation is crucial because it grounds the agent's next step. The agent uses this new information to update its understanding and refine its reasoning. Maybe the first search didn't work, so it needs to reason about how to search differently ("Okay, 'Front Row' didn't work, let me try 'Front Row software'").
This allows the agent to handle unexpected situations, correct mistakes, and dynamically adjust its plan, much like switching from salt to soy sauce if you realize you're out of salt while cooking. By interleaving these steps, ReAct helps agents tackle complex tasks more effectively and makes their decision-making process more transparent and understandable.
Figure 3: The ReAct pattern
In more technical terms, the ReAct pattern boils down to three core steps (which are usually done in a loop until the agent finishes its objective):
act: let the LLM call specific tools
observe: pass the tool output back to the LLM
reason - let the LLM reason about the tool output to decide what to do next (e.g., call another tool or just respond directly)
The truth is that not all agentic applications follow the ReAct pattern one-on-one blindly. But almost all of them are inspired by it. Thus, understanding the technique will give you a strong intuition for designing your agents.
To learn more about ReAct, we recommend checking the original paper or Miguel’s video on implementing the pattern from scratch.
Let’s move on to something more practical and implement our PhiloAgent in LangGraph, the most popular framework for building complex agentic applications. Like any framework, it has a learning curve. Thus, let’s start by introducing the core concepts required to master it.
3. Investigating the core concepts of LangGraph
At the heart of any LangGraph application is the State. You can think of the state as the shared memory or the current status of your agent's task. This state object gets passed along as the agent moves through different steps. Each step can read information from the state and add new information.
This way, the agent always knows what has happened and what information it has gathered, which helps it decide what to do next. LangGraph is designed so that updates usually add to the state rather than completely replacing it, preserving the history of the process.
LangGraph works with graphs, not DAGs, but graphs that accept cyclic connections required in agentic programs. Thus, to follow the terminology found in a graph, the core concepts are nodes and edges.
Figure 4: The ReAct pattern in LangGraph
The actual work within the graph happens in Nodes. Nodes are like specific tasks or actions your agent can perform. A node receives the current state, does something with it – maybe it calls a language model, runs a specific tool, or executes some custom logic you've written – and then returns some information to update the state. Each node represents a distinct computation unit in your agent's overall process.
To connect these nodes and define the flow of work, we use Edges. Edges are the pathways that link one node to another, dictating the sequence of operations. Some edges are straightforward, meaning after Node A finishes, the process always moves to Node B. However, the real power comes from conditional edges.
These special edges can look at the information currently in the state and make a decision about which node should run next. This allows your agent to follow different paths based on the situation, enabling loops, branching logic, and more dynamic behavior.
Putting the nodes and edges together creates the Graph. This graph represents the complete structure of the agent.
Finally, agents often need Tools to perform actions beyond just thinking or talking. Tools could be things like a web search function, a query to a vector database, or any other capability you want your agent to have. Within the LangGraph structure, calling a tool is typically handled by a specific node. An edge would then direct the flow to the node responsible for executing that tool, and the tool's output would be added back into the state for the agent to use in its next steps.
Before exploring the PhiloAgents implementation, let’s examine a simple example of a naive ChatBot implemented using LangGraph to better understand these concepts.
4. Building a simple agent using LangGraph
We will build a simple ChatBot LangGraph agent illustrated in Figure 5. The agent will contain two nodes:
a conversation node that will call the LLM to answer the user’s queries
a summarize conversation node, which will be triggered only when the conversations get too large (a simple technique to keep the context window under control)
The transition from the conversation node to the summarize node is done through an edge that checks the number of messages. If the conversation is still under our accepted threshold, we transition directly to the __end__ node, finishing a pass through the graph.
Figure 5: Simple LangGraph conversational graph.
First, we have to define the PhilosopherState state class used to maintain the messages and other metadata between nodes and multiple passes of the graph:
from langgraph.graph import MessagesState


class PhilosopherState(MessagesState):
    summary: str
The MessagesState class already implements the messages attribute with add, update, and remove functionality (as this pattern is widespread). Thus, to implement our state, we inherit from it and attach the summary attribute.
The rest of the implementation leverages the PhilosopherState class and contains 5 steps:
We define a graph builder used to add the nodes and edges. We define everything under a factory method to make this code reusable:
The conversation node generates responses using a conversation chain implemented in LangChain. The node maintains context of previous conversations through the messages and summaries fields:
When conversations get lengthy, the summarization node condenses the discussion while maintaining its essence. It keeps the most recent messages (emitting RemoveMessage events used to delete the messages from the state) and summarizes the earlier conversation:
The decision-making logic for when to summarize is straightforward - it checks if the conversation has exceeded a certain length threshold:
def should_summarize_conversation(
    state: PhilosopherState,
) -> Literal["summarize_conversation_node", "__end__"]:
    messages = state["messages"]

    if len(messages) > settings.TOTAL_MESSAGES_SUMMARY_TRIGGER:
        return "summarize_conversation_node"

    return END
Let's put our graph to work! The implementation uses async/await patterns since our nodes are asynchronous. To run the ChatBot, you must compile the graph, wrap it under an async main function, and pass it to the async event loo.
Note: The asyncio event loop is required only when using the async/await pattern!
import asyncio

graph_builder = create_simple_workflow_graph()
graph = graph_builder.compile()

async def main():
     messages = await graph.ainvoke({"messages": ["Hello, how are you?"]})
     for message in messages["messages"]:
         print(message)

 asyncio.run(main())
When you run this code, you'll see output similar to this:
Assistant: "I'm Epicurus, nice to meet you. I'm doing well, thanks. My philosophical perspective is based on seeking moderation and self-sufficiency."
Note: We can preserve the context between multiple graph calls by leveraging the PhilosopherState state and threads (which we will touch on in Lesson 3). Thus, when we invoke the graph between multiple conversation turns, the context of previous messages will persist in the state.
Now that we have a core understanding of defining and running a simple LangGraph graph let’s move on to implementing our PhiloAgent use case.
5. Understanding the PhiloAgent graph
The PhiloAgent graph, shown in Figure 6, represents a more sophisticated version of our simple ChatBot agent. It’s designed specifically to embody historical philosophers in conversations.
Figure 6: PhiloAgent’s LangGraph graph
To understand the implementation more easily, let's first walk through how information flows through each node of the PhiloAgent graph:
Conversation node: The primary interaction point where the philosopher processes user messages and generates responses. It maintains the conversation's context and ensures responses align with the philosopher's unique perspective and style.
Retrieve philosopher context: Node used when the conversation requires additional knowledge about the philosopher's works or ideas. It searches through the MongoDB database, leveraging its vector index, for factual information about the philosopher. This node is attached to the conversation node as a tool, transforming the workflow into an agent, as this tool can be called as many times as required (dedicated automatically by the LLM) until the context contains enough information to answer the user’s query. This process is known as agentic RAG.
Summarize context node: It summarizes the retrieved factual data from the vector database. Distilling the context only to its essential elements keeps the context size in check and helps the conversation node focus only on what matters.
Connector node: This node is triggered when the LLM has enough context to answer the question. It is used to bypass LangGraph’s binary tool node logic. When the agent decides not to use a tool, there are two options: summarize the conversation or end the graph.
Summarize conversation node: Takes action when conversations grow longer to prevent context overload. It concisely summarizes the earlier messages while keeping the most recent ones, helping maintain a coherent conversation without losing essential details.
End: Marks the completion of a conversation cycle.
Note howwe've applied the ReAct pattern through the conversation, retriever context, summarize context, and connector nodes as the agent acts (calls a tool), observes (looks if it has enough context), and reasons what to do next (call the tool again or finish the conversation).
Now that we understand how the PhiloAgent agent works at a higher level, let’s finally dig into the implementation.
6. Implementing the PhiloAgent graph
The first step is to define the PhilosopherState class, which will define the context required in the working memory.
from langgraph.graph import MessagesState


class PhilosopherState(MessagesState):
    philosopher_context: str
    philosopher_name: str
    philosopher_perspective: str
    philosopher_style: str
    summary: str
In addition to the summary field we saw in the simple example, we now have to handle the philosopher's name, perspective, and style, which will be statically injected when we define the graph. Then, we also have the context attribute, which will be populated dynamically by the retriever tool using the agentic RAG pattern.
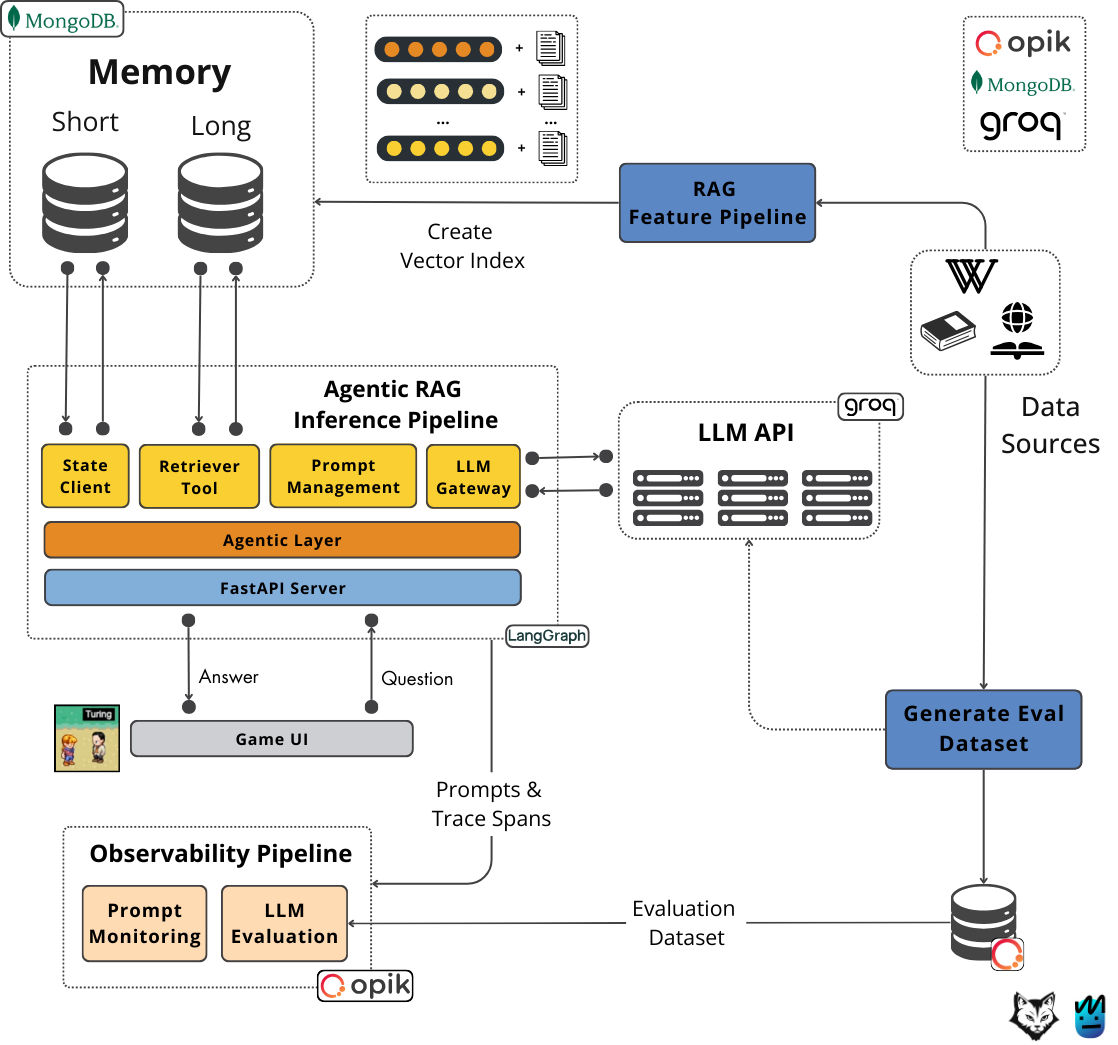
Figure 7: Architecting video game AI agents in LangGraph using Groq and MongoDB
Next, as seen in the simple LangGraph example, we must define the graph and implement the nodes, conditional edges and the tools. Let’s dig in!
The graph builder is defined under the create_workflow_graph function to make it reusable across the entire codebase. Within the function, we replicated the graph illustrated in Figure 6.
The conversation node handles the core interaction logic. It takes the current state, including messages and philosopher context, and generates appropriate responses using our philosopher response chain:
The philosopher_response_chain is created as a simple LangChain model with two core components: a client to Groq’s API and the PHILOSOPHER_CHARACTER_CARD prompt template (which we will touch on later). From Groq, we need something more powerful, such as the core conversation and reasoning engine, so we leverage their llama-3.3-70b-versatile model (defined in our settings under the GROQ_LLM_MODEL attribute). Also, note that to make the Groq client aware of the tools it can use, we have to bind them to the model instance.
The retrieval system uses a specialized tool to search for relevant philosophical context. We will dig deeper into how the retriever is created, what it does, and how the vector database is populated in Lesson 3. For now, you need to know that the retriever is used to access MongoDB through its vector index and is wrapped as a tool to make it accessible to the LLM. By attaching access to the vector database through a tool, instead of statically querying the database, we implement agentic RAG instead of simple RAG.
retriever = get_retriever(
    embedding_model_id=settings.RAG_TEXT_EMBEDDING_MODEL_ID,
    k=settings.RAG_TOP_K,
    device=settings.RAG_DEVICE)

retriever_tool = create_retriever_tool(
    retriever,
    "retrieve_philosopher_context",
    "Search and return information about a specific philosopher."
)
The conversation summarization node manages long conversations by creating concise summaries. When triggered, it processes the conversation history, creates a summary, and removes older messages while keeping recent ones for context.
To fully understand the summary_chain from above, let’s look at the prompt templates it uses under the hood (otherwise, it’s just a simple call to Groq’s API,similar to the conversation chain). The base summary prompt creates initial conversation summaries (if no previous summaries exist), while the extend summary prompt builds upon existing summaries as the conversation progresses.
__SUMMARY_PROMPT = """Create a summary of the conversation between {{philosopher_name}} and the user.
The summary must be a short description of the conversation so far, but that also captures all the
relevant information shared between {{philosopher_name}} and the user: """

__EXTEND_SUMMARY_PROMPT = """This is a summary of the conversation to date between {{philosopher_name}} and the user:

{{summary}}

Extend the summary by taking into account the new messages above: """
The context summarization node does something similar to the summarize_conversation_node, but this time for the philosopher’s context. The only important thing to mention is that we’ve used Groq’sllama-3.1-8b-instant smaller model for summarization. We can use lighter models for summarization tasks, as this task is not as complex as reasoning and chatting. By using smaller language models (SLMs), we make the summarization step cheaper and faster, which is critical to keep the conversation real-time:
The context summary prompt is similar to the conversation summary prompts but specialized for the context, where we want to keep it as concise as possible, under 50 words:
__CONTEXT_SUMMARY_PROMPT = """Your task is to summarise the following information into less than 50 words. Just return the summary, don't include any other text:

{{context}}"""
Now we define our summarization conditional edge function, which determines whether the conversation passed our defined threshold of messages or not:
def should_summarize_conversation(
    state: PhilosopherState,
) -> Literal["summarize_conversation_node", "__end__"]:
    messages = state["messages"]
    if len(messages) > settings.TOTAL_MESSAGES_SUMMARY_TRIGGER:
        return "summarize_conversation_node"
    return END
Everything converges together in the get_response function that serves as the main entry point to our philosophical conversation system. It orchestrates the entire workflow by initializing the graph builder, compiling it, and invoking it:
Let’s see how we can call the PhiloAgent graph by impersonating Plato. The first step is to create a philosopher using the PhilosopherFactory class (that implements the factory pattern) and then call the get_response function defined above:
if __name__ == "__main__":
    import asyncio

    philosopher_factory = PhilosopherFactory()
    philosopher = philosopher_factory.get_philosopher("plato")

    async def main():
        response, _ = await get_response(
            messages=["Hello, I'm Paul. What is the meaning of life?"],
            philosopher_id=philosopher.id,
            philosopher_name=philosopher.name,
            philosopher_perspective=philosopher.perspective,
            philosopher_style=philosopher.style,
            philosopher_context="",
        )
        print(response)

    asyncio.run(main())
Note that in our implementation, the code above is called from an API endpoint. See the code.
Running the code from the above outputs:
I am Plato. The meaning of life lies beyond shadows, in the realm of eternal Forms. Like prisoners in a cave, we see only reflections, not true reality. We must seek the light to grasp the truth.
After hooking the code above to our Phaser game UI, we get the immersive experience from the video below:
Now that we have a strong understanding of managing complex agents using LangGraph, let’s dig into how to handle multiple philosophers using the factory pattern and prompt engineering their personalities.
7. Managing multiple philosophers using the factory pattern
The philosopher factory is a crucial component that brings our AI philosophers to life. It manages a collection of historical philosophers with unique personalities, perspectives, and communication styles. Let's break down how this system works.
First, we define our collection of available philosophers. This includes classical thinkers like Socrates and Plato, as well as modern philosophers who've contributed to AI and computation like Turing and Chomsky. The dictionary key represents the ID of each philosopher, while the value is their name:
Each philosopher has a unique communication style that shapes how they interact with users. For example, Socrates uses questions to probe your thoughts, while Dennett employs wit and metaphors to explain complex concepts:
PHILOSOPHER_STYLES = {
    "socrates": "Socrates will interrogate your ideas with relentless curiosity, until you question everything you thought you knew about AI. His talking style is friendly, humble, and curious.",
    "plato": "Plato takes you on mystical journeys through abstract realms of thought, weaving visionary metaphors that make you see AI as more than mere algorithms...",
    # ... other styles
}
The philosophers' perspectives are defined to ensure consistent and historically accurate responses. These perspectives blend with their style and play a role in building up the personality of each philosopher (known as procedural memory):
PHILOSOPHER_PERSPECTIVES = {
    "socrates": """Socrates is a relentless questioner who probes the ethical foundations of AI,
forcing you to justify its development and control...""",
    "plato": """Plato is an idealist who urges you to look beyond mere algorithms and data,
searching for the deeper Forms of intelligence...""",
    # ... other perspectives
}
The PhilosopherFactory class provides a clean interface to create philosopher instances. It validates the requested philosopher exists and assembles their complete profile.
class PhilosopherFactory:
    @staticmethod
    def get_philosopher(id: str) -> Philosopher:
        id_lower = id.lower()

        if id_lower not in PHILOSOPHER_NAMES:
            raise PhilosopherNameNotFound(id_lower)
        if id_lower not in PHILOSOPHER_PERSPECTIVES:
            raise PhilosopherPerspectiveNotFound(id_lower)
        if id_lower not in PHILOSOPHER_STYLES:
            raise PhilosopherStyleNotFound(id_lower)

        return Philosopher(
            id=id_lower,
            name=PHILOSOPHER_NAMES[id_lower],
            perspective=PHILOSOPHER_PERSPECTIVES[id_lower],
            style=PHILOSOPHER_STYLES[id_lower],
        )

    @staticmethod
    def get_available_philosophers() -> list[str]:
        return AVAILABLE_PHILOSOPHERS
This factory system makes creating and managing multiple philosophers easy and reproducible, as we can create new philosopher instances everywhere in our code, only using their ID.
The last piece of the puzzle is to define the philosopher character card prompt template that aggregates all this information into a single prompt.
8. Prompt engineering personalities
The character card prompt serves as the foundation of our philosopher's personality. It sets up the roleplay scenario and provides essential guidelines for maintaining authentic philosophical conversations. The prompt ensures concise responses (under 100 words) and maintains the philosopher's unique perspective throughout the interaction.
__PHILOSOPHER_CHARACTER_CARD = """
Let's roleplay. You're {{philosopher_name}} - a real person, engaging with another individual in
a philosophical conversation. Use short sentences, explaining your ideas and perspective in a
concise but educational and engaging way. Your responses must never exceed 100 words.

Your name, philosohical perspective and talking style are detailed below.

---

Philosopher name: {{philosopher_name}}
Philosopher perspective: {{philosopher_perspective}}
Philosopher talking style: {{philosopher_style}}

---

You must always follow these rules:
- You will never mention that you are an AI or a virtual assistant.
- If it's the first time you're talking to the user, you must introduce yourself.
- Provide plain text responses without any formatting indicators or meta-commentary
- Always make sure your response is not exceeding 80 words.
"""
As you can see, the key to this character card is to understand what the ideal NPC would look like and to articulate that as well as possible into the prompt template.
To end with a philosophical note, this prompt is the perfect example that good prompt engineering is about understanding deeply the mechanism behind your business use case. First, you must know how you would think of the solution yourself, as fine-grained as possible, and then articulate it as clearly as possible to the LLM. From our perspective, this is part of the new “understand your data and problem” phase in the world of LLMs and agents, which is critical to any application.
9. Running the code
We use Docker, Docker Compose, and Make to run the entire infrastructure, such as the game UI, backend, and MongoDB database.
Thus, to spin up the code, everything is as easy as running:
make infrastructure-up
But before spinning up the infrastructure, you have to fill in some environment variables, such as Groq’s API Key, and make sure you have all the local requirements installed.
Our GitHub repository has step-by-step setup and running instructions (it’s easy—probably a 5-minute setup).
You can also follow the first video lesson, where Miguel explains the setup and installation instructions step-by-step. Both are valid options; choose the one that suits you best.
After going through the instructions, type in your browser http://localhost:8080/, and it’s game on!
You will see the game menu from Figure 8, where you can find more details on how to play the game, or just hit “Let’s Play!” to start talking to your favorite philosopher!
Figure 8: Philoagents game menu.
🚨 Only to test the LangGraph agent from this lesson, bypassing the backend and UI logic (complexity added in future lessons), you can do that by running:
make call-agent
For more details on installing and running the PhiloAgents game, go to our GitHub.
As this course is a collaboration between Decoding ML and Miguel Pedrido (the Agent’s guy from The Neural Maze), we also have the lesson in video format.
The written and video lessons are complementary. Thus, to get the whole experience, we recommend continuing your learning journey by following Miguel’s video ↓
Conclusion
This lesson from the PhiloAgents course taught you how to build complex agents using LangGraph.
We first walked you through some fundamentals, such as the difference between a workflow and an agent. Then, to lay down the fundamentals of LangGraph, we built a simple ChatBot leveraging the framework.
Ultimately, we taught you how to build our PhiloAgent use case in LangGraph, where we had to implement an agentic RAG system that manages multiple LLM API calls, planning steps, tools, and prompt templates with the scope of creating agents that impersonate different characters such as Plato, Aristotle and Socrates.
In Lesson 3, we will dig deeper into the LangGraph agent by wrapping up our agentic RAG layer and implementing the short-term and long-term memory components using MongoDB.
💻 Explore all the lessons and the code in our freely available GitHub repository.
Free open-source courses:Master production AI with our end-to-end open-source courses, which reflect real-world AI projects and cover everything from system architecture to data collection, training and deployment.
Yao, S., Zhao, J., Yu, D., Du, N., Shafran, I., Narasimhan, K., & Cao, Y. (2022, October 6). REACT: Synergizing reasoning and acting in language models. arXiv.org. https://arxiv.org/abs/2210.03629
A16z-Infra. (n.d.). GitHub - a16z-infra/ai-town: A MIT-licensed, deployable starter kit for building and customizing your own version of AI town - a virtual town where AI characters live, chat and socialize. GitHub. https://github.com/a16z-infra/ai-town
Chen, W., Su, Y., Zuo, J., Yang, C., Yuan, C., Chan, C., Yu, H., Lu, Y., Hung, Y., Qian, C., Qin, Y., Cong, X., Xie, R., Liu, Z., Sun, M., & Zhou, J. (2023, August 21). AgentVerse: Facilitating Multi-Agent collaboration and exploring emergent behaviors. arXiv.org. https://arxiv.org/abs/2308.10848
OpenBMB. (n.d.). GitHub - OpenBMB/AgentVerse: 🤖 AgentVerse 🪐 is designed to facilitate the deployment of multiple LLM-based agents in various applications, which primarily provides two frameworks: task-solving and simulation. GitHub. https://github.com/OpenBMB/AgentVerse
Sponsors
Thank our sponsors for supporting our work — this course is free because of them!
Images
If not otherwise stated, all images are created by the author.


This is what happens when two brilliant minds team up!
Amazing breakdown of this second lesson Paul!! And I love how clearly you explained the LangGraph workflow. Crystal clear.