A journey where you will have the chance to learn to implement an LLM application using agents, advanced Retrieval-augmented generation (RAG), fine-tuning, LLMOps, and AI systems techniques.
In this lesson, we will learn to transform noisy documents collected from Notion and the Internet (through crawling) into a high-quality instruction dataset. This will allow us to fine-tune an LLM specialized in summarizing documents (an everyday use case for real-world projects).
Forget the ready-to-use datasets you see in online tutorials. In real-world projects, success comes from rolling up your sleeves and working through the messy process of preparing your own custom data.
Process that requires building a robust pipeline that collects, cleans, structures, and augments your data (as we started to explore in Lesson 2). This process ensures you have a high-quality and diverse set of samples to fine-tune your LLM (or any other AI model).
While implementing the dataset generation pipeline, we will learn the following:
Design an ideal dataset generation pipeline.
Determine the right number of samples needed for fine-tuning LLMs.
Explore popular LLM summarization techniques.
Manage and monitor your pipelines using an MLOps framework like ZenML.
Visualize your data with histograms for deeper insights.
Generate an instruct summarization dataset using distillation techniques.
Filter and refine your samples to keep only high-quality data during distillation.
Augment your dataset for maximum variability and impact.
Extract data from MongoDB.
Load the generated dataset into your Hugging Face data registry.
Figure 1: The architecture of the Second Brain AI assistant powered by RAG, LLMs and agents.
Let’s get started. Enjoy!
Podcast version of the lesson
1×
0:00
-16:34
Table of contents:
Designing the ideal dataset generation pipeline
Determining the necessary sample size for fine-tuning LLMs
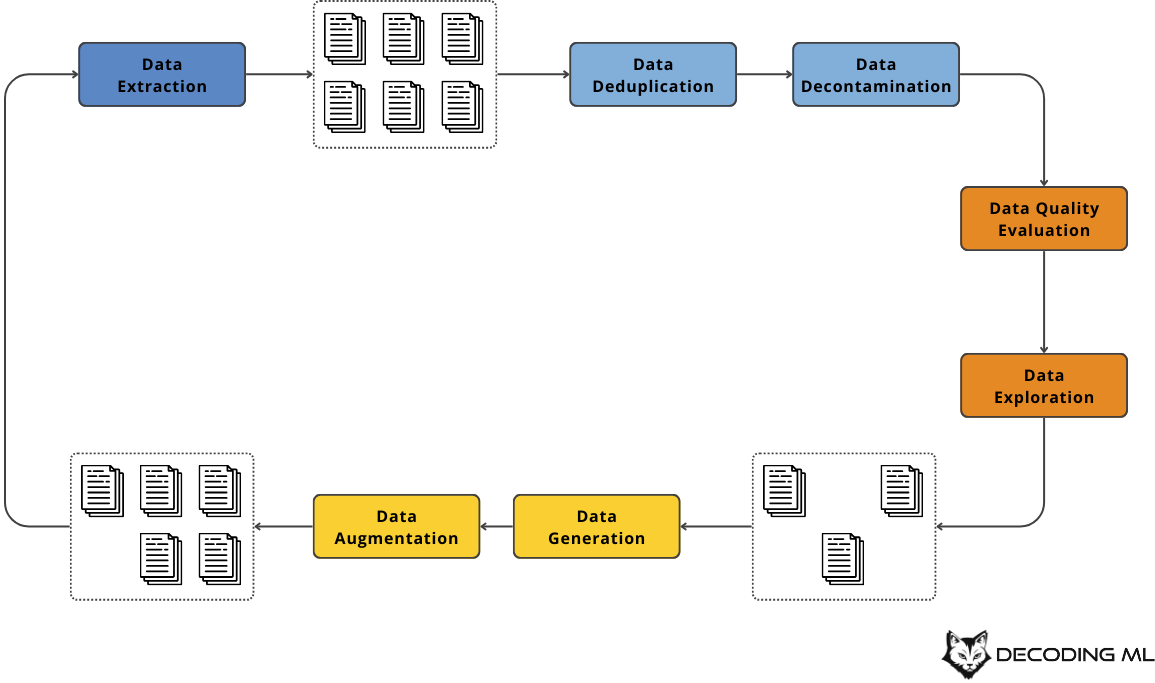
1. Designing the ideal dataset generation pipeline
You want a dataset that balances accuracy, diversity, and complexity so your model can handle various real-world tasks.
The flow starts with data extraction, where you want to collect data that fits your use case, even if it’s not already in the ideal format. For example, we will start with our Notion collections and crawled documents. However, they are not in the required format for fine-tuning. Thus, we must transform them until they match the instructions and answers we need.
Once you’ve gathered enough resources, we move to the data deduplication phase. If you have the same or similar samples within your dataset, the model may memorize rather than generalize or make your fine-tuning more costly, as similar samples won’t add new information but just make the training longer. For example, you can find exact duplicates using hash functions like MD5 or SHA-256 and near-duplicates with algorithms like MinHash. You can also leverage semantic similarity through vectors built from methods like Word2Vec, GloVe, or BERT to drop examples that say the same thing with slightly different wording.
Figure 2: The ideal pipeline for creating instruction datasets for fine-tuning LLMs - Image inspired by Maxime Labonne’s chapters from the LLM Engineer’s Handbook
Next, you move to data decontamination, where you split your dataset into the standard train, validation and test splits while ensuring no samples leak between them.
If pruning is done right, it ensures your dataset doesn’t accidentally leak your evaluation or test samples into the training set. For example, you can merge all your splits before data deduplication to ensure you don’t have any overlaps. This reduces data leakage risks that will produce artificially high scores during evaluation.
Next, you move to data quality evaluation, removing low-quality samples by applying rules based on heuristics or LLMs. You might drop anything too short or too long, filter out specific keywords that suggest spam or other unwanted text, and verify that everything follows a consistent format. These steps help you keep only the data that meets your set standards so your model doesn’t waste time on messy, irrelevant material.
Other methods for evaluating data quality include having humans manually review instructions and responses or letting an LLM act as a judge (similar to what we did in Lesson 2). Human evaluations can be thorough but expensive and slow, while model-based evaluations are faster but sometimes miss specific nuances. You usually want to calibrate both so they reach similar conclusions, which tells you that your automatic filters and guidelines align with human intuition.
Now, we move to data exploration, where you use straightforward approaches like charts and word clouds to see if your tokens are concentrated around particular topics or rely on clustering to automatically group samples that share key themes.
It’s also common to expand your dataset if you find gaps in your dataset you can’t fill with your initial data sources — a process known as data generation. For example, you might generate your own instructions and answers using prompt engineering or distill them from a more knowledgeable model. This can be a quick fix for corner cases that don’t often appear in regular samples but are essential for your application.
If you already have basic samples but need more variety, you can leverage data augmentation methods to evolve existing instructions or rewrite their answers to be more complex, trickier, or in-depth. This boosts the quantity and quality of your dataset without starting from scratch.
In this lesson, we will focus on creating an instruct summarization dataset to specialize an LLM, such as Llama 3.1 8B, in generating high-quality summarization without relying on general-purpose models like GPT.
Thus, let’s explore how many training samples we need and what popular techniques are used to generate summaries with LLMs.
2. Determining the necessary sample size for fine-tuning LLMs
When fine-tuning summarization LLMs, the optimal amount of data depends on the intended use case and the model’s scope.
General-purpose models, similar to GPT-like LLMs, often rely on vast amounts of data—sometimes millions of samples—to capture a broad spectrum of topics and nuances.
In contrast, task-specific models that focus on a particular function, such as summarization, can be fine-tuned with a much smaller dataset, typically ranging from 100 to 100,000 samples. Notably, while even 100 rows may yield reasonable results, optimal performance is often observed once a dataset reaches around 300 rows, as long as the samples are accurate, diverse, and sufficiently complex.
Domain-specific applications, where specialized knowledge is essential, can have even more varied data requirements. These often require a tailored mixture of samples that address both the task and the domain's unique vocabulary and structure.
The line between task-specific and domain-specific fine-tuning is sometimes blurred. For example, a model fine-tuned for financial risk assessment could be considered task-specific (since it focuses on evaluating risk) and domain-specific (given its need to incorporate and understand specialized financial regulations, market terminology, and economic indicators).
Ultimately, regardless of the type, the quality of your dataset is the most critical aspect. Thorough data cleaning and careful preparation are key to maximizing the benefits of fine-tuning.
Before architecting our system, the last step is understanding the most popular LLM summarization techniques.
For an in-depth walkthrough over the topics from sections 1 and 2, you can consider buying our LLM Engineer’s Handbook, where my co-author, Maxime Labonne, wrote an entire chapter on this:
Three primary techniques often stand out when crafting summaries from a large corpus: stuffing, map-reduce, and clustering.
The stuffing method adds everything into a single LLM prompt, making it ideal for smaller datasets that fit comfortably in the model’s context window.
However, a map-reduce approach becomes more effective once the text grows beyond that limit. This approach involves splitting the corpus into smaller chunks, summarizing each chunk in parallel (the “map” step), and then combining or synthesizing those summaries into a final cohesive result (the “reduce” step).
Beyond these approaches lies clustering, which groups similar documents before summarization. By creating thematic clusters, you can capture overarching patterns in the data and generate summaries for each cluster. This offers a deeper, topic-focused perspective than standard stuffing or map-reduce techniques might overlook.
Figure 3: LLM summarization strategies
In this lesson, we will specialize the LLM for stuffing, but it’s important to know that if you plan to work with longer documents, you should add examples of map-reduce or clustering techniques within the instruction dataset to make the LLM more versatile.
Finally, let’s architect our dataset generation pipeline to create a summarization instruct dataset based on our Notion and crawled documents.
When architecting a dataset generation pipeline, you want a smooth flow of data from the moment you fetch raw documents until you end up with a high-quality, curated collection of instruct samples.
What’s the interface of the pipeline?
The dataset generation pipeline loads raw documents stored in MongoDB (both Notion and crawled resources sit in the same collection).
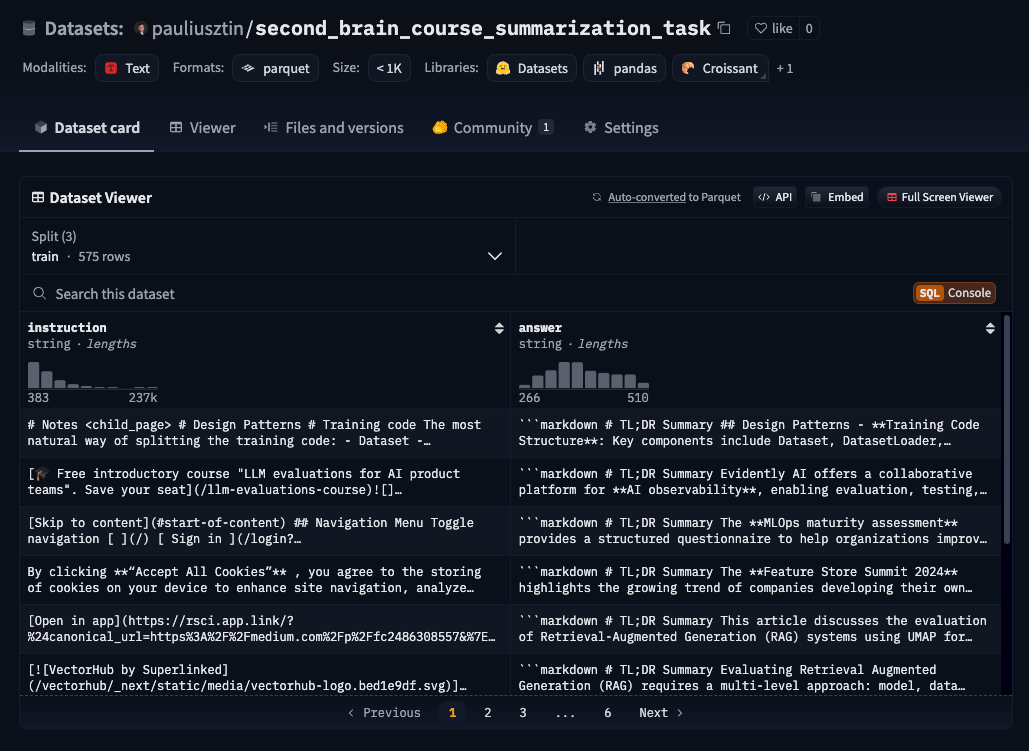
Next, it outputs the generated dataset to a Hugging Face data registry, which can easily be explored, versioned, and shared with the training pipeline. For example, this is how our pauliusztin/second_brain_course_summarization_task dataset looks on Hugging Face.
Why is the dataset generation pipeline a “feature pipeline”?
A solid convention for labeling each pipeline is based on its output artifacts. In our case, the output artifact is a dataset used for fine-tuning. As the dataset inputs the LLM, it contains features of the LLM. Hence, it’s a feature pipeline.
What does the pipeline’s architecture look like?
We will try to follow the steps from Section 1 (Understanding the ideal dataset generation pipeline) of the article. But as the name suggests, that is the “ideal” scenario. In practice, you can’t be too rigid. Thus, you might have to skip some steps or move them around to fit your use case.
We begin by extracting the raw documents from MongoDB. Next, we use histograms to explore each document's content length and quality scores. This initial exploration helps us examine the distributions, which in turn helps us choose the right threshold for filtering “noisy” documents.
Figure 4: The architecture of the summarization instruct dataset generation pipeline
Now, we can move to our filtering step, where we take out noisy documents. This step ensures we feed only high-value content to our summarization algorithms by removing documents with low-quality scores or those lacking enough descriptive content.
From there, the system generates a summary for each document, leveraging LLMs and prompt engineering techniques. But note that we have only ~400 documents. After filtering, we ended up with only ~250 high-quality documents. Thus, we run multiple summaries for each document to augment our dataset and capture different angles or variations when fine-tuning your models. This might involve running the same document through summarization with altered temperature or other parameters to produce diverse yet consistent summaries.
After creating those summaries, we apply a second layer of filtering that doesn’t meet our length and quality criteria. Only the most solid summaries proceed to the next step, where we split the data between the training, evaluation and testing splits and package them into a final dataset.
Ultimately, we push the summarization instruct dataset to the Hugging data registry.
The pipeline will be managed by ZenML, an MLOps framework that will help us orchestrate, run, track, and version the pipeline with its configs and output artifacts.
Enough with laying down theory and system design principles. Let’s examine our data and then dive into the code.
5. Looking at the crawled data
We will work with the data we crawled in Lesson 2. As a quick reminder, we crawled all the links within our Notion databases to access all our references while doing RAG. Our final dataset combines all our Notion documents and the crawled resources into the same MongoDB collection.
Here is how one of our crawled documents, stored in the raw MongoDB collections, looks like:
{
    "id": "1e9904da14de31241401ba5bcfccea63",
    "metadata": {
        "id": "1e9904da14de31241401ba5bcfccea63",
        "url": "https://cloud.google.com/architecture/mlops-continuous-delivery-and-automation-pipelines-in-machine-learning/",
        "title": "MLOps: Continuous delivery and automation pipelines in machine learning  |  Cloud Architecture Center  |  Google Cloud",
        "properties": {
            "description": "Discusses techniques for implementing and automating continuous integration (CI), continuous delivery (CD), and continuous training (CT) for machine learning (ML) systems.",
            ...
            "og:locale": "en",
            "twitter:card": "summary_large_image"
        }
    },
    "parent_metadata": {
        "id": "ee340ba74bc6a22addf3fcdbe0f0e40b",
        "url": "https://www.notion.so/Roadmap-Maturity-assessments-ee340ba74bc6a22addf3fcdbe0f0e40b",
        "title": "Roadmap & Maturity assessments",
        "properties": {
            "Type": "Leaf"
        }
    },
    "content": "cloud.google.com uses cookies from Google to deliver and enhance the quality of its services and to analyze traffic. [Learn more](https://policies.google.com/technologies/cookies?hl=en).\n\nOK, got it\n\n ... and model latency.\n\n  * Validating the data either for retraining or batch prediction.\n\n  * Verifying that models meet the predictive performance targets before they are deployed.\n\n can automate the retraining and deployment of new models. Setting up a CI/CD system lets you automatically test and deploy new pipeline implementations. This system lets you cope with rapid changes in your data and business environment. You don't have to immediately move all of your processes from one level to another. You can gradually implement these practices to help improve the automation of your ML system development and production.\n\n## What's next\n\n",
    "content_quality_score": 0.1,
    "summary": null,
    "child_urls": [
        "https://cloud.google.com/architecture/framework/reliability/horizontal-scalability",
        "https://cloud.google.com/architecture/framework/reliability/observability",
        "https://cloud.google.com/architecture/framework/reliability/graceful-degradation",
        "https://cloud.google.com/architecture/framework/reliability/perform-testing-for-recovery-from-failures",
        ...
    ]
}
Note that this represents only one resource. During this course, we will process more than 400 similar documents. We will load these documents from MongoDB into Python, leveraging the same Document Pydantic class, we used during Lesson 2. Thus, we won’t go over it again.
How do we transform this data into instruct-answer pairs valid for fine-tuning?
We will leverage each document's “content” field as input. Meanwhile, we will use an LLM to create a summary for each piece of content. In doing so, we will create a dataset with the following structure:
With that in mind, let’s start digging into the code.
6. Orchestrating the pipeline
The entry point of the dataset generation pipeline is orchestrated and managed by ZenML.
As seen in Figure 6, within ZenML, we can visualize the core steps of the pipeline and the configuration used to run it at a glance.
Figure 6: Running the dataset generation pipeline from ZenML.
1. Let's start with the pipeline definition. Here, we set up a function with various parameters that control how our dataset will be generated and processed. These parameters include collection names, model IDs, and data quality and processing thresholds:
The main pipeline execution consists of four key steps. First, we fetch documents from MongoDB. Then, we create histograms to analyze our data distribution. After that, we generate the summary dataset and save our results to Hugging Face:
Meanwhile, by leveraging ZenML, we can configure the pipeline from a YAML file. For example, this is the one used by us (available in our GitHub at configs/generate_dataset.yaml):
Now, the MongoDBService is used to fetch documents from the specified collection with the given limit. We're using an empty dictionary query to fetch all documents:
    with MongoDBService(model=Document, collection_name=collection_name) as service:
        documents = service.fetch_documents(limit, query={})
Finally, we add some metadata into ZenML's step context. This is useful for monitoring and tracking the pipeline's execution:
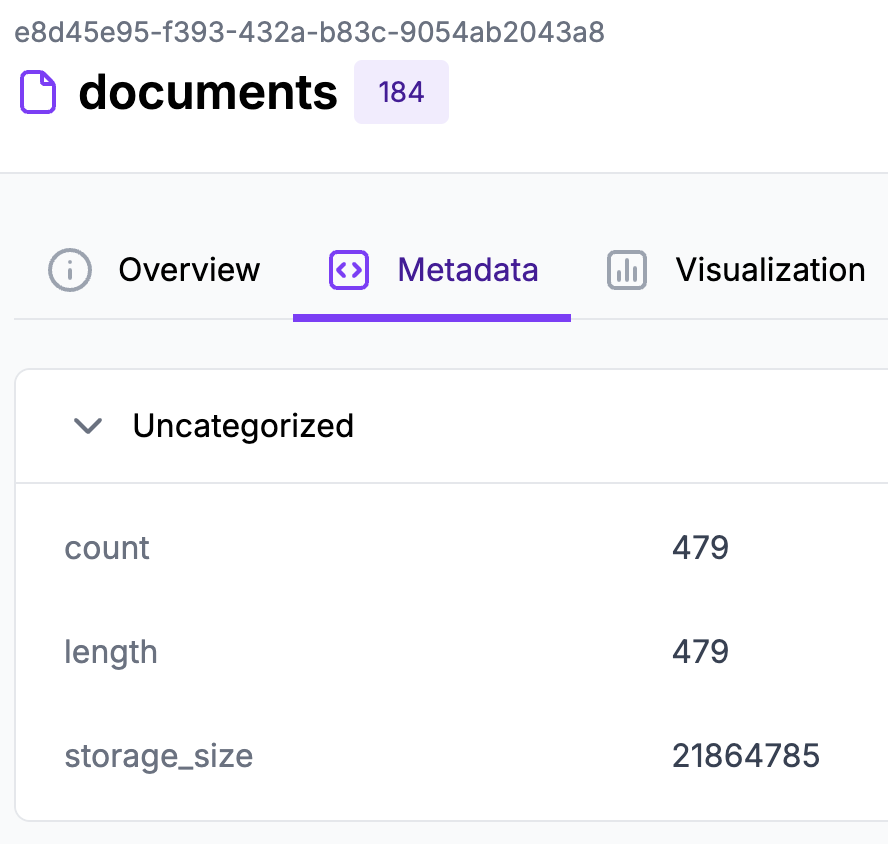
As seen in Figure 7, we can quickly see how many documents we retrieved by looking at the metadata of the documents’ output artifact.
Figure 7: Looking at the ‘documents’ output artifact within ZenML.
Now, let’s compute some statistics on top of our documents to see what we are working with.
When using ZenML, if we compute any chart within a step and return it, it will automatically be rendered within the metadata tab of the output artifact.
Let’s see how this works in practice. We define a ZenML step that computes a series of histograms and returns them as PIL images:
from PIL import Image
... # Other imports


@step
def create_histograms(
    documents: list[Document],
) -> Annotated[Image.Image, ArtifactConfig(name="histogram_chart")]:
    ... # Code to compute the charts


    return histogram_chart
As seen in Figure 8, within the histogram_chart output artifact, we can visualize the following histograms:
one that looks at the distribution of the content length
one that looks at the distribution of the quality score (computed in Lesson 2)
Figure 8: Looking at the ‘histogram_chart’ output artifact in ZenML.
Using a histogram for these two attributes will help us decide what thresholds to filter the documents before using them in the dataset generation algorithm.
For example, we will accept only documents with content lengths greater than 50 characters and quality scores greater than 0.3 (as specified in the ZenML configuration file).
Considering that, we are prepared to dig into the dataset generation algorithm.
8. Implementing the dataset generation algorithm
As before, the first phase is to define the ZenML step:
Nothing interesting happens here except defining an instance of the SummarizationDatasetGenerator class (which implements the distillation algorithm) and calling it on top of our retrieved documents.
Let’s dig into it.
At the core of our implementation is the SummarizationDatasetGenerator class. It's designed to be flexible, allowing you to control various aspects of the generation process - from model selection to quality thresholds. The core parameters that you have to notice here are the pregeneration and postgeneration filters we will use to keep the quality of the dataset in check:
The generate() method orchestrates the entire process. It takes your documents, generates summaries, and packages everything into the dataset:
    def generate(self, documents: list[Document]) -> InstructDataset:
        filtered_summarized_documents = self.__summarize_documents(documents)

        instruct_dataset_samples = [
            self.__to_instruct_dataset_sample(summarized_document)
            for summarized_document in filtered_summarized_documents
            if summarized_document
        ]

        return InstructDataset.from_samples(
            samples=instruct_dataset_samples,
            val_split_ratio=self.val_split_ratio,
            test_split_ratio=self.test_split_ratio,
            seed=42,
        )
Within the __summarize_documents() method, we call the pregeneration and postgeneration filters defined in the __init__(). Between them, we call the __augmented_summarization_loop(), which calls the summarization algorithm multiple times with different temperatures:
One of the most interesting parts is the augmented summarization loop. This clever approach generates multiple summaries for each document by gradually increasing the temperature parameter, which adds variety to our dataset. The temperature ranges from 0.0 to 0.5, helping us create diverse yet consistent summaries. We could further expand this by tweaking the top_k and top_p sampling parameters, which control the autoregressive process:
    def __augmented_summarization_loop(
        self, documents: list[Document], loops: int = 3
    ) -> list[Document]:
        summarization_agent = SummarizationAgent(
            max_characters=self.summarization_max_characters,
            model_id=self.summarization_model,
            max_concurrent_requests=self.max_workers,
            mock=self.mock,
        )
        augmented_documents = []
        for i in range(loops):
            temperature = i * 0.5 / loops
            copied_documents = copy.deepcopy(documents)
            summarized_documents = summarization_agent(
                copied_documents, temperature=temperature
            )
            valid_summarized_documents = [
                doc for doc in summarized_documents if doc.summary is not None
            ]
            augmented_documents.extend(valid_summarized_documents)

        return augmented_documents
Ultimately, we implemented a generic function that calls a list of filters on top of the given documents:
    def filter_documents(
        self, filters: list[Callable[[Document], bool]], documents: list[Document]
    ) -> list[Document]:
        for document_filter in filters:
            documents = [
                document for document in documents if document_filter(document)
            ]
        return documents
Also, let’s quickly take a look at the InstructDataset class used to model the generated dataset with the help of Pydantic:
First, let's define our core data structures. You'll need two main classes to represent individual samples and handle the entire dataset. The InstructDatasetSample class is a simple container for instruction-answer pairs, while InstructDataset manages collections of these samples along with other metadata such as split ratios and randomization settings:
class InstructDatasetSample(BaseModel):
    instruction: str
    answer: str


class InstructDataset(BaseModel):
    train: list[InstructDatasetSample]
    validation: list[InstructDatasetSample]
    test: list[InstructDatasetSample]
    val_split_ratio: float
    test_split_ratio: float
    seed: int | None = None
The from_samples() factory method collects samples and splits them into training, validation, and test sets:
    @classmethod
    def from_samples(
        cls,
        samples: list[InstructDatasetSample],
        val_split_ratio: float,
        test_split_ratio: float,
        seed: int | None = None,
    ) -> "InstructDataset":
        shuffled_samples = samples.copy()

        if seed is not None:
            random.seed(seed)
        random.shuffle(shuffled_samples)

        train_samples = shuffled_samples[
            : int(len(shuffled_samples) * (1 - val_split_ratio - test_split_ratio))
        ]
        val_samples = shuffled_samples[
            int(len(shuffled_samples) * (1 - val_split_ratio - test_split_ratio)) : int(
                len(shuffled_samples) * (1 - test_split_ratio)
            )
        ]
        test_samples = shuffled_samples[
            int(len(shuffled_samples) * (1 - test_split_ratio)) :
        ]

        assert len(train_samples) > 0, "Train split must have at least one sample"
        assert len(val_samples) > 0, "Validation split must have at least one sample"
        assert len(test_samples) > 0, "Test split must have at least one sample"

        return InstructDataset(
            train=train_samples,
            validation=val_samples,
            test=test_samples,
            val_split_ratio=val_split_ratio,
            test_split_ratio=test_split_ratio,
            seed=seed,
        )
The last step is to dig into the SummarizationAgent, which implements our summarization logic, leveraging under the hood the OpenAI API.
First, let's define our SummarizationAgent class with its core configuration. The agent uses a carefully crafted system prompt to instruct the LLM to create Markdown-formatted summaries while focusing on essential elements like section titles, tags, entities, and key findings.
As we want to run the summarization on hundreds (and possibly thousands) of documents, to keep the algorithm cheap, we will use smaller models, such as 4o-mini, which requires more careful prompt engineering than bigger reasoning models, such as o3:
class SummarizationAgent:
    SYSTEM_PROMPT_TEMPLATE = """You are a helpful assistant specialized in summarizing documents.
Your task is to create a clear, concise TL;DR summary in markdown format.
Things to keep in mind while summarizing:
- titles of sections and sub-sections
- tags such as Generative AI, LLMs, etc.
- entities such as persons, organizations, processes, people, etc.
- the style such as the type, sentiment and writing style of the document
- the main findings and insights while preserving key information and main ideas
- ignore any irrelevant information such as cookie policies, privacy policies, HTTP errors,etc.

Document content:
{content}

Generate a concise TL;DR summary having a maximum of {characters} characters of the key findings from the provided documents, highlighting the most significant insights and implications.
Return the document in markdown format regardless of the original format.
"""

    def __init__(
        self,
        max_characters: int,
        model_id: str = "gpt-4o-mini",
        mock: bool = False,
        max_concurrent_requests: int = 10,
    ) -> None:
        self.max_characters = max_characters
        self.model_id = model_id
        self.mock = mock
        self.max_concurrent_requests = max_concurrent_requests
The main entry point of our agent is the __call__() method, which creates an async loop to efficiently run multiple API requests in parallel while not having I/O bottlenecks:
The batch processing logic is where things get interesting. We monitor memory usage, process documents in parallel, and implement a retry mechanism for failed summaries with increased wait times:
    async def __summarize_batch(
        self, documents: list[Document], temperature: float = 0.0
    ) -> list[Document]:
        process = psutil.Process(os.getpid())
        start_mem = process.memory_info().rss

        summarized_documents = await self.__process_batch(
            documents, temperature, await_time_seconds=7
        )
        documents_with_summaries = [
            doc for doc in summarized_documents if doc.summary is not None
        ]
        documents_without_summaries = [doc for doc in documents if doc.summary is None]

        if documents_without_summaries:
            retry_results = await self.__process_batch(
                documents_without_summaries, temperature, await_time_seconds=20
            )
            documents_with_summaries += retry_results

        return documents_with_summaries
To manage concurrent requests efficiently, we use a semaphore and tqdm for progress tracking. This ensures we don't overwhelm the LLM API while informing you about the progress:
    async def __process_batch(
        self, documents: list[Document], temperature: float, await_time_seconds: int
    ) -> list[Document]:
        semaphore = asyncio.Semaphore(self.max_concurrent_requests)
        tasks = [
            self.__summarize(
                document, semaphore, temperature, await_time_seconds=await_time_seconds
            )
            for document in documents
        ]
        results = []
        for coro in tqdm(
            asyncio.as_completed(tasks),
            total=len(documents),
            desc="Processing documents",
            unit="doc",
        ):
            result = await coro
            results.append(result)

        return results
Finally, the core summarization logic handles the actual interaction with the LLM. It includes mock support for testing and proper rate limiting to avoid API throttling:
    async def __summarize(
        self,
        document: Document,
        semaphore: asyncio.Semaphore | None = None,
        temperature: float = 0.0,
        await_time_seconds: int = 2,
    ) -> Document:
        if self.mock:
            return document.add_summary("This is a mock summary")

        async def process_document():
            try:
                response = await acompletion(
                    model=self.model_id,
                    messages=[
                        {
                            "role": "system",
                            "content": self.SYSTEM_PROMPT_TEMPLATE.format(
                                characters=self.max_characters, content=document.content
                            ),
                        },
                    ],
                    stream=False,
                    temperature=temperature,
                )
                await asyncio.sleep(await_time_seconds)

                if not response.choices:
                    return document

                summary: str = response.choices[0].message.content
                return document.add_summary(summary)
            except Exception as e:
                return document

        if semaphore:
            async with semaphore:
                return await process_document()

        return await process_document()
The last step is to push the created dataset to the Hugging Face data registry.
9. Loading the dataset to the data registry
As usual, the first phase is to define the ZenML step, which takes the InstructDataset, maps it to a Hugging Face dataset, and then pushes it to Hugging Face using the provided dataset_id:
@step
def push_to_huggingface(
    dataset: Annotated[InstructDataset, "instruct_dataset"],
    dataset_id: Annotated[str, "dataset_id"],
) -> Annotated[str, "output"]:
    assert settings.HUGGINGFACE_ACCESS_TOKEN is not None, (
        "Huggingface access token must be provided for pushing to Huggingface"
    )

    logger.info(f"Pushing dataset {dataset_id} to Hugging Face.")

    huggingface_dataset = dataset.to_huggingface()
    huggingface_dataset.push_to_hub(dataset_id, token=settings.HUGGINGFACE_ACCESS_TOKEN)
The code that maps the Pydantic model to a Hugging Face dataset is encapsulated under the InstructDataset class as follows:
    def to_huggingface(self) -> DatasetDict:
        train = Dataset.from_list([sample.model_dump() for sample in self.train])
        validation = Dataset.from_list(
            [sample.model_dump() for sample in self.validation]
        )
        test = Dataset.from_list([sample.model_dump() for sample in self.test])

        return DatasetDict({"train": train, "validation": validation, "test": test})
It doesn't do anything fancy. It maps every Pydantic model to a Python dict and wraps everything into a DatasetDict Hugging Face class.
After pushing the dataset to Hugging Face, the dataset will look something similar to what you see in Figure 9. You can leverage Hugging Face’s dashboard to explore it further.
The last section of this lesson is understanding how to run the whole dataset generation pipeline through ZenML.
10. Running the code
The best way to set up and run the code is through our GitHub repository, where we have documented everything you need. We will keep these instructions only in our GitHub to avoid having the documentation scattered throughout too many places (which is a pain to maintain and use).
But to give a sense of the “complexity” of running the code, you have to run ONLY the following commands using Make:
make local-infrastructure-up    # 1. Spin up the infrastructure
...                             # 2. Previous commands from Lesson 2
make generate-dataset-pipeline  # 3. Run the dataset generation pipeline
That’s all it takes to generate and load the fine-tuning instruction dataset to Hugging Face. As an example, you can look at our dataset hosted on Hugging Face: pauliusztin/second_brain_course_summarization_task
While the dataset generation pipeline is running, you can visualize it on ZenML’sdashboard by typing in your browser: http://127.0.0.1:8237
This was a long lesson. If you are still here, you really want to learn how to build LLM systems. Congrats!
This lesson taught you the fundamentals of building a dataset generation pipeline, how much data you need for fine-tuning, and what it takes to model a summarization algorithm.
Next, it dived into the architecture of our dataset generation feature pipeline and its implementation using technologies such as OpenAI, Hugging Face, ZenML, and MongoDB.
Lesson 4 will teach you to fine-tune and evaluate an LLM specialized in summarizing documents, such as Llama 3.1 8B, leveraging the generated dataset. It will also show you how to deploy the fine-tuned LLM as a real-time inference endpoint that we will integrate into the LLM system in future lessons.
💻 Explore all the lessons and the code in our freely available GitHub repository.
If you have questions or need clarification, feel free to ask. See you in the next session!
Whenever you’re ready, there are 3 ways we can help you:
Perks: Exclusive discounts on our recommended learning resources
(live courses, self-paced courses, learning platforms and books).
Free open-source courses:Master production AI with our end-to-end open-source courses, which reflect real-world AI projects, covering everything from system architecture to data collection and deployment.